INTERIOR PANELS / TRIM ROOF HEADLINING INSTALLATION
PROCEDURE

 1.INSTALL ROOF HEADLINING ASSEMBLY
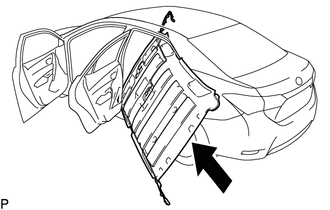
Put the roof headlining assembly into the vehicle through the rear passenger door as shown in the illustration.
- NOTICE:
-
Do not damage the roof headlining assembly or vehicle interior.
Engage the 2 guides.
Install the roof headlining assembly with the 3 clips.
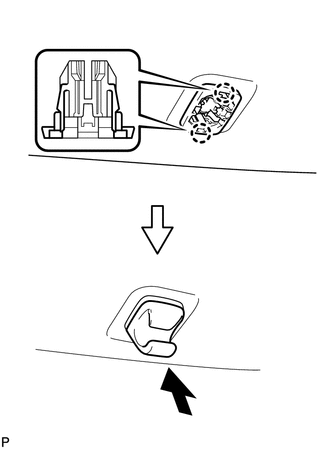
Engage the 2 claws.
- HINT:
-
Use the same procedure for the RH side and LH side.
Push in the visor holder as shown in the illustration.
- HINT:
-
Use the same procedure for the RH side and LH side.
for Front Pillar RH Side:
Engage the 3 clamps.
Connect the connector.
for Front Pillar LH Side:
Engage the 5 clamps.
Connect the connector.
for Rear Pillar RH Side:
Connect the connector.
Engage the clamp.
Engage the 2 guides.
Install the bolt.
- Torque:
- 7.0 N*m (71 kgf*cm, 62 in.*lbf)
w/ Rain Sensor:
Connect the connector.
w/ Sliding Roof:
Connect the connector.
63318C
2.INSTALL SLIDING ROOF OPENING TRIM MOULDING (w/ Sliding Roof)
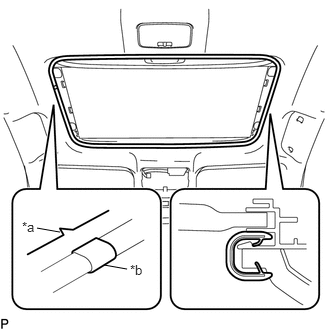
| *a | Notch |
| *b | Alignment Mark |
Align the alignment mark on the sliding roof opening trim moulding with the notch of the roof headlining assembly to install the sliding roof opening trim moulding.
- NOTICE:
-
After installation, check that the corners fit correctly.
74310
3.INSTALL VISOR ASSEMBLY RH
for "TORX" Screw:
Using a T25 "TORX" socket wrench, install the visor assembly RH with the 2 screws.
except "TORX" Screw:
Install the visor assembly RH with the 2 screws.
74320
4.INSTALL VISOR ASSEMBLY LH
- HINT:
-
Use the same procedure as for the RH side.
74610A
5.INSTALL ASSIST GRIP SUB-ASSEMBLY
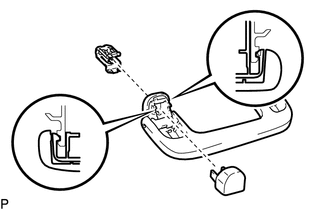
Install the clip to the assist grip.
- HINT:
-
Use the same procedure for the RH side and LH side.
Temporarily install the assist grip cover LH to the assist grip as shown in the illustration.
- HINT:
-
Use the same procedure for the RH side and LH side.
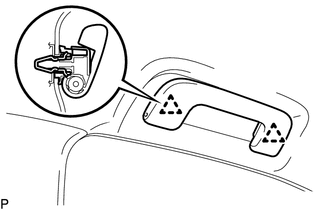
Engage the 2 clips to install the assist grip sub-assembly.
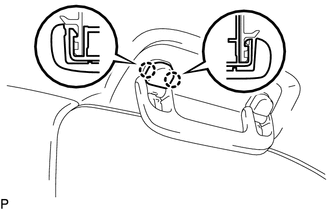
Engage the 2 claws to install the assist grip cover LH.
- NOTICE:
-
After installing the assist grip cover LH and RH, make sure that the 2 clips on the assist grip sub-assembly are engaged securely.
- HINT:
-
Use the same procedure for the RH side and LH side.
74620B
6.INSTALL REAR ASSIST GRIP ASSEMBLY
- HINT:
-
Use the same procedure as for the assist grip sub-assembly.
81250
7.INSTALL NO. 2 ROOM LIGHT ASSEMBLY (w/ Sliding Roof)
81240
8.INSTALL NO. 1 ROOM LIGHT ASSEMBLY
81260A
9.INSTALL MAP LIGHT ASSEMBLY (w/o Sliding Roof)
81260A
10.INSTALL MAP LIGHT ASSEMBLY (w/ Sliding Roof)
89943
11.INSTALL RAIN SENSOR COVER (w/ Rain Sensor)
12.INSTALL FRONT CONSOLE BOX
13.INSTALL UPPER INSTRUMENT PANEL
62470A
14.INSTALL ROOF SIDE INNER GARNISH ASSEMBLY RH
Engage the 3 guides and 4 clips to install the roof side inner garnish assembly RH.
62551F
15.INSTALL REAR SEAT SIDE GARNISH RH (for Fixed Seat Type)
Engage the 2 claws and 2 clips to install the rear seat side garnish RH.
62551F
16.INSTALL REAR SEAT SIDE GARNISH RH (for Reclining Seat Type)
Engage the 3 claws, 2 clips and guide to install the rear seat side garnish RH.
62480A
17.INSTALL ROOF SIDE INNER GARNISH ASSEMBLY LH
- HINT:
-
Use the same procedure as for the RH side.
62552F
18.INSTALL REAR SEAT SIDE GARNISH LH
- HINT:
-
Use the same procedure as for the RH side.
62410A
19.INSTALL CENTER PILLAR GARNISH ASSEMBLY RH
Pass the floor anchor of the front seat outer belt assembly RH through the center pillar garnish assembly RH.
Engage the clip.
Install the center pillar garnish assembly RH with the 2 screws.
62413A
20.INSTALL CENTER PILLAR LOWER GARNISH RH
Engage the 2 claws, 3 clips and 2 guides to install the center pillar lower garnish RH.
73210
21.CONNECT FRONT SEAT OUTER BELT ASSEMBLY RH
73233
22.INSTALL LAP BELT OUTER ANCHOR COVER (for RH Side)
62331A
23.INSTALL REAR DOOR OPENING TRIM WEATHERSTRIP RH
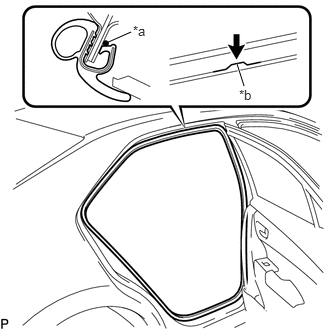
| *a | Alignment Mark (Yellow) |
| *b | Flange Position |
Align the alignment mark (yellow) on the weatherstrip with the flange on the vehicle body indicated by the arrow in the illustration, and install the rear door opening trim weatherstrip RH.
- NOTICE:
-
After installation, check that the corners fit correctly.
67917A
24.INSTALL REAR DOOR SCUFF PLATE RH
Engage the 6 claws to install the rear door scuff plate RH.
62211U
25.INSTALL FRONT PILLAR GARNISH ASSEMBLY RH
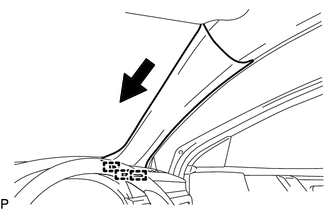
Push the front pillar garnish assembly RH as shown in the illustration to engage the 3 guides.
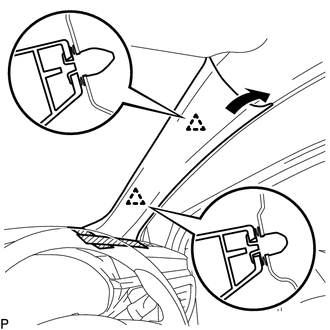
Engage the 2 clips to install the front pillar garnish assembly RH as shown in the illustration.
62311B
26.INSTALL FRONT DOOR OPENING TRIM WEATHERSTRIP RH
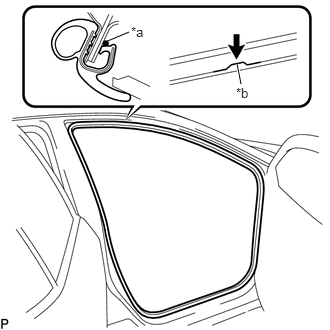
| *a | Alignment Mark (Red) |
| *b | Flange Position |
Align the alignment mark (red) on the weatherstrip with the flange on the vehicle body indicated by the arrow in the illustration, and install the front door opening trim weatherstrip RH.
- NOTICE:
-
After installation, check that the corners fit correctly.
62111C
27.INSTALL COWL SIDE TRIM BOARD RH
Engage the clip.
Install the cowl side trim board RH with the clip.
67913
28.INSTALL FRONT DOOR SCUFF PLATE RH
Engage the 8 claws to install the front door scuff plate RH.
62420A
29.INSTALL CENTER PILLAR GARNISH ASSEMBLY LH
- HINT:
-
Use the same procedure as for the RH side.
62414A
30.INSTALL CENTER PILLAR LOWER GARNISH LH
- HINT:
-
Use the same procedure as for the RH side.
73220
31.CONNECT FRONT SEAT OUTER BELT ASSEMBLY LH
- HINT:
-
Use the same procedure as for the RH side.
73233
32.INSTALL LAP BELT OUTER ANCHOR COVER (for LH Side)
- HINT:
-
Use the same procedure as for the RH side.
62332A
33.INSTALL REAR DOOR OPENING TRIM WEATHERSTRIP LH
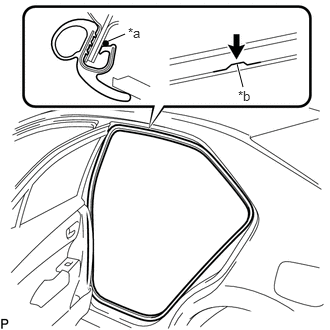
| *a | Alignment Mark (Orange) |
| *b | Flange Position |
Align the alignment mark (orange) on the weatherstrip with the flange on the vehicle body indicated by the arrow in the illustration, and install the rear door opening trim weatherstrip LH.
- NOTICE:
-
After installation, check that the corners fit correctly.
67918A
34.INSTALL REAR DOOR SCUFF PLATE LH
- HINT:
-
Use the same procedure as for the RH side.
62212B
35.INSTALL FRONT PILLAR GARNISH ASSEMBLY LH
- HINT:
-
Use the same procedure as for the RH side.
62312B
36.INSTALL FRONT DOOR OPENING TRIM WEATHERSTRIP LH
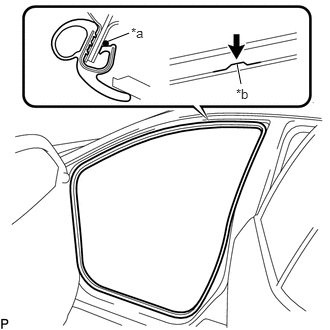
| *a | Alignment Mark (Purple) |
| *b | Flange Position |
Align the alignment mark (purple) on the weatherstrip with the flange on the vehicle body indicated by the arrow in the illustration, and install the front door opening trim weatherstrip LH.
- NOTICE:
-
After installation, check that the corners fit correctly.
62112
37.INSTALL COWL SIDE TRIM BOARD LH
- HINT:
-
Use the same procedure as for the RH side.
67914
38.INSTALL FRONT DOOR SCUFF PLATE LH
- HINT:
-
Use the same procedure as for the RH side.
39.INSTALL REAR SEAT ASSEMBLY (for Fixed Seat Type)
40.INSTALL REAR SEAT ASSEMBLY (for Reclining Seat Type)
41.INSTALL FRONT SEAT ASSEMBLY RH
42.INSTALL FRONT SEAT ASSEMBLY LH
- HINT:
-
Use the same procedure as for the RH side.