INTERIOR PANELS / TRIM UPPER INSTRUMENT PANEL INSTALLATION
PROCEDURE

 1.INSTALL UPPER INSTRUMENT PANEL ASSEMBLY
When installing a new instrument panel sub-assembly:
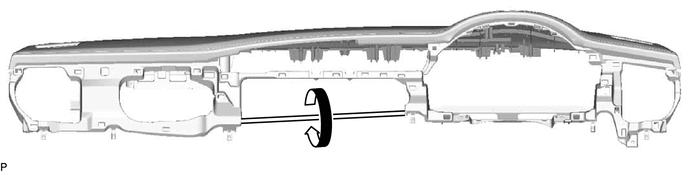
Immediately before installing the upper instrument panel assembly, twist and cut off the portion as shown in the illustration.
Push the upper instrument panel assembly in the direction indicated by the arrow (1) as shown in the illustration to engage the 5 guides.
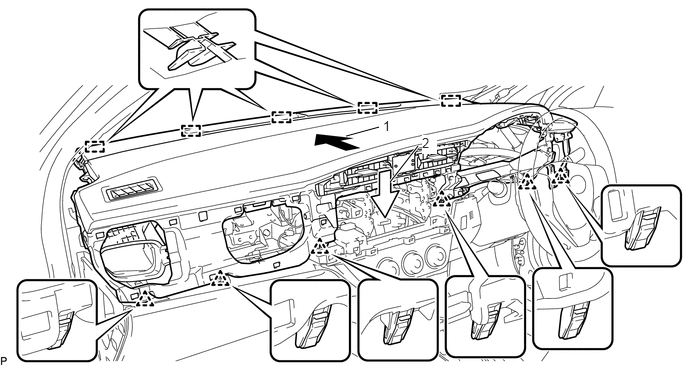
Push the upper instrument panel assembly in the direction indicated by the arrow (2) as shown in the illustration to engage the 6 clips and install the upper instrument panel assembly.
w/ Front Passenger Airbag:
Install the bolt <A>.
- Torque:
- 20 N*m (204 kgf*cm, 15 ft.*lbf)
Install the 2 clips.
Connect the connector.
82142A
2.CONNECT NO. 2 INSTRUMENT PANEL WIRE (w/ Front Passenger Airbag)
62211U
3.INSTALL FRONT PILLAR GARNISH ASSEMBLY RH
62212B
4.INSTALL FRONT PILLAR GARNISH ASSEMBLY LH
- HINT:
-
Use the same procedure as for the RH side.
55318C
5.INSTALL INSTRUMENT SIDE PANEL LH
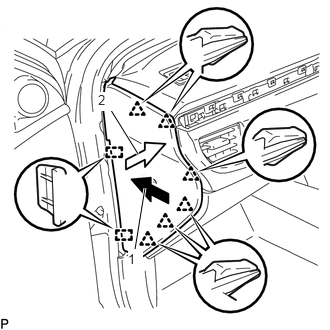
Push the instrument side panel LH in the direction indicated by the arrow (1) as shown in the illustration to engage the 2 guides and push it in the direction indicated by the arrow (2) as shown in the illustration to engage the 6 clips and install the instrument side panel LH.
62312B
6.INSTALL FRONT DOOR OPENING TRIM WEATHERSTRIP LH
7.INSTALL NO. 2 INSTRUMENT PANEL REGISTER SUB-ASSEMBLY
Engage the 8 clips to install the No. 2 instrument panel register sub-assembly.
83100
8.INSTALL COMBINATION METER ASSEMBLY
55410C
9.INSTALL INSTRUMENT CLUSTER FINISH PANEL ASSEMBLY
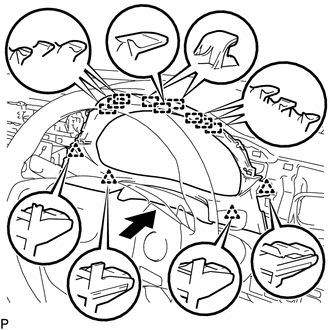
Engage the 9 guides and 4 clips to install the instrument cluster finish panel assembly as shown in the illustration.
55405B
10.INSTALL CENTER INSTRUMENT CLUSTER FINISH PANEL SUB-ASSEMBLY
Connect the connector.
Engage the 9 clips to install the center instrument cluster finish panel sub-assembly.
55011A
11.INSTALL NO. 1 INSTRUMENT PANEL GARNISH SUB-ASSEMBLY
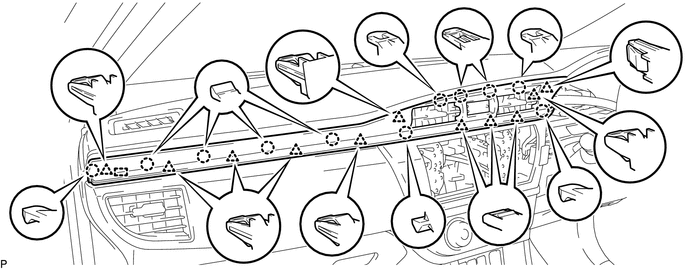
Engage the guide, 11 claws and 11 clips to install the No. 1 instrument panel garnish sub-assembly.
55650
12.INSTALL NO. 1 INSTRUMENT PANEL REGISTER ASSEMBLY
Engage the 2 claws and 4 clips to install the No. 1 instrument panel register assembly.
55317A
13.INSTALL INSTRUMENT SIDE PANEL RH
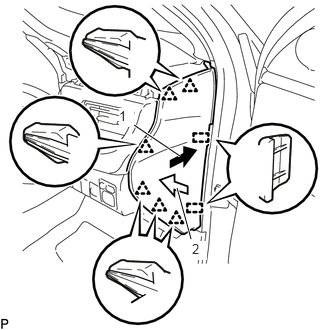
Push the instrument side panel RH in the direction indicated by the arrow (1) as shown in the illustration to engage the 2 guides and push it in the direction indicated by the arrow (2) as shown in the illustration to engage the 6 clips and install the instrument side panel RH.
62311B
14.INSTALL FRONT DOOR OPENING TRIM WEATHERSTRIP RH
55012A
15.INSTALL NO. 2 INSTRUMENT PANEL GARNISH SUB-ASSEMBLY
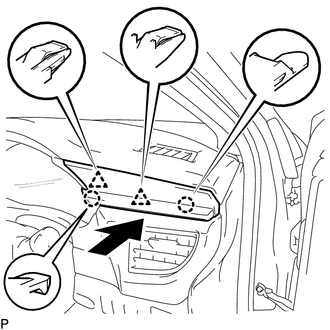
Engage the 2 claws and 2 clips to install the No. 2 instrument panel garnish sub-assembly as shown in the illustration.
16.CONNECT CABLE TO NEGATIVE BATTERY TERMINAL
- NOTICE:
-
When disconnecting the cable, some systems need to be initialized after the cable is reconnected.
-
Click hereGeneral>INTRODUCTION>REPAIR INSTRUCTION>INITIALIZATION
17.INSPECT SRS WARNING LIGHT (w/ Front Passenger Airbag)