LIGHTING (INT) LIGHTING SYSTEM Interior Light Circuit
DESCRIPTION
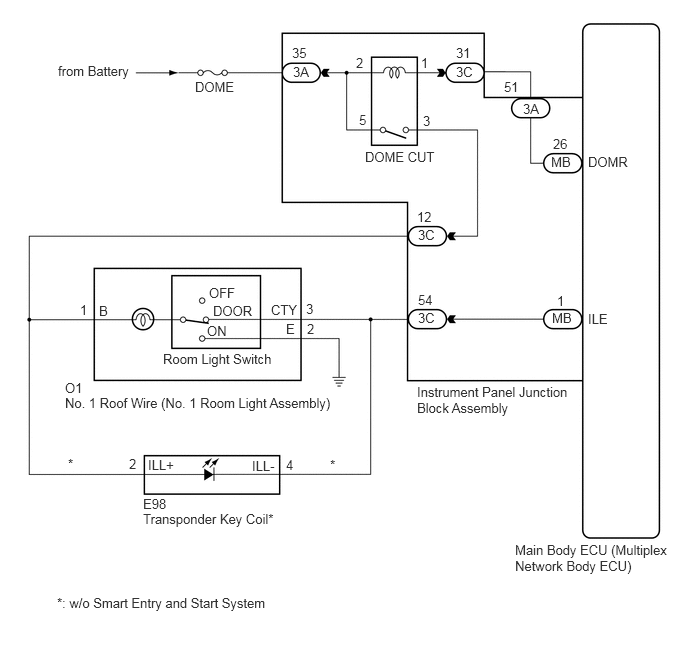
The main body ECU (multiplex network body ECU) controls the operation of the following lights:
Transponder Key Coil*
No. 1 Room Light Assembly
*: w/o Smart Entry and Start System
WIRING DIAGRAM
CAUTION / NOTICE / HINT
- HINT:
-
The DOME CUT relay supplies power to the interior lights. If all the lights that use power from the DOME CUT relay do not turn on, check the interior light auto cut circuit first.
-
Click hereVehicle Interior>LIGHTING (INT)>LIGHTING SYSTEM>Interior Light Auto Cut Circuit
PROCEDURE
Choose the model to be inspected.
- Result:
Result Proceed to w/o Smart Entry and Start System A w/ Smart Entry and Start System B
A
B
Connect the GTS to the DLC3.
Turn the ignition switch to ON.
Turn the GTS on.
Enter the following menus: Body Electrical / Main Body / Active Test.
Perform the Active Test according to the display on the GTS.
- Body Electrical > Main Body > Active Test
-
Tester Display Measurement Item Control Range Diagnostic Note Illuminated Entry System Turns on the lights that are controlled by the illuminated entry system* ON or OFF -
*: Refer to System Description for the lights that are controlled by the illuminated entry system.
Click hereVehicle Interior>LIGHTING (INT)>LIGHTING SYSTEM>SYSTEM DESCRIPTION
- Body Electrical > Main Body > Active Test
-
Tester Display Illuminated Entry System - 50004 123 4
- OK:
All lights that are controlled by the illuminated entry system illuminate.
- Result:
Result Proceed to OK A NG (No. 1 room light does not illuminate) B NG (Transponder key coil does not illuminate) C NG (No. 1 room light and transponder key coil do not illuminate) D
A
B
C
D
Disconnect the 3C instrument panel junction block assembly connector.
Apply battery voltage to the connector and check that the No. 1 room light illuminates.
- OK:
Measurement Condition Condition Specified Condition Battery positive (+) → 3C-12
Battery negative (-) → 3C-54Room light switch in DOOR position No. 1 room light illuminates
- Result:
Proceed to OK NG
OK
NG
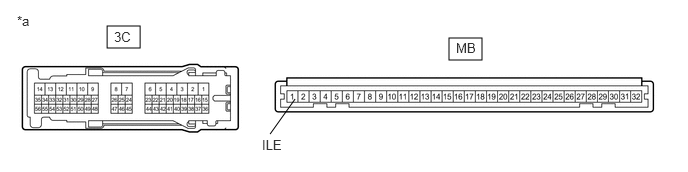
| *a | Component without harness connected
(Instrument Panel Junction Block Assembly) |
- | - |
Remove the instrument panel junction block assembly.
Click herePower Source / Network>POWER DISTRIBUTION>MAIN BODY ECU>REMOVAL
Remove the main body ECU (multiplex network body ECU) from the instrument panel junction block assembly.
Click herePower Source / Network>POWER DISTRIBUTION>MAIN BODY ECU>REMOVAL
Measure the resistance according to the value(s) in the table below.
- Standard Resistance:
Tester Connection Condition Specified Condition 3C-54 - MB-1 (ILE) Always Below 1 Ω
- Result:
Proceed to OK NG
OK
NG
Disconnect the E98 transponder key coil connector.
Measure the voltage according to the value(s) in the table below.
- Standard Voltage:
Tester Connection Condition Specified Condition E98-2 (ILL+) - Body ground Battery saving function not operating 11 to 14 V
- Result:
Proceed to OK NG
OK
NG
Disconnect the 3C instrument panel junction block assembly connector.
Measure the resistance according to the value(s) in the table below.
- Standard Resistance:
Tester Connection Condition Specified Condition 3C-54 - E98-4 (ILL-) Always Below 1 Ω
- Result:
Proceed to OK NG
OK
NG
Remove the transponder key coil.
Click hereVehicle Interior>LIGHTING (INT)>IGNITION KEY CYLINDER LIGHT>REMOVAL
Inspect the transponder key coil.
Click hereVehicle Interior>LIGHTING (INT)>IGNITION KEY CYLINDER LIGHT>INSPECTION
- Result:
Proceed to OK NG
OK
NG
Disconnect the 3C instrument panel junction block assembly connector.
Apply battery voltage to the connector and check that the No. 1 room light illuminates.
- OK:
Measurement Condition Condition Specified Condition Battery positive (+) → 3C-12
Battery negative (-) → 3C-54Room light switch in DOOR position No. 1 room light illuminates
- Result:
Proceed to OK NG
OK
NG
Connect the GTS to the DLC3.
Turn the ignition switch to ON.
Turn the GTS on.
Enter the following menus: Body Electrical / Main Body / Active Test.
Perform the Active Test according to the display on the GTS.
- Body Electrical > Main Body > Active Test
-
Tester Display Measurement Item Control Range Diagnostic Note Illuminated Entry System Turns on the lights that are controlled by the illuminated entry system* ON or OFF -
*: Refer to System Description for the lights that are controlled by the illuminated entry system.
Click hereVehicle Interior>LIGHTING (INT)>LIGHTING SYSTEM>SYSTEM DESCRIPTION
- Body Electrical > Main Body > Active Test
-
Tester Display Illuminated Entry System - 50004 123 4
- OK:
No. 1 room light illuminates.
- Result:
Proceed to OK NG
OK
NG
Disconnect the 3C instrument panel junction block assembly connector.
Apply battery voltage to the connector and check that the No. 1 room light illuminates.
- OK:
Measurement Condition Condition Specified Condition Battery positive (+) → 3C-12
Battery negative (-) → 3C-54Room light switch in DOOR position No. 1 room light illuminates
- Result:
Proceed to OK NG
OK
NG
| *a | Component without harness connected
(Instrument Panel Junction Block Assembly) |
- | - |
Remove the instrument panel junction block assembly.
Click herePower Source / Network>POWER DISTRIBUTION>MAIN BODY ECU>REMOVAL
Remove the main body ECU (multiplex network body ECU) from the instrument panel junction block assembly.
Click herePower Source / Network>POWER DISTRIBUTION>MAIN BODY ECU>REMOVAL
Measure the resistance according to the value(s) in the table below.
- Standard Resistance:
Tester Connection Condition Specified Condition 3C-54 - MB-1 (ILE) Always Below 1 Ω
- Result:
Proceed to OK NG
OK
NG