U340E AUTOMATIC TRANSMISSION / TRANSAXLE AUTOMATIC TRANSAXLE ASSEMBLY INSTALLATION
CAUTION / NOTICE / HINT
- CAUTION:
-
The engine assembly with automatic transaxle assembly is very heavy. Be sure to follow the procedure described in the repair manual, or the engine lifter may suddenly drop.
PROCEDURE

 32000
1.INSPECT TORQUE CONVERTER ASSEMBLY
32000
1.INSPECT TORQUE CONVERTER ASSEMBLY
32000
2.INSTALL TORQUE CONVERTER ASSEMBLY
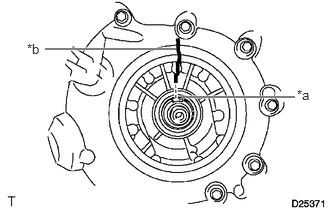
| *a | Key |
| *b | Matchmark |
Turn the front oil pump drive gear so that the key is at the top and place a matchmark on the transaxle housing to indicate the position of the key.
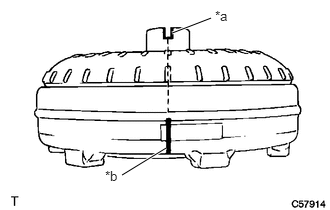
| *a | Groove |
| *b | Matchmark |
Place a matchmark on the torque converter assembly so that the position of its groove is clearly indicated.
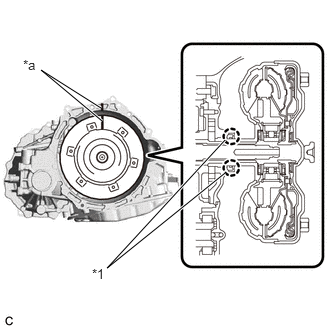
| *1 | Front Oil Pump Oil Seal |
| *a | Matchmark |
Align the matchmark on the transaxle housing with the one on the torque converter assembly and engage the splines of the input shaft with the turbine runner splines.
- NOTICE:
- ·
Install the torque converter assembly to the input shaft while keeping it horizontal.
·Do not damage the front oil pump oil seal.
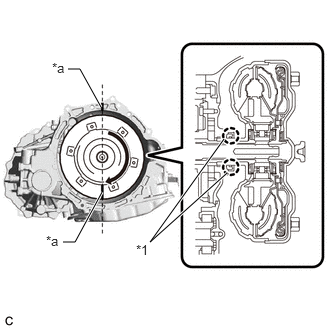
| *1 | Front Oil Pump Oil Seal |
| *a | Matchmark |
Rotate the torque converter assembly approximately 180° and engage the splines of the stator shaft with the stator assembly.
- NOTICE:
- ·
Install the torque converter assembly to the input shaft while keeping it horizontal.
·Do not damage the front oil pump oil seal.
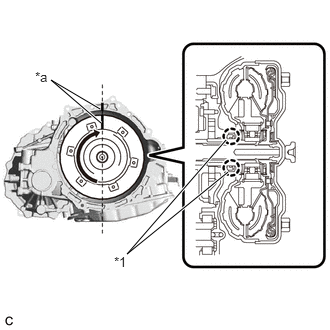
| *1 | Front Oil Pump Oil Seal |
| *a | Matchmark |
Rotate the torque converter assembly approximately 180° again, align the matchmark on the torque converter assembly with the one on the housing and insert the groove of the torque converter assembly into the key of the oil pump drive gear.
- NOTICE:
- ·
Do not push the torque converter assembly excessively when rotating it.
·Install the torque converter assembly to the input shaft while keeping it horizontal.
·Do not damage the front oil pump oil seal.
Clean the drive plate and torque converter assembly setting bolt holes.
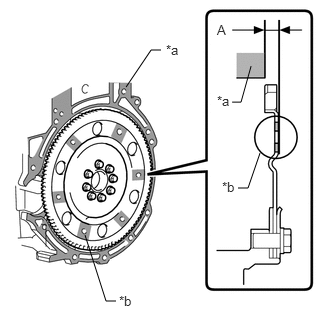
| *a | Engine Assembly Surface |
| *b | Drive Plate Surface |
Using a vernier caliper and straightedge, measure the dimension (A) between the automatic transaxle assembly contact surface of the engine assembly*a and the torque converter assembly contact surfaces of the drive plate*b.
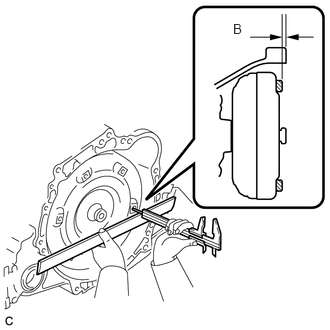
Using a vernier caliper and straightedge, measure the dimension (B) shown in the illustration and check that the dimension (B) is more than the dimension (A), which was measured in the previous step.
- Standard:
A + 1 mm (0.0394 in.) or more
- NOTICE:
- ·
Make sure to deduct the thickness of the straightedge.
·If the automatic transaxle assembly is installed to the engine assembly with the torque converter assembly not sufficiently inserted, the torque converter assembly may be damaged.
·Do not include the thickness of the set block.
3.INSTALL WIRE HARNESS CLAMP BRACKET
Install the wire harness clamp bracket to the automatic transaxle assembly with the bolt.
- Torque:
- 25.5 N*m (260 kgf*cm, 19 ft.*lbf)
33403M
4.INSTALL SPEEDOMETER DRIVEN HOLE (ATM) COVER SUB-ASSEMBLY
Coat a new O-ring with ATF and install it to the speedometer driven hole (ATM) cover sub-assembly.
- NOTICE:
-
Be careful not to damage the O-ring.
Install the speedometer driven hole (ATM) cover sub-assembly to the automatic transaxle assembly with the bolt.
- Torque:
- 7.0 N*m (71 kgf*cm, 62 in.*lbf)
12321A
5.INSTALL REAR ENGINE MOUNTING BRACKET
Install the rear engine mounting bracket to the automatic transaxle assembly with the 3 bolts.
- Torque:
- 64 N*m (653 kgf*cm, 47 ft.*lbf)
12311A
6.INSTALL FRONT ENGINE MOUNTING BRACKET
Install the front engine mounting bracket to the automatic transaxle assembly with the 2 bolts.
- Torque:
- 45 N*m (459 kgf*cm, 33 ft.*lbf)
12325A
7.INSTALL ENGINE MOUNTING BRACKET LH
Clean the bolts and the installation holes in the engine mounting bracket LH.
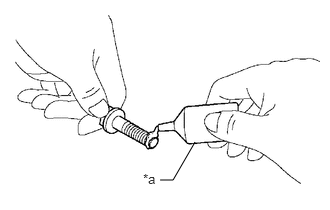
| *a | Adhesive |
Apply adhesive to 2 or 3 threads on the ends of the 3 bolts.
- Adhesive:
Toyota Genuine Adhesive 1324, Three Bond 1324 or equivalent
- NOTICE:
-
In order to ensure proper installation of the 3 bolts, apply adhesive to the 3 bolts and install them within 10 minutes of adhesive application.
Install the engine mounting bracket LH to the automatic transaxle assembly with the 3 bolts.
- Torque:
- 52 N*m (530 kgf*cm, 38 ft.*lbf)
30500
8.INSTALL AUTOMATIC TRANSAXLE ASSEMBLY
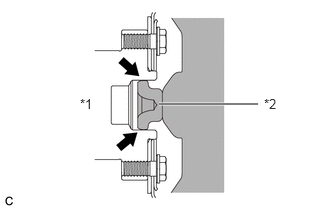
| *1 | Crankshaft |
| *2 | Torque Converter Assembly Centerpiece |
Apply clutch spline grease to the surface of the crankshaft that contacts the torque converter assembly centerpiece.
- Clutch Spline Grease:
Toyota Genuine Clutch Spline Grease or equivalent
- Maximum Grease Amount:
Approximately 1 g (0.0353 oz)
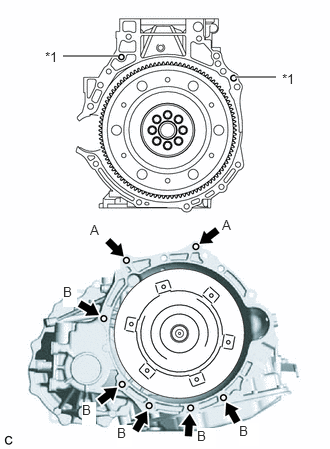
| *1 | Knock Pin |
Confirm that the 2 knock pins are installed to the engine assembly and are not damaged.
Install the automatic transaxle assembly to the engine assembly with the 7 bolts.
- Torque:
- 29.5 N*m (301 kgf*cm, 22 ft.*lbf)
- NOTICE:
- ·
Make sure that the wire harness or similar items are not pinched between the contact surfaces.
·Do not use excess force when installing the automatic transaxle assembly.
·When mounting the automatic transaxle assembly to the engine assembly, make sure to securely fit the 2 knock pins into the knock holes.
·Check that the torque converter assembly rotates.
·When tightening the bolts, be sure that the mating surfaces of the engine assembly and the automatic transaxle assembly are in close contact with one another.
- HINT:
- ·
Bolt (A): Install from automatic transaxle assembly side
·Bolt (B): Install from engine assembly side
33823
9.INSTALL NO. 1 TRANSMISSION CONTROL CABLE BRACKET
Install the No. 1 transmission control cable bracket to the automatic transaxle assembly with the 2 bolts.
- Torque:
- 12 N*m (122 kgf*cm, 9 ft.*lbf)
Connect the wire harness clamp to the No. 1 transmission control cable bracket.
Connect the transmission wire connector.
Connect the park/neutral position switch assembly connector.
33829
10.INSTALL TRANSMISSION CONTROL CABLE SUPPORT
Install the transmission control cable support to the automatic transaxle assembly with the bolt.
- Torque:
- 12 N*m (122 kgf*cm, 9 ft.*lbf)
Connect the wire harness clamp to the transmission control cable support.
Connect the transmission revolution sensor connector.
28100
11.INSTALL STARTER ASSEMBLY
11363A
12.INSTALL FLYWHEEL HOUSING SIDE COVER
35013
13.INSTALL TRANSMISSION OIL FILLER TUBE SUB-ASSEMBLY
Coat a new O-ring with ATF and install it to the transmission oil filler tube sub-assembly.
- NOTICE:
-
Be careful not to damage the O-ring.
Install the transmission oil filler tube sub-assembly to the automatic transaxle assembly with the bolt.
- Torque:
- 11.5 N*m (117 kgf*cm, 8 ft.*lbf)
Install the transmission oil level gauge sub-assembly to the transmission oil filler tube sub-assembly.
14.INSTALL OIL COOLER TUBE SUB-ASSEMBLY
Connect the oil cooler tube sub-assembly to the 2 oil cooler tube unions and slide the 2 clips to secure it.
Install the oil cooler tube sub-assembly to the transmission oil filler tube sub-assembly with the bolt.
- Torque:
- 11.5 N*m (117 kgf*cm, 8 ft.*lbf)
12361A
15.TEMPORARILY INSTALL FRONT ENGINE MOUNTING INSULATOR
12371A
16.TEMPORARILY INSTALL REAR ENGINE MOUNTING INSULATOR
17.INSTALL ENGINE ASSEMBLY WITH TRANSAXLE
51204A
18.TEMPORARILY INSTALL CENTER ENGINE MOUNTING MEMBER SUB-ASSEMBLY
51201
19.INSTALL FRONT SUSPENSION CROSSMEMBER SUB-ASSEMBLY
51204A
20.FULLY INSTALL CENTER ENGINE MOUNTING MEMBER SUB-ASSEMBLY
12371A
21.FULLY INSTALL REAR ENGINE MOUNTING INSULATOR
12361A
22.FULLY INSTALL FRONT ENGINE MOUNTING INSULATOR
23.REMOVE ENGINE HANGER
24.INSTALL WIRE HARNESS CLAMP BRACKET
32101A
25.INSTALL DRIVE PLATE AND TORQUE CONVERTER ASSEMBLY SETTING BOLT
Clean the threads of the 6 drive plate and torque converter assembly setting bolts.
| *a | Adhesive |
Apply a few drops of adhesive to 2 or 3 threads at the tip of each of the 6 drive plate and torque converter assembly setting bolts.
- Adhesive:
Toyota Genuine Adhesive 1324, Three Bond 1324 or equivalent
- NOTICE:
-
In order to ensure proper installation of the 6 drive plate and torque converter assembly setting bolts, apply adhesive to the 6 drive plate and torque converter assembly setting bolts and install them within 10 minutes of adhesive application.
Turn the crankshaft to gain access to the installation locations of the 6 drive plate and torque converter assembly setting bolts and install each bolt while holding the crankshaft pulley with SST.
- SST
- 09213-54015 09330-00021
- HINT:
-
Part number of installation bolt for SST (crankshaft pulley holding tool): 91551-00850 (quantity: 2)
- Torque:
- 28 N*m (286 kgf*cm, 21 ft.*lbf)
- NOTICE:
-
First install the black-colored bolt, and then the remaining 5 silver-colored bolts.
11361J
26.INSTALL FLYWHEEL HOUSING UNDER COVER
27.RESET MEMORY