NETWORKING CAN COMMUNICATION SYSTEM DIAGNOSIS SYSTEM
ECUS OR SENSORS WHICH COMMUNICATE THROUGH CAN COMMUNICATION SYSTEM
V Bus
Combination meter assembly
Airbag ECU assembly
Power steering ECU assembly
Air conditioning amplifier assembly
Skid control ECU (brake actuator assembly)*1
Main body ECU (multiplex network body ECU)
ECM
Steering sensor*2
Certification ECU (smart key ECU assembly)*3
- HINT:
- ·
*1: w/ ABS
·*2: w/ VSC
·*3: w/ Smart Entry and Start System
CHECK FOR INSTALLED SYSTEMS (ECUS AND SENSORS) THAT USE CAN COMMUNICATION
The systems (ECUs and sensors) that use CAN communication vary depending on the vehicle and optional equipment. Check which systems (ECUs and sensors) are installed to the vehicle.
| ECU/Sensor Name | GTS Display | Applicability |
|---|---|---|
| ECM | ECM (Engine) | Installed on all vehicles |
| Combination meter assembly | Combination Meter | Installed on all vehicles |
| Power steering ECU assembly | Power Steering (EPS) | Installed on all vehicles |
| Main body ECU (multiplex network body ECU) | Main Body | Installed on all vehicles |
| Airbag ECU assembly | Airbag | Installed on all vehicles |
| Skid control ECU (brake actuator assembly) | Skid Control (ABS/VSC/TRAC) | Vehicles with ABS |
| Air conditioning amplifier assembly | Air Conditioning Amplifier | Installed on all vehicles |
| Steering Sensor | Spiral cable (Steering Angle Sensor) | Vehicles with VSC |
| Certification ECU (Smart Key ECU Assembly) | Certification (Smart) | Vehicles with Smart Entry and Start System |
- HINT:
-
The names of ECUs and sensors shown on the GTS display may differ from those shown in the DTC Table by ECU section.
CAN BUS CHECK
- HINT:
-
The ECUs and sensors that are properly connected to the CAN communication system can be displayed using the GTS.
Using the GTS, select the CAN Bus Check screen.
- CAN Bus Check
- 50007
- NOTICE:
- ·
It may be possible to select buses that do not have ECUs or sensors from the bus selection pull-down menu. This is not a malfunction. (This occurs when optional devices are not on a sub bus that is monitored by a gateway function equipped ECU.)
·In the bus selection pull down menu, all buses applicable to the model are displayed (e.g. LIN communication buses are also displayed). Therefore, refer to the wiring diagrams to check the names of sub buses for CAN communication.
Click herePower Source / Network>NETWORKING>CAN COMMUNICATION SYSTEM>SYSTEM DIAGRAM
- HINT:
-
Different connection statuses are indicated by the background color of ECUs and sensors that are displayed.
| Bus Type | Background Color | Connection Status |
|---|---|---|
| V Bus | White | Communication has been normal since the start of the CAN bus check. |
| Yellow | Communication stop occurred at least once since the start of the CAN bus check, but communication is currently occurring (unstable communication). | |
| Red | Communication was established at least once since the start of the CAN bus check, but communication is currently not occurring (unstable communication). | |
| Not displayed | Communication stop has continued since the start of the CAN bus check.*1 | |
| Sub Bus
(gateway function equipped ECU that does not have history of connected ECUs)*2 |
White | Communication has been normal since the start of the CAN bus check. |
| Yellow | Communication stop occurred at least once since the start of the CAN bus check, but communication is currently occurring (unstable communication). | |
| Red | Communication was established at least once since the start of the CAN bus check, but communication is currently not occurring (unstable communication). | |
| Not displayed | Communication stop has continued since the start of the CAN bus check.*1 | |
| Sub Bus
(gateway function equipped ECU that has history of connected ECUs)*3 |
White | Communication has been normal since the start of the CAN bus check. |
| Yellow | Communication stop occurred at least once since the start of the CAN bus check, but communication is currently occurring (unstable communication). | |
| Red | Currently not communicating (either of the following):
·
Communication stop has continued since the start of the CAN bus check. ·
Communication was established at least once since the start of the CAN bus check, but communication is currently not occurring. |
|
| Not displayed | Either of the following:
·
If a gateway function equipped ECU cannot communicate, the sub bus and ECUs connected to the sub bus will not be displayed. ·
If no ECUs are connected to the sub bus, "There is no system found on the Communication Bus" will be displayed. |
- HINT:
- ·
Gateway function equipped ECUs relay signals between the ECUs connected to the different buses.
·*1: ECUs that are present in the vehicle but are not displayed on the CAN Bus Check screen.
·*2: Gateway function equipped ECU that does not memorize the sub bus ECUs that are connected to it.
·*3: Gateway function equipped ECU that memorizes the sub bus ECUs that are connected to it.
·If none of the connected ECUs are displayed, or there is no response from the vehicle to the GTS, check the DLC3 branch and the V bus main bus lines for a malfunction.
Observe the connection response screen for approximately 2 minutes to check for a change in connection status of the connected ECUs and sensors.
- HINT:
- ·
If an open occurs in one of the lines of a CAN branch (except DLC3), output from the other branch line (the line that is not open) will be unstable and it may interfere with the response (display) of other ECUs and sensors.
·If the connection status changes during the inspection, repair the open in the branch line of the ECU or sensor that does not respond (is not detected) and then perform the CAN bus check again.
HOW TO INTERPRET CAN BUS CHECK SCREEN
When a communication stop is currently occurring, the probable malfunctioning part can be determined from the CAN bus check and by using the following methods.
- NOTICE:
-
The following CAN bus wiring diagram is provided only as an example. This wiring diagram is different from the actual wiring diagram for this vehicle.
- HINT:
- ·
When a communication stop is currently occurring, it is easier to determine the probable malfunctioning part from the CAN bus check rather than from communication DTCs.
·Wait for approximately 2 minutes after turning the ignition switch to ON (or simulate the driving conditions that enable the malfunction to be reproduced) and select "CAN Bus Check". Then observe the communication status of each ECU on the screen.
If a communication error of only 1 ECU or sensor is indicated on the CAN Bus Check screen, a communication stop of the ECU or sensor is suspected.
Example: Open in both CAN branch lines of ECU B on the V bus
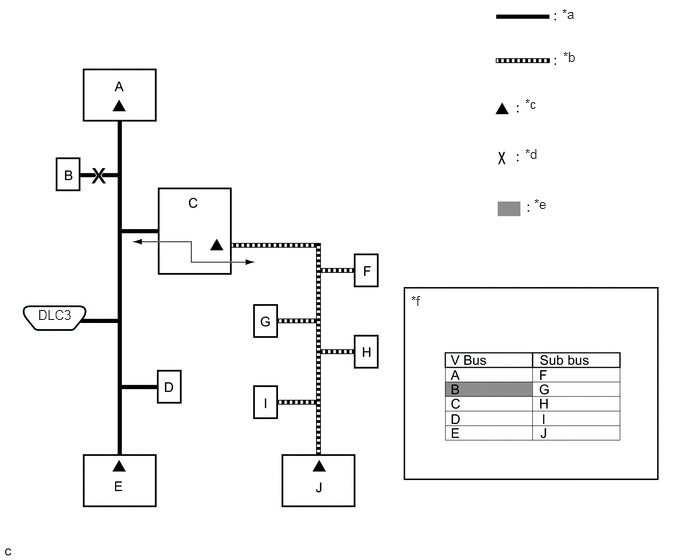
| *a | V Bus | *b | Sub Bus |
| *c | Terminating Resistor | *d | Location of Malfunction |
| *e | Not displayed or background color changes to red or yellow | *f | CAN Bus Check Screen |
- HINT:
-
When there are communication stops, ECUs that are present in the vehicle may not be displayed on the CAN Bus Check screen.
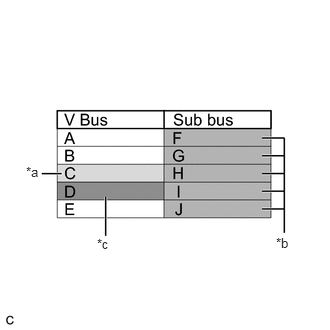
| *a | Background color periodically changes to yellow or red |
| *b | Not displayed or background color is yellow or red |
| *c | Not displayed |
If communication errors for multiple ECUs or sensors are indicated on the CAN Bus Check screen, then a communication stop of the ECU or sensor that shows a more serious communication stop (an ECU or sensor which is not displayed) is suspected.
Example: Open in a CAN branch line for ECU D on the V bus
| Bus Type | Background Color | Connection Status |
|---|---|---|
| V Bus | White | Communication has been normal since the start of the CAN bus check. |
| Yellow | Communication stop occurred at least once since the start of the CAN bus check, but communication is currently occurring (unstable communication). | |
| Red | Communication was established at least once since the start of the CAN bus check, but communication is currently not occurring (unstable communication). | |
| Not displayed | Communication stop has continued since the start of the CAN bus check.*1 | |
| Sub Bus
(gateway function equipped ECU that does not have history of connected ECUs)*2 |
White | Communication has been normal since the start of the CAN bus check. |
| Yellow | Communication stop occurred at least once since the start of the CAN bus check, but communication is currently occurring (unstable communication). | |
| Red | Communication was established at least once since the start of the CAN bus check, but communication is currently not occurring (unstable communication). | |
| Not displayed | Communication stop has continued since the start of the CAN bus check.*1 | |
| Sub Bus
(gateway function equipped ECU that has history of connected ECUs)*3 |
White | Communication has been normal since the start of the CAN bus check. |
| Yellow | Communication stop occurred at least once since the start of the CAN bus check, but communication is currently occurring (unstable communication). | |
| Red | Currently not communicating (either of the following):
·
Communication stop has continued since the start of the CAN bus check. ·
Communication was established at least once since the start of the CAN bus check, but communication is currently not occurring. |
|
| Not displayed | Either of the following:
·
If a gateway function equipped ECU cannot communicate, the sub bus and ECUs connected to the sub bus will not be displayed. ·
If no ECUs are connected to the sub bus, "There is no system found on the Communication Bus" will be displayed. |
- HINT:
- ·
Gateway function equipped ECUs relay signals between the ECUs connected to the different buses.
·*1: ECUs that are present in the vehicle but are not displayed on the CAN Bus Check screen.
·*2: Gateway function equipped ECU that does not memorize the sub bus ECUs that are connected to it.
·*3: Gateway function equipped ECU that memorizes the sub bus ECUs that are connected to it.
·The example of the CAN Bus Check screen in the illustration shows the result of electrical noise on the CAN bus which is caused by an open in a CAN branch line of ECU D (output from the other branch line is unstable) and the communication of ECU C is also unstable. In addition, in this example, ECU C is equipped with a gateway function. Therefore, communication is also unstable between the sub bus ECUs of ECU C and the V bus.
·The example in the illustration shows that ECU D is not displayed on the CAN Bus Check screen. This indicates a more significant communication stop. In this case, a communication stop of ECU D is suspected.
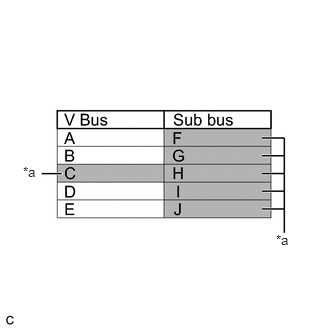
| *a | Not displayed or background color changes to red |
If a communication error is indicated on both the V bus and sub bus on the CAN Bus Check screen, suspect any communication stop displayed for the V bus first.
Example: Open in both CAN branch lines of ECU C on the V bus
- HINT:
- ·
In the CAN bus check, it is possible to confirm the communication status of ECUs connected to the V bus after connecting the GTS to the DLC3. As for sub buses, it is possible to confirm which sub bus connected ECUs can communicate with a gateway function equipped ECU on the V bus.
·If a gateway function equipped ECU has a communication error, ECUs connected to the gateway function equipped ECU are also affected, and communication stops will be indicated.
·The CAN Bus Check screen in the illustration shows that ECU C has a gateway function and a communication stop in ECU C is suspected.
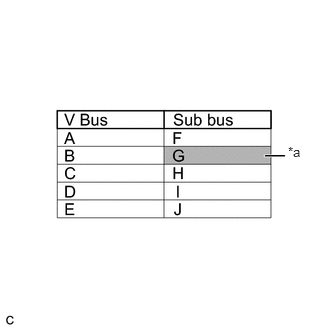
| *a | Background color changes to red |
If the CAN Bus Check screen indicates a communication stop only in the sub bus, a communication stop in the sub bus is suspected.
Example: Open in both CAN branch lines of ECU G on the sub bus
- HINT:
- ·
A communication error in a sub bus does not affect the V bus or other buses.
·When a gateway function equipped ECU has memorized the ECUs that are connected to the sub bus, if any of the ECUs connected to the gateway function equipped ECU has a communication error, the background color changes to yellow or red. (The displayed name will not disappear.)
If both of the V bus main bus lines are open, ECUs or sensors that are located farther away from the DLC3 than the open part will be displayed as a communication stop on the CAN Bus Check screen.
(In this case, ECU A and B are not displayed or their background color changes to red.)
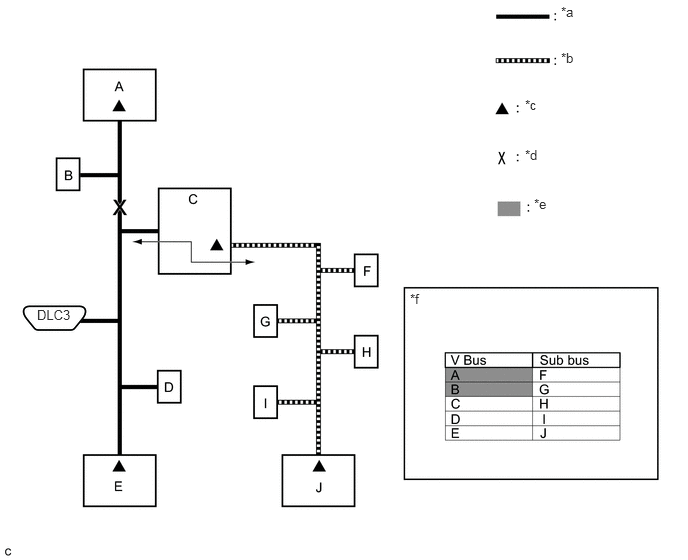
| *a | V Bus | *b | Sub Bus |
| *c | Terminating Resistor | *d | Location of Malfunction |
| *e | Not displayed or background color is red | *f | CAN Bus Check Screen |
- HINT:
-
If a communication error occurs in an ECU, it is not displayed on the CAN Bus Check screen even though the ECU is present.
If both of the sub bus main bus lines are open, ECUs that are located farther away from the gateway function equipped ECU than the open part will be displayed as a communication stop on the CAN Bus Check screen.
(In this case, ECU I and J are not displayed or their background color changes to red.)
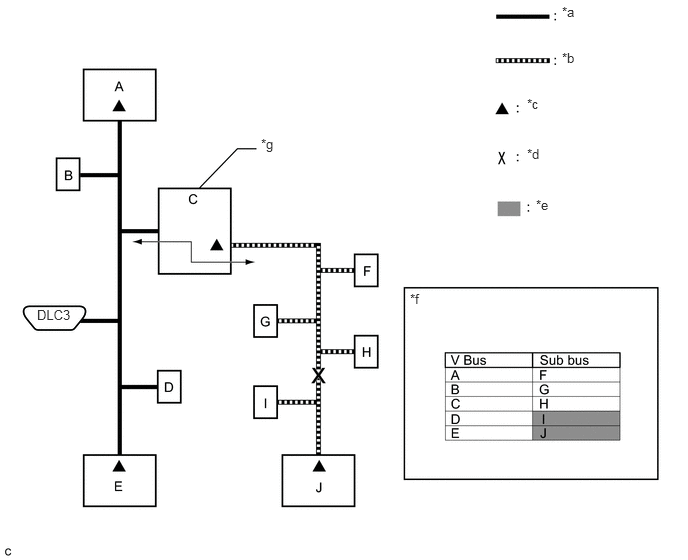
| *a | V Bus | *b | Sub Bus |
| *c | Terminating Resistor | *d | Location of Malfunction |
| *e | Not displayed or background color is red | *f | CAN Bus Check Screen |
| *g | Gateway Function Equipped ECU | - | - |
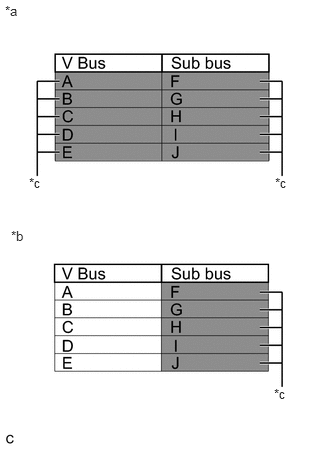
| *a | When any of the following malfunctions occur on the V bus |
| *b | When any of the following malfunctions occur on a sub bus |
| *c | Not displayed |
When any of the following malfunctions occur, CAN communication cannot be established and almost all ECUs and sensors on the bus show a communication error on the CAN Bus Check screen.
| Short between CAN lines (CANH and CANL) |
| Short between a CAN line (CANH or CANL) and +B |
| Short between a CAN line (CANH or CANL) and ground |
| Open in a CAN main bus line |
- HINT:
- ·
When a malfunction occurs on the V bus, almost all ECUs and sensors on the V bus and sub bus indicate a communication error (almost all ECUs are not displayed). As communication with the gateway function equipped ECU that is connected to the V bus stops, communication from the ECUs connected to the sub bus that is monitored by the gateway function equipped ECU also stops (these ECUs are not displayed).
·When a malfunction occurs in a sub bus, almost all ECUs connected to the sub bus indicate a communication error.
·A communication error in a sub bus does not affect the V bus or other buses.
·The malfunctioning part can be determined by checking for a short circuit between CAN bus lines or between a CAN bus line and ground or +B short using an electrical tester.
HOW TO INTERPRET COMMUNICATION DTCS (DTCS THAT START WITH U)
If a CAN communication error cannot be reproduced, determine the suspected malfunctioning part using the DTCs stored in ECUs that are connected to the CAN buses by following the procedure below.
- HINT:
-
Communication DTCs (DTCs that start with U) indicate a communication error between the ECU that stores the DTC and the ECU that is indicated by the DTC.
If multiple ECUs store a communication DTC for a particular ECU, a communication stop of the ECU is suspected.
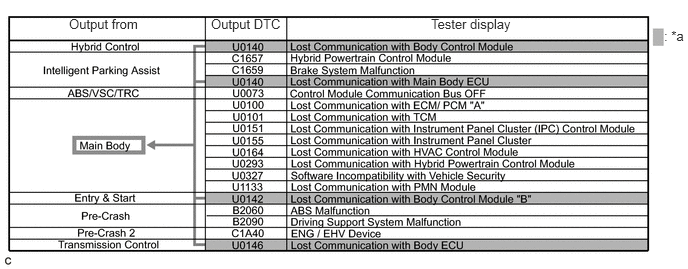
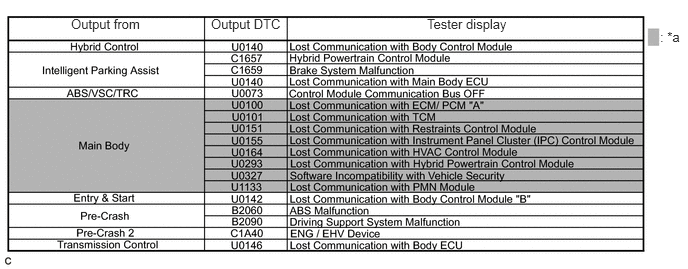
| *a | Items to be Checked | - | - |
- NOTICE:
- ·
This DTC table is from another model, and is only used here to show an example of DTCs that are output when there is an open in a CAN branch line for the main body ECU. This table does not show DTCs applicable to this vehicle.
·Even though a DTC title may indicate a communication error with a specific ECU, the ECU name used in the DTC name on the GTS may differ depending on the ECU that stores the DTC. (Regarding output DTCs, refer to step 6 and the DTC chart for each ECU.)
- HINT:
-
As multiple ECUs indicate a communication stop with the main body ECU, the possibility of a communication stop of the main body ECU is high.
If almost all of the communication DTCs of an ECU are stored, a communication stop of the ECU is suspected.
| *a | Items to be Checked | - | - |
- NOTICE:
-
This DTC table is from another model, and is only used here to show an example of DTCs that are output when there is an open in a CAN branch line for the main body ECU. This table does not show DTCs applicable to this vehicle.
- HINT:
- ·
If almost all of the DTCs of the main body ECU are stored, the possibility of a communication stop of the main body ECU is high.
·When a CAN communication error occurs, many DTCs are output. DTCs other than communication error DTCs (such as DTCs that start with C or B) and communication DTCs for the ABS system are important DTCs, however it may be easier to determine the malfunctioning part by examining the overall situation without considering these DTCs.
To help determine the part of the sub bus that has a communication error, prioritize the communication stop DTCs stored in the gateway function equipped ECU.
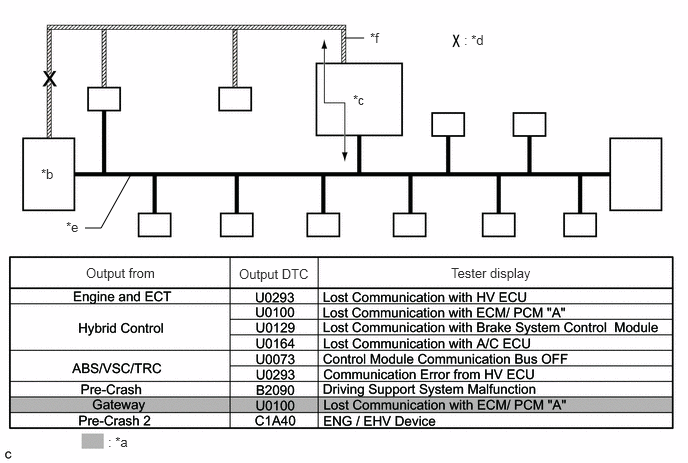
| *a | Items to be Checked | *b | ECM |
| *c | Gateway Function Equipped ECU | *d | Location of Malfunction |
| *e | V Bus | *f | Sub Bus |
- NOTICE:
-
This DTC table is from another model, and is only used here to show the ECUs connected to both a V bus and a sub bus. It shows DTCs output when there is an open in the main bus lines for the ECM on the sub bus. This table does not show DTCs applicable to this vehicle.
- HINT:
- ·
As gateway function equipped ECUs (sub bus monitor ECU) monitor signals from all ECUs that are connected to sub buses, gateway function equipped ECUs can detect ECUs with a communication stop more accurately.
·When there is a communication stop for the gateway function equipped ECU (gateway), communication with ECUs connected to other buses such as the V bus stops. Therefore, communication DTCs for ECUs connected to other buses are also stored.
When any of the following malfunctions occurs, many DTCs are likely to be output from many ECUs. Because of this, it may be difficult to determine the probable malfunctioning part.
Short between CAN lines (CANH and CANL)
Short between a CAN line (CANH or CANL) and ground
Short between a CAN line (CANH or CANL) and +B
Open in a CAN branch line (CANH or CANL) of an ECU or sensor
Open in a CAN main bus line (CANH or CANL) between 2 ECUs that have a terminating resistor
DTC TABLE BY ECU
- HINT:
- ·
In the CAN communication system, the CAN communication DTCs of each ECU can be displayed using the GTS.
·If CAN communication system DTCs are output, the malfunction cannot be determined only by the DTCs. Perform troubleshooting according to How to Proceed with Troubleshooting.
Click herePower Source / Network>NETWORKING>CAN COMMUNICATION SYSTEM>HOW TO PROCEED WITH TROUBLESHOOTING
·If the system function temporarily returns to normal, DTCs may not be output again even though the following DTC check procedures are used.
ECM (2ZR-FE) / GTS Display "Engine and ECT"
- Powertrain > Engine and ECT > Trouble Codes
- 50001 234
- HINT:
-
This ECU uses the CAN communication system for DTC communication.
| DTC | Detection Item | DTC Detection Condition | DTC Detection Pre-condition | DTC Check Procedure | Warning Indication in Meter | DTC Storage Method |
|---|---|---|---|---|---|---|
| U0129 | Lost Communication with Brake System Control Module | The ECM does not receive data from the skid control ECU (brake actuator assembly) for 2.22 seconds or more. | Both conditions are met:
·
The ignition switch is ON for 2.1 seconds or more. ·
The power source voltage of the ECM is 10.5 V or more. |
Turn the ignition switch to ON and wait at least 4.32 seconds. | MIL illuminates. | DTC is stored until it is cleared using the GTS. |
ECM (1ZR-FE) / GTS Display "Engine and ECT"
- HINT:
-
The ECM is connected to the CAN communication system, but the ECM does not store or output CAN communication DTCs.
ECM (2NZ-FE) / GTS Display "Engine and ECT"
- HINT:
-
The ECM is connected to the CAN communication system, but the ECM does not store or output CAN communication DTCs.
Skid Control ECU (Brake Actuator Assembly) (w/ ABS) / GTS Display "ABS/VSC/TRC"
- Chassis > ABS/VSC/TRC > Trouble Codes
- 50001 105
- HINT:
-
This ECU uses the CAN communication system for DTC communication.
| DTC | Detection Item | DTC Detection Condition | DTC Detection Pre-condition | DTC Check Procedure | Warning Indication in Meter | DTC Storage Method |
|---|---|---|---|---|---|---|
| U0073 | Control Module Communication Bus OFF | The skid control ECU (brake actuator assembly) cannot send/receive data (bus off) once or more within 5 seconds. | Both conditions are met:
·
The ignition switch is ON for 1 second or more. ·
The power source voltage (IG1 terminal voltage) of the skid control ECU (brake actuator assembly) is between 10 and 17.4 V. |
Turn the ignition switch to ON and wait at least 6 seconds. | ·
ABS warning light illuminates. ·
Brake warning light illuminates. |
DTC is stored until it is cleared using the GTS. |
Skid Control ECU (Brake Actuator Assembly) (w/ VSC) / GTS Display "ABS/VSC/TRC"
- Chassis > ABS/VSC/TRC > Trouble Codes
- 50001 105
- HINT:
-
This ECU uses the CAN communication system for DTC communication.
| DTC | Detection Item | DTC Detection Condition | DTC Detection Pre-condition | DTC Check Procedure | Warning Indication in Meter | DTC Storage Method |
|---|---|---|---|---|---|---|
| U0073 | Control Module Communication Bus OFF | One of the following conditions is met:
1.
The skid control ECU (brake actuator assembly) cannot send/receive data (bus off) once or more within 5 seconds. 2.
The airbag ECU assembly or steering sensor and skid control ECU (brake actuator assembly) cannot communicate for 1 second or more. 3.
The following condition occurs 10 times in succession within 60 seconds: ·
The airbag ECU assembly or steering sensor cannot communicate with the skid control ECU (brake actuator assembly) once or more within 5 seconds. |
Both conditions are met:
·
The ignition switch is ON for 1 second or more. ·
The power source voltage (IG1 terminal voltage) of the skid control ECU (brake actuator assembly) is between 10 and 17.4 V. |
Turn the ignition switch to ON and wait at least 60 seconds. | ·
ABS warning light illuminates. ·
Slip indicator light illuminates. ·
Brake warning light illuminates. |
DTC is stored until it is cleared using the GTS. |
| U0100 | Lost Communication with ECM / PCM | The skid control ECU (brake actuator assembly) does not receive data from the ECM for 2 seconds or more. | All conditions are met:
·
The ignition switch is ON for 1 second or more. ·
Vehicle speed is 15 km/h (9 mph) or more. ·
The power source voltage (IG1 terminal voltage) of the skid control ECU (brake actuator assembly) is between 10 and 17.4 V. |
Turn the ignition switch to ON and drive the vehicle at a speed of 15 km/h (9 mph) or more for 3 seconds or more. | Slip indicator light illuminates. | DTC is stored until it is cleared using the GTS. |
| U0124 | Lost Communication with Lateral Acceleration Sensor Module | Either of the following conditions is met:
·
The skid control ECU (brake actuator assembly) does not receive data from the airbag ECU assembly for 1 second or more. ·
The following condition occurs 10 times or more within 60 seconds: ·
The skid control ECU (brake actuator assembly) does not receive data from the airbag ECU assembly once or more within 5 seconds. |
Both conditions are met:
·
The ignition switch is ON for 1 second or more. ·
The power source voltage (IG1 terminal voltage) of the skid control ECU (brake actuator assembly) is between 10 and 17.4 V. |
Turn the ignition switch to ON and wait at least 60 seconds. | ·
ABS warning light illuminates. ·
Slip indicator light illuminates. |
DTC is stored until it is cleared using the GTS. |
| U0126 | Lost Communication with Steering Angle Sensor Module | Either of the following conditions is met:
·
The skid control ECU (brake actuator assembly) does not receive data from the steering sensor for 1 second or more. ·
The following condition occurs 10 times or more within 60 seconds: ·
The skid control ECU (brake actuator assembly) does not receive data from the steering sensor once or more within 5 seconds. |
Both conditions are met:
·
The ignition switch is ON for 1 second or more. ·
The power source voltage (IG1 terminal voltage) of the skid control ECU (brake actuator assembly) is between 10 and 17.4 V. |
Turn the ignition switch to ON and wait at least 60 seconds. | Slip indicator light illuminates. | DTC is stored until it is cleared using the GTS. |
Power Steering ECU Assembly / GTS Display "EMPS"
- Chassis > EMPS > Trouble Codes
- 50001 142
- HINT:
This ECU uses the CAN communication system for DTC communication.
| DTC | Detection Item | DTC Detection Condition | DTC Detection Pre-condition | DTC Check Procedure | Warning Indication in Meter | DTC Storage Method |
|---|---|---|---|---|---|---|
| U0100 | Lost Communication with ECM / PCM "A" | The power steering ECU assembly does not receive data from the ECM for 300 seconds or more. | All conditions are met:
·
The ignition switch is ON for 3 seconds or more. ·
Vehicle speed is 20 km/h (12 mph) or more. ·
The power source voltage of the power steering ECU assembly is 9 V or more. |
Drive the vehicle at a speed of 20 km/h (12 mph) or more for 300 seconds or more. | EPS warning light illuminates. | DTC remains stored only while malfunction is occurring. |
| U0129 | Lost Communication with Brake System Control Module | The power steering ECU assembly cannot receive data from the skid control ECU (brake actuator assembly) for 2.34 seconds or more. | Both conditions are met:
·
The ignition switch is ON for 3 seconds or more. ·
The power source voltage of the power steering ECU assembly is 9 V or more. |
Turn the ignition switch to ON and wait at least 5.34 seconds. | EPS warning light illuminates. | DTC remains stored only while malfunction is occurring. |
Main Body ECU (Multiplex Network Body ECU) / GTS Display "Main Body"
- Body Electrical > Main Body > Trouble Codes
- 50001 123
- HINT:
-
This ECU uses the CAN communication system for DTC communication.
| DTC | Detection Item | DTC Detection Condition | DTC Detection Pre-condition | DTC Check Procedure | Warning Indication in Meter | DTC Storage Method |
|---|---|---|---|---|---|---|
| U0100 | Lost Communication With ECM / PCM "A" | The main body ECU (multiplex network body ECU) does not receive data from the ECM for 10 seconds or more. | Both conditions are met:
·
Power source status change (+B OFF → ON, ACC ON ←→ OFF, IG ON ←→ OFF) is detected and 10 seconds or more elapse. ·
The power source voltage of the main body ECU (multiplex network body ECU) is 10 V or more. |
Turn the ignition switch to ON and wait at least 20 seconds. | - | DTC is stored until it is cleared using the GTS. |
| U0101 | Lost Communication with TCM | The main body ECU (multiplex network body ECU) does not receive data from the ECM for 10 seconds or more. | Both conditions are met:
·
Power source status change (+B OFF → ON, ACC ON ←→ OFF, IG ON ←→ OFF) is detected and 10 seconds or more elapse. ·
The power source voltage of the main body ECU (multiplex network body ECU) is 10 V or more. |
Turn the ignition switch to ON and wait at least 20 seconds. | - | DTC is stored until it is cleared using the GTS. |
| U0120 | Lost Communication with Starter / Generator Control Module | The main body ECU (multiplex network body ECU) does not receive data from the certification ECU (smart key ECU assembly) for 10 seconds or more. | Both conditions are met:
·
Power source status change (+B OFF → ON, ACC ON ←→ OFF, IG ON ←→ OFF) is detected and 10 seconds or more elapse. ·
The power source voltage of the main body ECU (multiplex network body ECU) is 10 V or more. |
Turn the ignition switch to ON and wait at least 20 seconds. | - | DTC is stored until it is cleared using the GTS. |
| U0151 | Lost Communication with Restraints Control Module | The main body ECU (multiplex network body ECU) does not receive data from the airbag ECU assembly for 10 seconds or more. | Both conditions are met:
·
Power source status change (+B OFF → ON, ACC ON ←→ OFF, IG ON ←→ OFF) is detected and 10 seconds or more elapse. ·
The power source voltage of the main body ECU (multiplex network body ECU) is 10 V or more. |
Turn the ignition switch to ON and wait at least 20 seconds. | - | DTC is stored until it is cleared using the GTS. |
| U0155 | Lost Communication with Instrument Panel Cluster (IPC) Control Module | The main body ECU (multiplex network body ECU) does not receive data from the combination meter assembly for 10 seconds or more. | Both conditions are met:
·
Power source status change (+B OFF → ON, ACC ON ←→ OFF, IG ON ←→ OFF) is detected and 10 seconds or more elapse. ·
The power source voltage of the main body ECU (multiplex network body ECU) is 10 V or more. |
Turn the ignition switch to ON and wait at least 20 seconds. | - | DTC is stored until it is cleared using the GTS. |
| U0164 | Lost Communication with HVAC Control Module | The main body ECU (multiplex network body ECU) does not receive data from the air conditioning amplifier assembly for 10 seconds or more. | Both conditions are met:
·
Power source status change (+B OFF → ON, ACC ON ←→ OFF, IG ON ←→ OFF) is detected and 10 seconds or more elapse. ·
The power source voltage of the main body ECU (multiplex network body ECU) is 10 V or more. |
Turn the ignition switch to ON and wait at least 20 seconds. | - | DTC is stored until it is cleared using the GTS. |
| U0327 | Software Incompatibility with Vehicle Security Control Module | The main body ECU (multiplex network body ECU) does not receive data from the certification ECU (smart key ECU assembly) for 10 seconds or more. | Both conditions are met:
·
Power source status change (+B OFF → ON, ACC ON ←→ OFF, IG ON ←→ OFF) is detected and 10 seconds or more elapse. ·
The power source voltage of the main body ECU (multiplex network body ECU) is 10 V or more. |
Turn the ignition switch to ON and wait at least 20 seconds. | - | DTC is stored until it is cleared using the GTS. |
Air Conditioning Amplifier Assembly / GTS Display "Air Conditioner"
- Body Electrical > Air Conditioner > Trouble Codes
- 50001 121
- HINT:
-
This ECU uses the CAN communication system for DTC communication.
| DTC | Detection Item | DTC Detection Condition | DTC Detection Pre-condition | DTC Check Procedure | Warning Indication in Meter | DTC Storage Method |
|---|---|---|---|---|---|---|
| U0100 | Lost Communication With ECM / PCM "A" | The air conditioning amplifier assembly does not receive data from the ECM for 5 seconds or more. | Both conditions are met:
·
The ignition switch is ON. ·
The power source voltage of the air conditioning amplifier assembly is 10 V or more. |
Turn the ignition switch to ON and wait at least 5 seconds. | - | DTC is stored until it is cleared using the GTS. |
| U0131 | Lost Communication With Power Steering Control Module | The air conditioning amplifier assembly does not receive data from the power steering ECU assembly for 5 seconds or more. | Both conditions are met:
·
The ignition switch is ON. ·
The power source voltage of the air conditioning amplifier assembly is 10 V or more. |
Turn the ignition switch to ON and wait at least 5 seconds. | - | DTC is stored until it is cleared using the GTS. |
| U0142 | Lost Communication With Body Control Module "B" | The air conditioning amplifier assembly does not receive data from the main body ECU (multiplex network body ECU) for 5 seconds or more. | Both conditions are met:
·
The ignition switch is ON. ·
The power source voltage of the air conditioning amplifier assembly is 10 V or more. |
Turn the ignition switch to ON and wait at least 5 seconds. | - | DTC is stored until it is cleared using the GTS. |
| U0155 | Lost Communication With Instrument Panel Cluster (IPC) Control Module | The air conditioning amplifier assembly does not receive data from the combination meter assembly for 5 seconds or more. | Both conditions are met:
·
The ignition switch is ON. ·
The power source voltage of the air conditioning amplifier assembly is 10 V or more. |
Turn the ignition switch to ON and wait at least 5 seconds. | - | DTC is stored until it is cleared using the GTS. |
Combination Meter Assembly / GTS Display "Combination Meter"
- Body Electrical > Combination Meter > Trouble Codes
- 50001 122
- HINT:
-
This ECU uses the CAN communication system for DTC communication.
| DTC | Detection Item | DTC Detection Condition | DTC Detection Pre-condition | DTC Check Procedure | Warning Indication in Meter | DTC Storage Method |
|---|---|---|---|---|---|---|
| U0100 | Lost Communication with ECM / PCM "A" | The combination meter assembly does not receive data from the ECM for 2 seconds or more. | Both conditions are met:
·
The ignition switch is ON. ·
The power source voltage of the combination meter assembly is 9.5 V or more. |
Turn the ignition switch to ON and wait at least 2 seconds. | - | DTC is stored until it is cleared using the GTS. |
| U0129 | Lost Communication with Brake System Control Module | The combination meter assembly does not receive data from the skid control ECU (brake actuator assembly) for 3 seconds or more. | Both conditions are met:
·
The ignition switch is ON. ·
The power source voltage of the combination meter assembly is 9.5 V or more. |
Turn the ignition switch to ON and wait at least 3 seconds. | - | DTC is stored until it is cleared using the GTS. |
| U0131 | Lost Communication with Power Steering Control Module | The combination meter assembly does not receive data from the power steering ECU assembly for 3 seconds or more. | Both conditions are met:
·
The ignition switch is ON. ·
The power source voltage of the combination meter assembly is 9.5 V or more. |
Turn the ignition switch to ON and wait at least 3 seconds. | EPS warning light illuminates. | DTC is stored until it is cleared using the GTS. |
| U0142 | Lost Communication with Body Control Module "B" | The combination meter assembly does not receive data from the main body ECU (multiplex network body ECU) for 3 seconds or more. | Both conditions are met:
·
The ignition switch is ON. ·
The power source voltage of the combination meter assembly is 9.5 V or more. |
Turn the ignition switch to ON and wait at least 3 seconds. | - | DTC is stored until it is cleared using the GTS. |
| U0151 | Lost Communication with Restraints Control Module | The combination meter assembly does not receive data from the airbag ECU assembly for 10 seconds or more. | Both conditions are met:
·
The ignition switch is ON. ·
The power source voltage of the combination meter assembly is 9.5 V or more. |
Turn the ignition switch to ON and wait at least 10 seconds. | SRS warning light illuminates. | DTC is stored until it is cleared using the GTS. |
Airbag ECU Assembly / GTS Display "SRS Airbag"
- HINT:
-
The airbag ECU assembly is connected to the CAN communication system, but the airbag ECU assembly does not store or output CAN communication DTCs.
Certification ECU (Smart Key ECU Assembly)(w/ Smart Entry and Start System) / GTS Display "Entry&Start"
- Body Electrical > Entry&Start > Trouble Codes
- 50001 125
- HINT:
-
This ECU uses the CAN communication system for DTC communication.
| DTC | Detection Item | DTC Detection Condition | DTC Detection Pre-condition | DTC Check Procedure | Warning Indication in Meter | DTC Storage Method |
|---|---|---|---|---|---|---|
| U0100 | Lost Communication with ECM / PCM | The certification ECU (smart key ECU assembly) does not receive data from the ECM for 10 seconds or more. | Both conditions are met:
·
Power source status change (+B OFF → ON, ACC ON ←→ OFF, IG ON ←→ OFF) is detected and 10 seconds or more elapse. ·
The power source voltage of the certification ECU (smart key ECU assembly) is 10 V or more. |
Turn the ignition switch to ON and wait at least 20 seconds. | - | DTC is stored until it is cleared using the GTS. |
| U0142 | Lost Communication with Main Body ECU | The certification ECU (smart key ECU assembly) does not receive data from the main body ECU (multiplex network body ECU) for 10 seconds or more. | Both conditions are met:
·
Power source status change (+B OFF → ON, ACC ON ←→ OFF, IG ON ←→ OFF) is detected and 10 seconds or more elapse. ·
The power source voltage of the certification ECU (smart key ECU assembly) is 10 V or more. |
Turn the ignition switch to ON and wait at least 20 seconds. | - | DTC is stored until it is cleared using the GTS. |
| U0155 | Lost Communication with Combination Meter | The certification ECU (smart key ECU assembly) does not receive data from the combination meter assembly for 10 seconds or more. | Both conditions are met:
·
Power source status change (+B OFF → ON, ACC ON ←→ OFF, IG ON ←→ OFF) is detected and 10 seconds or more elapse. ·
The power source voltage of the certification ECU (smart key ECU assembly) is 10 V or more. |
Turn the ignition switch to ON and wait at least 20 seconds. | - | DTC is stored until it is cleared using the GTS. |
Certification ECU (Smart Key ECU Assembly)(w/ Smart Entry and Start System) / GTS Display "Power Source Control"
- Body Electrical > Power Source Control > Trouble Codes
- 50001 223
- HINT:
-
This ECU uses the CAN communication system for DTC communication.
| DTC | Detection Item | DTC Detection Condition | DTC Detection Pre-condition | DTC Check Procedure | Warning Indication in Meter | DTC Storage Method |
|---|---|---|---|---|---|---|
| U0100 | Lost Communication with ECM / PCM | The certification ECU (smart key ECU assembly) does not receive data from the ECM for 3.1 seconds or more. | Both conditions are met:
·
The ignition switch is ON for 10 seconds or more. ·
The power source voltage of the certification ECU (smart key ECU assembly) is 9.5 V or more. |
Turn the ignition switch to ON and wait at least 13.1 seconds. | - | DTC is stored until it is cleared using the GTS. |
| U0140 | Lost Communication with Main Body ECU | The certification ECU (smart key ECU assembly) does not receive data from the main body ECU (multiplex network body ECU) for 3 seconds or more. | Both conditions are met:
·
The ignition switch is ON for 10 seconds or more. ·
The power source voltage of the certification ECU (smart key ECU assembly) is 10 V or more. |
Turn the ignition switch to ON and wait at least 13 seconds. | - | DTC is stored until it is cleared using the GTS. |
| U0155 | Lost Communication with Combination Meter | The certification ECU (smart key ECU assembly) does not receive data from the combination meter assembly for 3.1 seconds or more. | Both conditions are met:
·
The ignition switch is ON for 10 seconds or more. ·
The power source voltage of the certification ECU (smart key ECU assembly) is 10 V or more. |
Turn the ignition switch to ON and wait at least 13.1 seconds. | - | DTC is stored until it is cleared using the GTS. |
Certification ECU (Smart Key ECU Assembly)(w/ Smart Entry and Start System) / GTS Display "Starting Control"
- Body Electrical > Starting Control > Trouble Codes
- 50001 221
- HINT:
-
This ECU uses the CAN communication system for DTC communication.
| DTC | Detection Item | DTC Detection Condition | DTC Detection Pre-condition | DTC Check Procedure | Warning Indication in Meter | DTC Storage Method |
|---|---|---|---|---|---|---|
| U0100 | Lost Communication with ECM / PCM | The certification ECU (smart key ECU assembly) does not receive data from the ECM for 2 seconds or more. | Both conditions are met:
·
The ignition switch is ON. ·
The power source voltage of the certification ECU (smart key ECU assembly) is 10.5 V or more. |
Turn the ignition switch to ON and wait at least 2 seconds. | - | DTC remains stored only while malfunction is occurring. |
Steering Sensor (w/ VSC) / GTS Display "-"
- HINT:
-
The steering sensor is connected to the CAN communication system, but the steering sensor does not store or output CAN communication DTCs.
DTC COMBINATION TABLE (OPEN OR SHORT IN V BUS, PAST COMMUNICATION ERROR)
Regarding a past communication error of an ECU and sensor connected to the V bus (in this case, normal is displayed when performing the CAN bus check, but communication DTCs are output), the probable CAN bus line(s) that had a malfunction can be determined based on the following DTC combination table.
- HINT:
- ·
Based on the table below and DTCs output from ECUs connected via CAN communication, the probable part for which communication stop occurred can be determined.
·Regarding an open in a CAN bus line(s) and a communication stop that is currently occurring, the malfunctioning part can be confirmed easily by performing the CAN bus check using the GTS because the ECU or sensor connected to the CAN bus line(s) does not respond (the ECU or sensor name will not be displayed on the screen).
·If an open in a CAN main bus line, a short between the CAN bus lines (CANH and CANL) or a short to ground or +B in the CAN bus occurs, DTCs of almost all ECUs (or sensors) on the CAN bus may be output, or a message indicating a communication error may be displayed on the GTS screen. In this case, check the resistance of the CAN bus (steps 7 to 9) first.
Click herePower Source / Network>NETWORKING>CAN COMMUNICATION SYSTEM>HOW TO PROCEED WITH TROUBLESHOOTING
·If an open occurs in just one of the lines of a CAN bus line(s), DTCs which are not related to malfunctioning parts may be output (DTCs may be displayed randomly), or a message indicating a communication error may be displayed.
| - | Trouble Mode (Open in Both CAN Branch Lines) | |||||
|---|---|---|---|---|---|---|
| V Bus | ||||||
| Output ECU | Output DTC | Center Airbag Sensor Communication Stop Mode
Click here(  ) )
|
Brake Actuator (Skid Control ECU) Communication Stop Mode
Click here( )
|
Air Conditioning Amplifier Communication Stop Mode
Click here( )
|
Power Steering ECU Communication Stop Mode
Click here( )
|
|
| V Bus | Airbag ECU Assembly | - | - | - | - | - |
| Air Conditioning Amplifier Assembly | U0100 | - | - | ○ | - | |
| U0131 | - | - | ○ | ○ | ||
| U0142 | - | - | ○ | - | ||
| U0155 | - | - | ○ | - | ||
| Power Steering ECU Assembly | U0100 | - | - | - | ○ | |
| U0129 | - | ○ | - | ○ | ||
| ECM (for 1ZR-FE) | - | - | - | - | - | |
| ECM (for 2ZR-FE) | U0129 | - | - | - | - | |
| ECM (for 2NZ-FE) | - | - | - | - | - | |
| Main Body ECU (Multiplex Network Body ECU) | U0100 | - | - | - | - | |
| U0101 | - | - | - | - | ||
| U0120 | - | - | - | - | ||
| U0151 | ○ | - | - | - | ||
| U0155 | - | - | - | - | ||
| U0164 | - | - | ○ | - | ||
| U0327 | - | - | - | - | ||
| Combination Meter Assembly | U0100 | - | - | - | - | |
| U0129 | - | ○ | - | - | ||
| U0131 | - | - | - | ○ | ||
| U0142 | - | - | - | - | ||
| U0151 | ○ | - | - | - | ||
| V Bus | Skid Control ECU (Brake Actuator Assembly)* | U0100 | - | ○ | - | - |
| U0124 | ○ | ○ | - | - | ||
| U0126 | - | ○ | - | - | ||
| Certification ECU (Smart Key ECU Assembly)
(Entry Function) |
U0100 | - | - | - | - | |
| U0142 | - | - | - | - | ||
| U0155 | - | - | - | - | ||
| Certification ECU (Smart Key ECU Assembly)
(Power Source Switching Function) |
U0100 | - | - | - | - | |
| U0140 | - | - | - | - | ||
| U0155 | - | - | - | - | ||
| Certification ECU (Smart Key ECU Assembly)
(Start Function) |
U0100 | - | - | - | - | |
| Steering Sensor | - | - | - | - | - | |
| - | Trouble Mode (Open in Both CAN Branch Lines) | |||||
|---|---|---|---|---|---|---|
| V Bus | ||||||
| Output ECU | Output DTC | Main Body ECU Communication Stop Mode
Click here( )
|
Certification ECU Communication Stop Mode
Click here( )
|
Steering Angle Sensor Communication Stop Mode
Click here( )
|
DLC3 | |
| V Bus | Airbag ECU Assembly | - | - | - | - | - |
| Air Conditioning Amplifier Assembly | U0100 | - | - | - | - | |
| U0131 | - | - | - | - | ||
| U0142 | ○ | - | - | - | ||
| U0155 | - | - | - | - | ||
| Power Steering ECU Assembly | U0100 | - | - | - | - | |
| U0129 | - | - | - | - | ||
| ECM (for 1ZR-FE) | - | - | - | - | - | |
| ECM (for 2ZR-FE) | U0129 | - | - | - | - | |
| ECM (for 2NZ-FE) | - | - | - | - | - | |
| Main Body ECU (Multiplex Network Body ECU) | U0100 | ○ | - | - | - | |
| U0101 | ○ | - | - | - | ||
| U0120 | ○ | ○ | - | - | ||
| U0151 | ○ | - | - | - | ||
| U0155 | ○ | - | - | - | ||
| U0164 | ○ | - | - | - | ||
| U0327 | ○ | ○ | - | - | ||
| V Bus | Combination Meter Assembly | U0100 | - | - | - | - |
| U0129 | - | - | - | - | ||
| U0131 | - | - | - | - | ||
| U0142 | ○ | - | - | - | ||
| U0151 | - | - | - | - | ||
| Skid Control ECU (Brake Actuator Assembly)* | U0100 | - | - | - | - | |
| U0124 | - | - | - | - | ||
| U0126 | - | - | - | - | ||
| Certification ECU (Smart Key ECU Assembly)
(Entry Function) |
U0100 | - | ○ | - | - | |
| U0142 | ○ | ○ | - | - | ||
| U0155 | - | ○ | - | - | ||
| Certification ECU (Smart Key ECU Assembly)
(Power Source Switching Function) |
U0100 | - | ○ | - | - | |
| U0140 | ○ | ○ | - | - | ||
| U0155 | - | ○ | - | - | ||
| Certification ECU (Smart Key ECU Assembly)
(Start Function) |
U0100 | - | ○ | - | - | |
| Steering Sensor | - | - | - | - | - | |
- HINT:
- ·
○: DTC is output.
·-: DTC is not output.
·*: DTC U0073 may be stored when communication is lost.
| - | Trouble Mode (Open in Both CAN Main Bus Lines) | ||||
|---|---|---|---|---|---|
| V Bus | |||||
| Output ECU | Output DTC | ECM Communication Stop Mode
Click here( )
|
No. 1 CAN Junction Connector to No. 2 CAN Junction Connector | Combination Meter ECU Communication Stop Mode
Click here( )
|
|
| V Bus | Airbag ECU Assembly | - | - | - | - |
| Air Conditioning Amplifier Assembly | U0100 | ○ | ○ | - | |
| U0131 | - | - | - | ||
| U0142 | - | - | - | ||
| U0155 | - | - | ○ | ||
| Power Steering ECU Assembly | U0100 | ○ | ○ | - | |
| U0129 | - | ○ | - | ||
| ECM (for 1ZR-FE) | - | - | - | - | |
| ECM (for 2ZR-FE) | U0129 | ○ | - | - | |
| ECM (for 2NZ-FE) | - | - | - | - | |
| V Bus | Main Body ECU (Multiplex Network Body ECU) | U0100 | ○ | ○ | - |
| U0101 | ○ | ○ | - | ||
| U0120 | - | - | - | ||
| U0151 | - | - | - | ||
| U0155 | - | - | ○ | ||
| U0164 | - | - | - | ||
| U0327 | - | - | - | ||
| Combination Meter Assembly | U0100 | ○ | ○ | ○ | |
| U0129 | - | - | ○ | ||
| U0131 | - | - | ○ | ||
| U0142 | - | - | ○ | ||
| U0151 | - | - | ○ | ||
| Skid Control ECU (Brake Actuator Assembly)* | U0100 | ○ | - | - | |
| U0124 | - | ○ | - | ||
| U0126 | - | ○ | - | ||
| Certification ECU (Smart Key ECU Assembly)
(Entry Function) |
U0100 | ○ | ○ | - | |
| U0142 | - | - | - | ||
| U0155 | - | - | ○ | ||
| Certification ECU (Smart Key ECU Assembly)
(Power Source Switching Function) |
U0100 | ○ | ○ | - | |
| U0140 | - | - | - | ||
| U0155 | - | - | ○ | ||
| Certification ECU (Smart Key ECU Assembly)
(Start Function) |
U0100 | ○ | ○ | - | |
| Steering Sensor | - | - | - | - | |
- HINT:
- ·
○: DTC is output.
·-: DTC is not output.
·*: DTC U0073 may be stored when communication is lost.
| - | Trouble Mode (CAN Bus Lines Short Circuit or Short to GND) | ||||
|---|---|---|---|---|---|
| V Bus | |||||
| Output ECU | Output DTC | CANH to CANL | CANH to Ground Short | CANL to Ground Short | |
| V Bus | Airbag ECU Assembly | - | - | - | - |
| Air Conditioning Amplifier Assembly | U0100 | ○ | ○ | ○ | |
| U0131 | ○ | ○ | ○ | ||
| U0142 | ○ | ○ | ○ | ||
| U0155 | ○ | ○ | ○ | ||
| Power Steering ECU Assembly | U0100 | ○ | ○ | ○ | |
| U0129 | ○ | ○ | ○ | ||
| ECM (for 1ZR-FE) | - | - | - | - | |
| ECM (for 2ZR-FE) | U0129 | ○ | ○ | ○ | |
| ECM (for 2NZ-FE) | - | - | - | - | |
| V Bus | Main Body ECU (Multiplex Network Body ECU) | U0100 | ○ | ○ | ○ |
| U0101 | ○ | ○ | ○ | ||
| U0120 | ○ | ○ | ○ | ||
| U0151 | ○ | ○ | ○ | ||
| U0155 | ○ | ○ | ○ | ||
| U0164 | ○ | ○ | ○ | ||
| U0327 | ○ | ○ | ○ | ||
| Combination Meter Assembly | U0100 | ○ | ○ | ○ | |
| U0129 | ○ | ○ | ○ | ||
| U0131 | ○ | ○ | ○ | ||
| U0142 | ○ | ○ | ○ | ||
| U0151 | ○ | ○ | ○ | ||
| Skid Control ECU (Brake Actuator Assembly)* | U0100 | ○ | ○ | ○ | |
| U0124 | ○ | ○ | ○ | ||
| U0126 | ○ | ○ | ○ | ||
| Certification ECU (Smart Key ECU Assembly)
(Entry Function) |
U0100 | ○ | ○ | ○ | |
| U0142 | ○ | ○ | ○ | ||
| U0155 | ○ | ○ | ○ | ||
| Certification ECU (Smart Key ECU Assembly)
(Power Source Switching Function) |
U0100 | ○ | ○ | ○ | |
| U0140 | ○ | ○ | ○ | ||
| U0155 | ○ | ○ | ○ | ||
| Certification ECU (Smart Key ECU Assembly)
(Start Function) |
U0100 | ○ | ○ | ○ | |
| Steering Sensor | - | - | - | - | |
- HINT:
- ·
○: DTC is output.
·-: DTC is not output.
·*: DTC U0073 may be stored when communication is lost.
CAN BUS WAVEFORMS
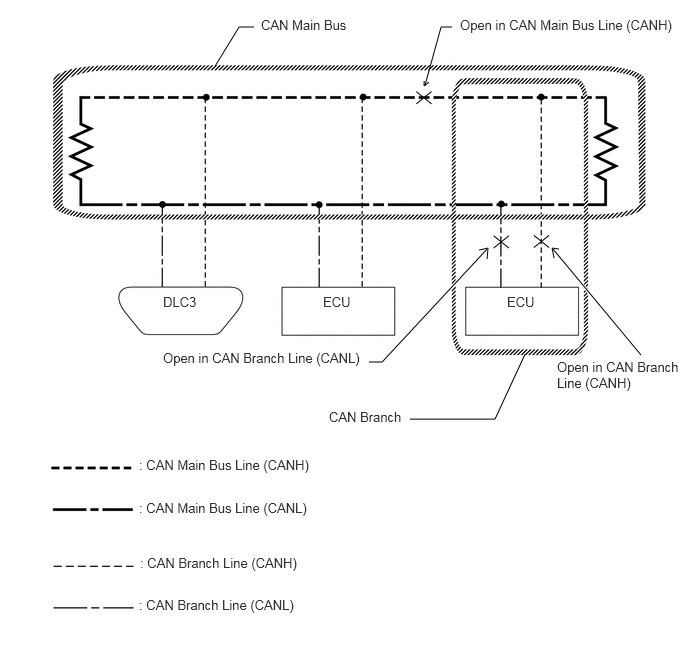
- HINT:
- ·
The following waveform is measured between terminals CANH and GND, and terminals CANL and GND of the DLC3. (Use this as a reference for diagnosis of CAN communication lines.)
·When malfunctions in multiple ECUs are suspected based on the CAN bus check and DTCs checked using the GTS, check the resistance of the CAN bus using an ohmmeter first. If no problems are found, check the following waveforms.
Click herePower Source / Network>NETWORKING>CAN COMMUNICATION SYSTEM>HOW TO PROCEED WITH TROUBLESHOOTING
·If a waveform is not similar to one of the following 3 patterns (Group 1), then an open in a CAN main bus line, an open in a CAN branch line, or a short between a CAN line (CANH or CANL) and ground is suspected (Group 2).
·Wiggle the connector and wire harness to check if the waveform changes.
CAN bus waveforms (Group 1)
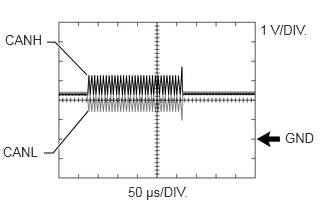
Normal waveform
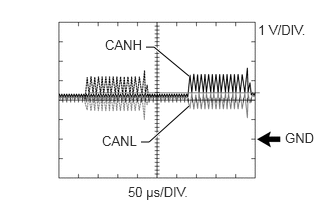
Open in both of the lines (CANH and CANL) of a CAN branch
- HINT:
- ·
Waveforms (waveforms shown using dotted lines) are not present from an ECU or sensor connected to a CAN branch with an open circuit in both lines. (Waveforms from other ECUs or sensors are normal.)
·Because this waveform is similar to a normal waveform, instead of using the waveform, the malfunctioning part can be narrowed down by performing a CAN bus check.
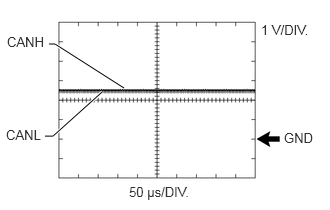
Short between the CAN bus lines (CANH and CANL)
- HINT:
- ·
Waveforms disappear.
·If the malfunction is in an ECU, disconnecting the ECU will change the waveform. If the waveform does not change, a malfunction in the wire harness is suspected.
CAN bus waveforms (reference) (Group 2)
- NOTICE:
-
The following CAN bus waveforms can be used only as reference. The actual measured waveform may differ significantly depending on the location of the open or short circuit.
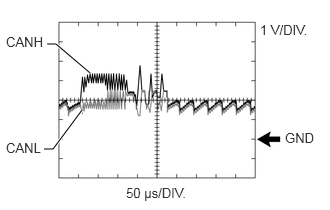
Open in a CAN branch line (CANH)
- HINT:
- ·
An abnormal waveform is output from an ECU with an open in one of its CAN branch lines. Because this abnormal output interferes with the signals from other ECUs, the output of other ECUs will also appear abnormal.
·Narrow down the malfunctioning part by checking DTCs or performing a CAN bus check, or by checking waveform changes when ECUs or sensors are disconnected. The waveform will change to one for an open in both sides of a CAN branch when the ECU or sensor with an open CAN branch line is disconnected.
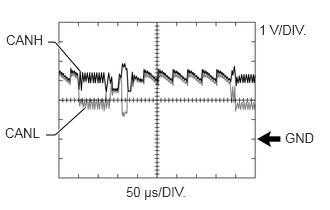
Open in a CAN branch line (CANL)
- HINT:
- ·
An abnormal waveform is output from an ECU with an open in one of its CAN branch lines. Because this abnormal output interferes with the signals from other ECUs, the output of other ECUs will also appear abnormal.
·Narrow down the malfunctioning part by checking DTCs or performing a CAN bus check, or by checking waveform changes when ECUs or sensors are disconnected. The waveform will change to one for an open in both sides of a CAN branch when the ECU or sensor with an open CAN branch line is disconnected.
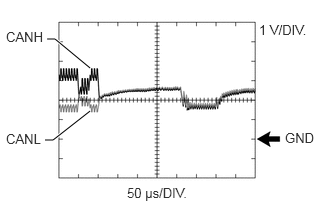
Open in a CAN main bus line (CANH)
- HINT:
- ·
Waveforms of ECUs or sensors that are closer to the DLC3 than the open part are almost normal.
·Waveforms of ECUs or sensors that are on the opposite side of the DLC3 from the open part are abnormal.
·An open in a CAN main bus line can be confirmed by measuring the resistance between the CANH and CANL terminals of any CAN branch.
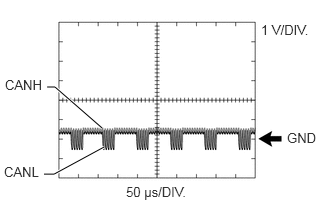
Short between a CAN bus line (CANH) and ground
- HINT:
- ·
Narrow down the shorted part by checking for waveform changes when disconnecting connectors from the CAN junction connectors or when disconnecting ECUs or sensors.
·A short to ground in the CANH line can be confirmed by measuring the resistance between CANH and ground using an ohmmeter.
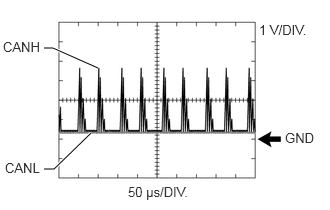
Short between a CAN bus line (CANL) and ground
- HINT:
- ·
Narrow down the shorted part by checking for waveform changes when disconnecting connectors from the CAN junction connectors or when disconnecting ECUs or sensors.
·A short to ground in the CANL line can be confirmed by measuring the resistance between CANL and ground using an ohmmeter.
DATA SENDING/RECEIVING TABLE
Data sending/receiving table
- HINT:
-
If Data List items related to sent/received data are not displayed properly, the part for which communication is interrupted can be determined using the table below.
| Data Content | Data Detected and Sent by | Data Received by
(Can be Checked in the Data List) |
Data Received by
(Cannot be Checked in the Data List) |
Relevant Data List Item
[Selected System] |
|---|---|---|---|---|
| Accelerator position | ECM | Skid control ECU (brake actuator assembly)*4 | Skid control ECU (brake actuator assembly)*5 | ·
Accelerator Position [Engine and ECT] ·
Accelerator Opening Angle % [ABS/VSC/TRC] |
| Engine speed | ECM | ·
Power steering ECU assembly ·
Combination meter assembly ·
Skid control ECU (brake actuator assembly)*4 ·
Certification ECU (smart key ECU assembly) |
·
Air conditioning amplifier assembly ·
Airbag ECU assembly ·
Main body ECU (multiplex network body ECU) ·
Skid control ECU (brake actuator assembly)*5 |
·
Engine Speed [Engine and ECT] ·
Engine Revolution [EMPS] ·
Engine Rpm [Combination Meter] ·
Engine Revolutions [ABS/VSC/TRC] ·
Engine Condition [Power Source Control] |
| Engine coolant temperature | ECM | ·
Air conditioning amplifier assembly ·
Combination meter assembly |
- | ·
Coolant Temp [Engine and ECT] ·
Engine Coolant Temp [Air Conditioner] ·
Coolant Temperature [Combination Meter] |
| Vehicle speed | Skid control ECU (brake actuator assembly) | ·
ECM ·
Power steering ECU assembly ·
Combination meter assembly*3 |
Airbag ECU assembly | ·
Vehicle Speed [ABS/VSC/TRC] ·
Vehicle Speed [Engine and ECT] ·
Meter Vehicle Velocity [EMPS] ·
Vehicle Speed Meter [Combination Meter] |
| Combination meter assembly*3 | Certification ECU (smart key ECU assembly) | ·
Air conditioning amplifier assembly ·
Main body ECU (multiplex network body ECU) |
·
Vehicle Speed Meter [Combination Meter] ·
Vehicle Speed Signal [Power Source Control] |
|
| Wheel speed | Skid control ECU (brake actuator assembly) | - | ·
ECM ·
Power steering ECU assembly |
·
FR Wheel Speed [ABS/VSC/TRC] ·
FL Wheel Speed [ABS/VSC/TRC] ·
RR Wheel Speed [ABS/VSC/TRC] ·
RL Wheel Speed [ABS/VSC/TRC] |
| Shift position | ECM | Certification ECU (smart key ECU assembly) | ·
Combination meter assembly*2 ·
Airbag ECU assembly ·
Main body ECU (multiplex network body ECU) |
·
Neutral Position SW Signal [Engine and ECT] ·
Shift P Signal [Power Source Control] |
| Ambient temperature | Air conditioning amplifier assembly | ECM | Main body ECU (multiplex network body ECU) | ·
Ambient Temp Sensor [Air Conditioner] ·
Ambient Temp for A/C [Engine and ECT] |
| Door courtesy switch | Main body ECU (multiplex network body ECU) | - | ·
Combination meter assembly*2 ·
Certification ECU (smart key ECU assembly) |
FR Door Courtesy SW [Main Body] |
| ECM power source voltage*1 | ECM | - | - | Battery Voltage [Engine and ECT] |
| Combination meter assembly power source voltage*1 | Combination meter assembly | - | - | +B Voltage Value [Combination Meter] |
| Skid control ECU (brake actuator assembly) power source voltage*1 | Skid control ECU (brake actuator assembly) | - | - | IG1 Voltage Value [ABS/VSC/TRC] |
| Power steering ECU assembly power source voltage*1 | Power steering ECU assembly | - | - | IG Power Supply [EMPS] |
| Solar sensor*1*6 | Air conditioning amplifier assembly | - | - | Solar Sensor (D side) [Air Conditioner] |
| Driver door touch sensor*1 | Certification ECU (smart key ECU assembly) | - | - | D-Door Touch Sensor [Entry&Start] |
*1: Whether the ECU that sends data is functioning or not can be judged by using the GTS to check items such as switches or sensors that send signals to the ECU via direct lines.
*2: Although the received contents cannot be checked in the Data List, whether or not the data is received normally can be checked by observing the combination meter assembly.
*3: The combination meter assembly receives a vehicle speed signal from the skid control ECU (brake actuator assembly) and sends the signal to other ECUs.
*4: w/ VSC
*5: w/ ABS
*6: for Automatic Air Conditioning System
Details of relevant Data List items (Selected system: Engine and ECT) (for 1ZR-FE)
- HINT:
-
Using the GTS to read the Data List allows the values or states of switches, sensors, actuators and other items to be read without removing any parts. This non-intrusive inspection can be very useful because intermittent conditions or signals may be discovered before parts or wiring is disturbed. Reading the Data List information early in troubleshooting is one way to save diagnostic time.
- NOTICE:
-
In the table below, the values listed under "Normal Condition" are reference values. Do not depend solely on these reference values when deciding whether a part is faulty or not.
- HINT:
-
Normal Condition: If no conditions are specifically stated for "idling", the shift lever should be in P, the A/C switch should be off and all accessory switches should be off.
Warm up the engine.
Turn the A/C switch off.
Turn the ignition switch off.
Connect the GTS to the DLC3.
Turn the ignition switch to ON.
Turn the GTS on.
Enter the following menus: Powertrain / Engine and ECT / Data List.
According to the display on the GTS, read the "Data List".
- Powertrain > Engine and ECT > Data List
-
Tester Display Measurement Item Range Normal Condition Diagnostic Note Vehicle Speed Vehicle speed Min.: 0 km/h (0 mph), Max.: 255 km/h (158 mph) Actual vehicle speed ·This is the current vehicle speed.
·The vehicle speed is detected using the wheel speed sensors.
·Vehicle speed data is delayed when it is displayed. Therefore, even if the vehicle speed listed in the freeze frame data is 0 km/h (0 mph), this does not always mean that the malfunction occurred when the vehicle was stopped.
Engine Speed Engine speed Min.: 0 rpm, Max.: 16383 rpm 600 to 700 rpm: Idling When the crankshaft position sensor is malfunctioning, "Engine Speed" is approximately 0 rpm or varies greatly from the actual engine speed. Coolant Temp Coolant temperature Min.: -40°C (-40°F), Max.: 140°C (284°F) 75 to 100°C (167 to 212°F): After warming up This is the engine coolant temperature.
- HINT:
- ·
After warming up the engine, the engine coolant temperature is 75 to 100°C (167 to 212°F).
·After a long soak, the engine coolant temperature, intake air temperature and ambient air temperature are approximately equal.
·If the value is -40°C (-40°F), or 140°C (284°F), the sensor circuit is open or shorted.
·Check if the engine overheats when the value indicates 140°C (284°F).
Battery Voltage Battery voltage Min.: 0 V, Max.: 65.535 V 11 to 14 V: Idling If 11 V or less, characteristics of some electrical components may change. Accelerator Position Accelerator pedal position Min.: 0%, Max.: 399.9% Actual accelerator pedal position This is the accelerator pedal position defined using the learned fully released position (sensor output) of No. 1 accelerator pedal position sensor as 0% and the fully depressed position as 100%. Neutral Position SW Signal Park/Neutral position switch status ON or OFF ON: Shift lever in P or N - Ambient Temp for A/C Ambient temperature for A/C Min.: -40°C (-40°F), Max.: 215°C (419°F) - -
Details of relevant Data List items (Selected system: Engine and ECT) (for 2ZR-FE)
- HINT:
-
Using the GTS to read the Data List allows the values or states of switches, sensors, actuators and other items to be read without removing any parts. This non-intrusive inspection can be very useful because intermittent conditions or signals may be discovered before parts or wiring is disturbed. Reading the Data List information early in troubleshooting is one way to save diagnostic time.
- NOTICE:
-
In the table below, the values listed under "Normal Condition" are reference values. Do not depend solely on these reference values when deciding whether a part is faulty or not.
- HINT:
-
Normal Condition: If no conditions are specifically stated for "idling", the shift lever should be in P or neutral, the A/C switch should be off and all accessory switches should be off.
Warm up the engine.
Turn the A/C switch off.
Turn the ignition switch off.
Connect the GTS to the DLC3.
Turn the ignition switch to ON.
Turn the GTS on.
Enter the following menus: Powertrain / Engine and ECT / Data List.
According to the display on the GTS, read the "Data List".
- Powertrain > Engine and ECT > Data List
-
Tester Display Measurement Item Range Normal Condition Diagnostic Note Vehicle Speed Vehicle speed Min.: 0 km/h (0 mph), Max.: 255 km/h (158 mph) Actual vehicle speed ·This is the current vehicle speed.
·The vehicle speed is detected using the wheel speed sensors.
·Vehicle speed data is delayed when it is displayed. Therefore, even if the vehicle speed listed in the freeze frame data is 0 km/h (0 mph), this does not always mean that the malfunction occurred when the vehicle was stopped.
Engine Speed Engine speed Min.: 0 rpm, Max.: 16383 rpm ·600 to 700 rpm: Idling with warm engine, A/C off (for M/T models)
·680 to 780 rpm: Idling with warm engine, shift lever in P, A/C off (for CVT models)
When the crankshaft position sensor is malfunctioning, "Engine Speed" is approximately 0 rpm or varies greatly from the actual engine speed. Coolant Temp Coolant temperature Min.: -40°C (-40°F), Max.: 140°C (284°F) 75 to 100°C (167 to 212°F): After warming up This is the engine coolant temperature.
- HINT:
- ·
After warming up the engine, the engine coolant temperature is 75 to 100°C (167 to 212°F).
·After a long soak, the engine coolant temperature, intake air temperature and ambient air temperature are approximately equal.
·If the value is -40°C (-40°F), or 140°C (284°F), the sensor circuit is open or shorted.
·Check if the engine overheats when the value indicates 140°C (284°F).
Battery Voltage Battery voltage Min.: 0 V, Max.: 65.535 V 11 to 14 V: Ignition switch ON If 11 V or less, characteristics of some electrical components may change. Accelerator Position Accelerator pedal position Min.: 0%, Max.: 399.9% Actual accelerator pedal position This is the accelerator pedal position defined using the learned fully released position (sensor output) of No. 1 accelerator pedal position sensor as 0% and the fully depressed position as 100%. Neutral Position SW Signal Park/Neutral position switch status ON or OFF ON: Shift lever in P or N - Ambient Temp for A/C Ambient temperature for A/C Min.: -40°C (-40°F), Max.: 215°C (419°F) - -
Details of relevant Data List items (Selected system: Engine and ECT) (for 2NZ-FE)
- HINT:
-
Using the GTS to read the Data List allows the values or states of switches, sensors, actuators and other items to be read without removing any parts. This non-intrusive inspection can be very useful because intermittent conditions or signals may be discovered before parts or wiring is disturbed. Reading the Data List information early in troubleshooting is one way to save diagnostic time.
- NOTICE:
-
In the table below, the values listed under "Normal Condition" are reference values. Do not depend solely on these reference values when deciding whether a part is faulty or not.
- HINT:
-
Normal Condition: If no conditions are specifically stated for "idling", the shift lever should be in P, the A/C should be off and all accessory switches should be off.
Warm up the engine.
Turn the A/C switch off.
Turn the ignition switch off.
Connect the GTS to the DLC3.
Turn the ignition switch to ON.
Turn the GTS on.
Enter the following menus: Powertrain / Engine and ECT / Data List.
According to the display on the GTS, read the "Data List".
- Powertrain > Engine and ECT > Data List
-
Tester Display Measurement Item Range Normal Condition Diagnostic Note Vehicle Speed Vehicle speed Min.: 0 km/h (0 mph), Max.: 255 km/h (158 mph) Actual vehicle speed ·This is the current vehicle speed.
·The vehicle speed is detected using the wheel speed sensors.
·Vehicle speed data is delayed when it is displayed. Therefore, even if the vehicle speed listed in the freeze frame data is 0 km/h (0 mph), this does not always mean that the malfunction occurred when the vehicle was stopped.
Engine Speed Engine speed Min.: 0 rpm, Max.: 16383 rpm 650 to 750 rpm: Idling When the crankshaft position sensor is malfunctioning, "Engine Speed" is approximately 0 rpm or varies greatly from the actual engine speed. Coolant Temp Coolant temperature Min.: -40°C (-40°F), Max.: 140°C (284°F) 75 to 100°C (167 to 212°F): After warming up This is the engine coolant temperature.
- HINT:
- ·
After warming up the engine, the engine coolant temperature is 75 to 100°C (167 to 212°F).
·After a long soak, the engine coolant temperature, intake air temperature and ambient air temperature are approximately equal.
·If the value is -40°C (-40°F), or 140°C (284°F), the sensor circuit is open or shorted.
·Check if the engine overheats when the value indicates 140°C (284°F).
Battery Voltage Battery voltage Min.: 0 V, Max.: 65.535 V 11 to 14 V: Idling If 11 V or less, characteristics of some electrical components may change. Accelerator Position Accelerator pedal position Min.: 0%, Max.: 399.9% Actual accelerator pedal position This is the accelerator pedal position defined using the learned fully released position (sensor output) of No. 1 accelerator pedal position sensor as 0% and the fully depressed position as 100%. Neutral Position SW Signal Park/neutral position switch status ON or OFF ON: Shift lever in P or N - Ambient Temp for A/C Ambient temperature for A/C Min.: -40°C (-40°F), Max.: 215°C (419°F) - -
Details of relevant Data List items (Selected system: ABS/VSC/TRC) (w/ ABS)
- HINT:
-
Using the GTS to read the Data List allows the values or states of switches, sensors, actuators and other items to be read without removing any parts. This non-intrusive inspection can be very useful because intermittent conditions or signals may be discovered before parts or wiring is disturbed. Reading the Data List information early in troubleshooting is one way to save diagnostic time.
- NOTICE:
-
In the table below, the values listed under "Normal Condition" are reference values. Do not depend solely on these reference values when deciding whether a part is faulty or not.
Warm up the engine.
Turn the ignition switch off.
Connect the GTS to the DLC3.
Turn the ignition switch to ON.
Turn the GTS on.
Enter the following menus: Chassis / ABS/VSC/TRC / Data List.
According to the display on the GTS, read the "Data List".
- Chassis > ABS/VSC/TRC > Data List
-
Tester Display Measurement Item Range Normal Condition Diagnostic Note FR Wheel Speed Front wheel speed sensor RH reading Min.: 0 km/h (0 mph), Max.: 326 km/h (202 mph) Vehicle stopped: 0 km/h (0 mph) When driving at constant speed: No large fluctuations FL Wheel Speed Front wheel speed sensor LH reading Min.: 0 km/h (0 mph), Max.: 326 km/h (202 mph) Vehicle stopped: 0 km/h (0 mph) When driving at constant speed: No large fluctuations RR Wheel Speed Rear wheel speed sensor RH reading Min.: 0 km/h (0 mph), Max.: 326 km/h (202 mph) Vehicle stopped: 0 km/h (0 mph) When driving at constant speed: No large fluctuations RL Wheel Speed Rear wheel speed sensor LH reading Min.: 0 km/h (0 mph), Max.: 326 km/h (202 mph) Vehicle stopped: 0 km/h (0 mph) When driving at constant speed: No large fluctuations Vehicle Speed Maximum wheel speed sensor reading Min.: 0 km/h (0 mph), Max.: 326 km/h (202 mph) Vehicle stopped: 0 km/h (0 mph) When driving at constant speed: No large fluctuations IG1 Voltage Value IG1 voltage value Min.: 0.00 V, Max.: 20.00 V Ignition switch ON: 11.00 to 14.00 V Changes in proportion to battery voltage
Details of relevant Data List items (Selected system: ABS/VSC/TRC) (w/ VSC)
- HINT:
-
Using the GTS to read the Data List allows the values or states of switches, sensors, actuators and other items to be read without removing any parts. This non-intrusive inspection can be very useful because intermittent conditions or signals may be discovered before parts or wiring is disturbed. Reading the Data List information early in troubleshooting is one way to save diagnostic time.
- NOTICE:
-
In the table below, the values listed under "Normal Condition" are reference values. Do not depend solely on these reference values when deciding whether a part is faulty or not.
Warm up the engine.
Turn the ignition switch off.
Connect the GTS to the DLC3.
Turn the engine switch on (IG).
Turn the GTS on.
Enter the following menus: Chassis / ABS/VSC/TRC / Data List.
According to the display on the GTS, read the "Data List".
- Chassis > ABS/VSC/TRC > Data List
-
Tester Display Measurement Item Range Normal Condition Diagnostic Note FR Wheel Speed Front wheel speed sensor RH reading Min.: 0 km/h (0 mph), Max.: 326.4 km/h (203 mph) Vehicle stopped: 0 km/h (0 mph) When driving at constant speed: No large fluctuations FL Wheel Speed Front wheel speed sensor LH reading Min.: 0 km/h (0 mph), Max.: 326.4 km/h (203 mph) Vehicle stopped: 0 km/h (0 mph) When driving at constant speed: No large fluctuations RR Wheel Speed Rear wheel speed sensor RH reading Min.: 0 km/h (0 mph), Max.: 326.4 km/h (203 mph) Vehicle stopped: 0 km/h (0 mph) When driving at constant speed: No large fluctuations RL Wheel Speed Rear wheel speed sensor LH reading Min.: 0 km/h (0 mph), Max.: 326.4 km/h (203 mph) Vehicle stopped: 0 km/h (0 mph) When driving at constant speed: No large fluctuations Vehicle Speed Maximum wheel speed sensor reading Min.: 0 km/h (0 mph), Max.: 326.4 km/h (203 mph) Vehicle stopped: 0 km/h (0 mph) When driving at constant speed: No large fluctuations Engine Revolutions Engine speed Min.: 0 rpm, Max.: 65535 rpm Engine stopped:
0 rpmWhen engine speed is constant:
No large fluctuationsAccelerator Opening Angle % Percentage of accelerator pedal opening angle Min.: 0.0%, Max.: 127.5% Accelerator pedal released: 0.0% During accelerator pedal operation: Changes in proportion with the pedal movement IG1 Voltage Value IG1 Voltage Value Min.: 0.00 V, Max.: 20.00 V Engine switch on (IG): 11.00 to 14.00 V Changes in proportion to battery voltage
Details of relevant Data List items (Selected system: EMPS)
- HINT:
-
Using the GTS to read the Data List allows the values or states of switches, sensors, actuators and other items to be read without removing any parts. This non-intrusive inspection can be very useful because intermittent conditions or signals may be discovered before parts or wiring is disturbed. Reading the Data List information early in troubleshooting is one way to save diagnostic time.
- NOTICE:
-
In the table below, the values listed under "Normal Condition" are reference values. Do not depend solely on these reference values when deciding whether a part is faulty or not.
Turn the ignition switch off.
Connect the GTS to the DLC3.
Turn the ignition switch to ON.
Turn the GTS on.
Enter the following menus: Chassis / EMPS / Data List.
According to the display on the GTS, read the "Data List".
- Chassis > EMPS > Data List
-
Tester Display Measurement Item Range Normal Condition Diagnostic Note Meter Vehicle Velocity Vehicle speed from speedometer Min.: 0.0 km/h (0.0 MPH)
Max.: 300.0 km/h (186.4 MPH)·0 km/h (0 MPH): Engine running and vehicle stopped
·No significant fluctuation: Engine running and vehicle driven at constant speed
- Engine Revolution Engine speed Min.: 0 rpm
Max.: 12800 rpmNo significant fluctuation Engine running at a constant speed IG Power Supply IG power source voltage Min.: 0.0000 V
Max.: 20.1531 V8 to 16 V Ignition switch ON
Details of relevant Data List items (Selected system: Combination Meter)
- NOTICE:
-
In the table below, the values listed under "Normal Condition" are reference values. Do not depend solely on these reference values when deciding whether a part is faulty or not.
- HINT:
-
Using the GTS to read the Data List allows the values or states of switches, sensors, actuators and other items to be read without removing any parts. This non-intrusive inspection can be very useful because intermittent conditions or signals may be discovered before parts or wiring is disturbed. Reading the Data List information early in troubleshooting is one way to save diagnostic time.
Warm up the engine.
Turn the ignition switch off.
Connect the GTS to the DLC3.
Turn the ignition switch to ON.
Turn the GTS on.
Enter the following menus: Body Electrical / Combination Meter / Data List.
According to the display on the GTS, read the "Data List".
- Body Electrical > Combination Meter > Data List
-
Tester Display Measurement Item Range Normal Condition Diagnostic Note Vehicle Speed Meter Vehicle speed Min.: 0 km/h (0 mph), Max.: 255 km/h (158 mph) Almost the same as actual vehicle speed - Engine Rpm Engine speed Min.: 0 rpm, Max.: 12750 rpm Almost the same as actual engine speed - Coolant Temperature Engine coolant temperature Min.: 0°C (32°F), Max.: 127.5°C (261.5°F) 75 to 100°C (167 to 212°F) (After warming up engine) - +B Voltage Value Battery voltage Min.: 0 V, Max.: 25.5 V 11 to 14 V -
Details of relevant Data List items (Selected system: Air Conditioner) (for Manual Air Conditioning System)
- NOTICE:
-
In the table below, the values listed under "Normal Condition" are reference values. Do not depend solely on these reference values when deciding whether a part is faulty or not.
- HINT:
-
Using the GTS to read the Data List allows the values or states of switches, sensors, actuators and other items to be read without removing any parts. This non-intrusive inspection can be very useful because intermittent conditions or signals may be discovered before parts or wiring is disturbed. Reading the Data List information early in troubleshooting is one way to save diagnostic time.
Connect the GTS to the DLC3.
Turn the ignition switch to ON.
Turn the GTS on.
Enter the following menus: Body Electrical / Air Conditioner / Data List.
According to the display on the GTS, read the "Data List".
- Body Electrical > Air Conditioner > Data List
-
Tester Display Measurement Item Range Normal Condition Diagnostic Note Ambient Temp Sensor Thermistor assembly Min.: -23.30°C (-9.94°F)
Max.: 65.95°C (150.71°F)Actual ambient temperature displayed - Engine Coolant Temp Engine coolant temperature sensor Min.: 1.30°C (34.34°F)
Max.: 90.55°C (194.99°F)Actual engine coolant temperature displayed -
Details of relevant Data List items (Selected system: Air Conditioner) (for Automatic Air Conditioning System)
- NOTICE:
-
In the table below, the values listed under "Normal Condition" are reference values. Do not depend solely on these reference values when deciding whether a part is faulty or not.
- HINT:
-
Using the GTS to read the Data List allows the values or states of switches, sensors, actuators and other items to be read without removing any parts. This non-intrusive inspection can be very useful because intermittent conditions or signals may be discovered before parts or wiring is disturbed. Reading the Data List information early in troubleshooting is one way to save diagnostic time.
Connect the GTS to the DLC3.
Turn the engine switch on (IG).
Turn the GTS on.
Enter the following menus: Body Electrical / Air Conditioner / Data List.
According to the display on the GTS, read the "Data List".
- Body Electrical > Air Conditioner > Data List
-
Tester Display Measurement Item Range Normal Condition Diagnostic Note Ambient Temp Sensor Thermistor assembly Min.: -23.30°C (-9.94°F)
Max.: 65.95°C (150.71°F)Actual ambient temperature displayed - Solar Sensor (D Side) Cooler (solar sensor) thermistor Min.: 0
Max.: 255Cooler (solar sensor) thermistor value increases as brightness increases - Engine Coolant Temp Engine coolant temperature sensor Min.: 1.30°C (34.34°F)
Max.: 90.55°C (194.99°F)Actual engine coolant temperature displayed -
Details of relevant Data List items (Selected system: Main Body)
- NOTICE:
-
In the following table, the values listed under "Normal Condition" are reference values. Do not depend solely on these reference values when deciding whether a part is faulty or not.
- HINT:
-
Using the GTS to read the Data List allows the values or states of switches, sensors, actuators and other items to be read without removing any parts. This non-intrusive inspection can be very useful because intermittent conditions or signals may be discovered before parts or wiring is disturbed. Reading the Data List information early in troubleshooting is one way to save diagnostic time.
Connect the GTS to the DLC3.
Turn the ignition switch to ON.
Turn the GTS on.
Enter the following menus: Body Electrical / Main Body / Data List.
According to the display on the GTS, read the "Data List".
- Body Electrical > Main Body > Data List
-
Tester Display Measurement Item Range Normal Condition Diagnostic Note FR Door Courtesy SW Front door courtesy light switch assembly RH signal ON or OFF ON: Front door RH open
OFF: Front door RH closed-
Details of relevant Data List items (Selected system: Power Source Control)
- HINT:
-
Using the GTS to read the Data List allows the values or states of switches, sensors, actuators and other items to be read without removing any parts. This non-intrusive inspection can be very useful because intermittent conditions or signals may be discovered before parts or wiring is disturbed. Reading the Data List information early in troubleshooting is one way to save diagnostic time.
- NOTICE:
-
In the table below, the values listed under "Normal Condition" are reference values. Do not depend solely on these reference values when deciding whether a part is faulty or not.
Connect the GTS to the DLC3.
Turn the engine switch on (IG).
Turn the GTS on.
Enter the following menus: Body Electrical / Power Source Control / Data List.
According to the display on the GTS, read the "Data List".
- Body Electrical > Power Source Control > Data List
-
Tester Display Measurement Item Range Normal Condition Diagnostic Note Shift P Signal Shift position P* ON or OFF OFF: Shift lever not in P ·Use this item to determine if the shift position switch is malfunctioning.
·The engine cannot be started when this item is OFF.
Engine Condition Engine state Stop or Run Stop: Engine stopped
Run: Engine running- Vehicle Speed Signal Vehicle being driven or stopped Stop or Run Stop: Vehicle stopped
Run: Vehicle being driven at 5 km/h (3 mph) or more-
*: except Manual Transaxle
Details of relevant Data List items (Selected system: Entry&Start)
- NOTICE:
-
In the table below, the values listed under "Normal Condition" are reference values. Do not depend solely on these reference values when deciding whether a part is faulty or not.
- HINT:
- ·
Using the GTS to read the Data List allows the values or states of switches, sensors, actuators and other items to be read without removing any parts. This non-intrusive inspection can be very useful because intermittent conditions or signals may be discovered before parts or wiring is disturbed. Reading the Data List information early in troubleshooting is one way to save diagnostic time.
·When using the GTS with the engine switch off, connect the GTS to the DLC3 and turn a courtesy light switch on and off at intervals of 1.5 seconds or less until communication between the GTS and the vehicle begins. Then select Model Code "KEY REGIST" under manual mode and enter the following menus: Body Electrical / Entry&Start(CAN). While using the GTS, periodically turn a courtesy light switch on and off at intervals of 1.5 seconds or less to maintain communication between the GTS and the vehicle.
Connect the GTS to the DLC3.
Turn the engine switch on (IG).
Turn the GTS on.
Enter the following menus: Body Electrical / Entry&Start / Data List.
According to the display on the GTS, read the "Data List".
- Body Electrical > Entry&Start > Data List
-
Tester Display Measurement Item Range Normal Condition Diagnostic Note D-Door Touch Sensor Driver door touch sensor (unlock sensor)* OFF or ON OFF: Driver door touch sensor (unlock sensor) not touched
ON: Driver door touch sensor (unlock sensor) touched·Displays whether the unlock sensor is on or off (even if the sensor is touched and contact is maintained, "ON" is displayed only momentarily).
·Use this Data List item to help determine if there is an unlock sensor malfunction when the entry unlock function does not operate.
*: Data from an actual vehicle provided for reference.