DOOR / HATCH REAR DOOR DISASSEMBLY
CAUTION / NOTICE / HINT
- HINT:
- ·
Use the same procedure for the RH side and LH side.
·The following procedure is for the RH side.
PROCEDURE

 1. PRECAUTION (w/ Power Window)
- NOTICE:
-
After turning the ignition switch off, waiting time may be required before disconnecting the cable from the negative (-) battery terminal. Therefore, make sure to read the disconnecting the cable from the negative (-) battery terminal notices before proceeding with work.
-
Click hereGeneral>INTRODUCTION>REPAIR INSTRUCTION>PRECAUTION
2.DISCONNECT CABLE FROM NEGATIVE BATTERY TERMINAL (w/ Power Window)
- NOTICE:
-
When disconnecting the cable, some systems need to be initialized after the cable is reconnected.
-
Click hereGeneral>INTRODUCTION>REPAIR INSTRUCTION>INITIALIZATION
74250
3.REMOVE REAR ARMREST ASSEMBLY
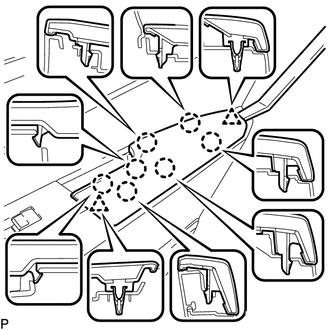
Using a moulding remover, disengage the 2 clips and 7 claws and remove the rear armrest assembly.
69260E
4.REMOVE REAR DOOR WINDOW REGULATOR HANDLE ASSEMBLY (w/o Power Window)
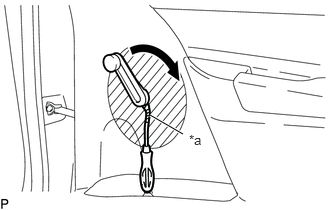
| *a | Protective Tape |

|
Protective Tape |
Apply protective tape to the area shown in the illustration.
Insert a clip remover between the rear door regulator inside handle plate and rear door trim board sub-assembly.
Turn the rear door window regulator handle assembly with the clip remover inserted, as shown in the illustration.
Remove the rear door window regulator handle assembly and rear door window regulator handle shaft snap ring.
69272B
5.REMOVE REAR DOOR REGULATOR INSIDE HANDLE PLATE (w/o Power Window)
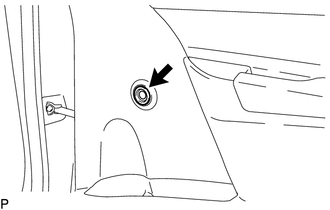
Remove the rear door regulator inside handle plate.
74272A
6.REMOVE REAR DOOR ARMREST UPPER BASE PANEL (w/o Power Window)
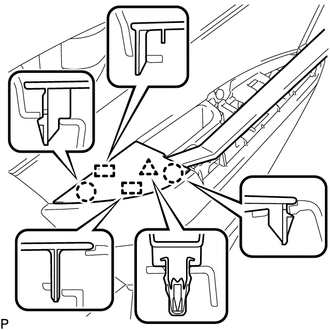
Using a moulding remover, disengage the clip, 2 claws and 2 guides and remove the rear door armrest upper base panel.
7.REMOVE REAR POWER WINDOW REGULATOR SWITCH ASSEMBLY WITH REAR DOOR ARMREST BASE PANEL (w/ Power Window)
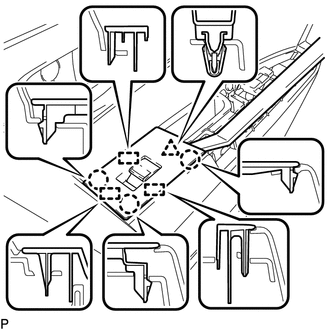
Using a moulding remover, disengage the clip, 3 claws and 3 guides.
Disconnect the connector and remove the rear power window regulator switch assembly with rear door armrest base panel.
67603
8.REMOVE REAR DOOR TRIM BOARD SUB-ASSEMBLY
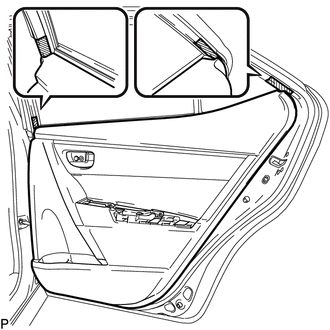
|
|
Protective Tape |
Put protective tape around the rear door panel.
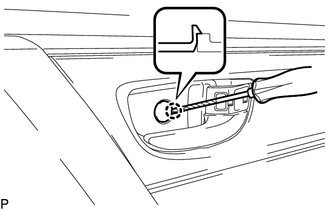
|
|
Protective Tape |
Using a screwdriver with its tip wrapped with protective tape, disengage the claw and open the cover.
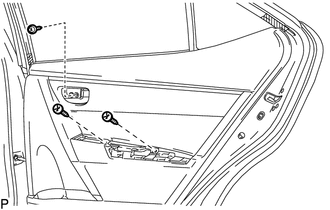
Remove the 3 screws.
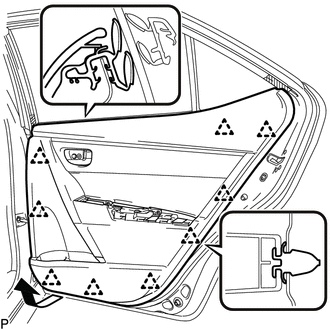
Disengage the 9 clips and remove the rear door trim board sub-assembly as shown in the illustration.
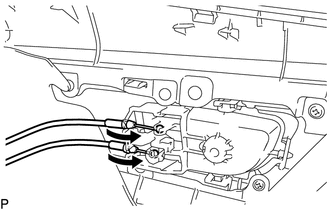
Disconnect the rear door lock remote control cable assembly and rear door inside locking cable assembly.
69205A
9.REMOVE REAR DOOR INSIDE HANDLE SUB-ASSEMBLY
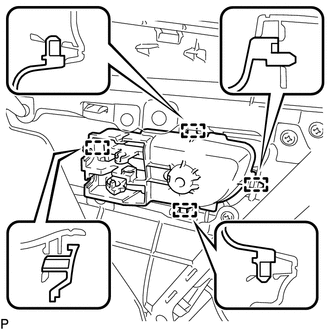
Disengage the 4 guides and remove the rear door inside handle sub-assembly.
68173B
10.REMOVE REAR DOOR INNER GLASS WEATHERSTRIP
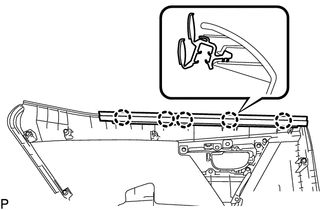
Disengage the 5 claws and remove the rear door inner glass weatherstrip.
67841B
11.REMOVE REAR DOOR SERVICE HOLE COVER
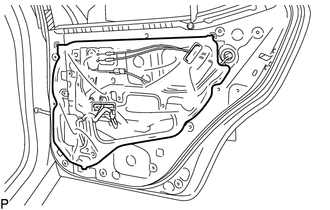
Remove the rear door service hole cover.
- HINT:
-
Remove any remaining butyl tape from the rear door panel.
68630
12.REMOVE REAR DOOR CHECK ASSEMBLY
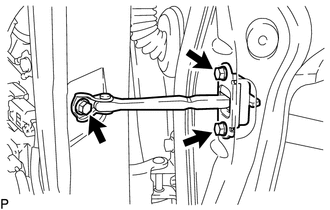
Remove the 3 bolts and rear door check assembly.
67871
13.REMOVE REAR DOOR WEATHERSTRIP
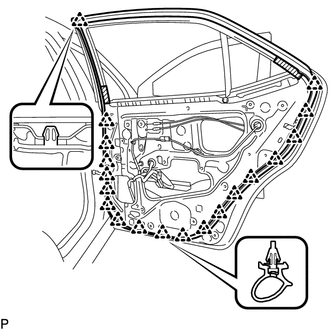
Using a clip remover, disengage the 19 clips and remove the rear door weatherstrip.
68142C
14.REMOVE REAR DOOR GLASS RUN
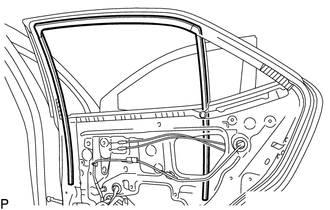
Remove the rear door glass run.
67847B
15.REMOVE NO. 1 REAR DOOR VENT SEAL
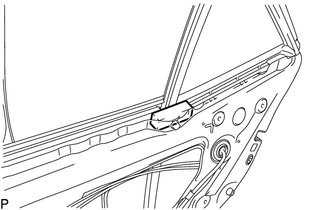
Remove the No. 1 rear door vent seal.
67407H
16.REMOVE REAR DOOR WINDOW DIVISION BAR SUB-ASSEMBLY
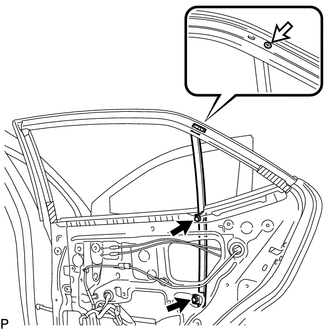

|
Bolt |

|
Screw |
Remove the 2 bolts and screw, and rear door window division bar sub-assembly.
- NOTICE:
-
When the rear door window division bar sub-assembly is removed, do not allow the rear door quarter window glass to fall.
68123B
17.REMOVE REAR DOOR QUARTER WINDOW GLASS
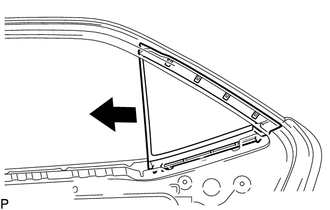
Remove the rear door quarter window glass with the rear door quarter window weatherstrip as shown in the illustration.
Remove the rear door quarter window glass from the rear door quarter window weatherstrip.
68103
18.REMOVE REAR DOOR GLASS SUB-ASSEMBLY
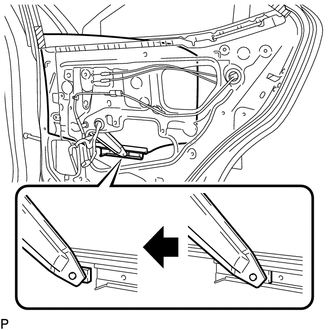
Remove the rear door glass sub-assembly from the rear door window regulator sub-assembly as shown in the illustration.
- NOTICE:
-
Do not damage the rear door glass sub-assembly.
69905B
19.REMOVE REAR DOOR GLASS CHANNEL SUB-ASSEMBLY
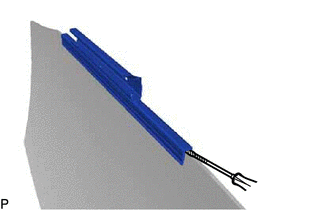
|
|
Protective Tape |
Using a screwdriver, remove the rear door glass channel sub-assembly.
- HINT:
-
Tape the screwdriver tip before use.
69975A
20.REMOVE REAR DOOR GLASS CHANNEL FILLER
Remove the rear door glass channel filler from the rear door glass assembly.
67673A
21.REMOVE REAR DOOR FRAME GARNISH
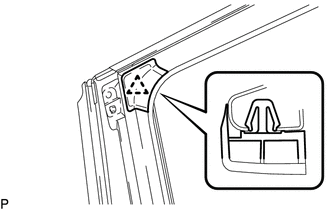
Disengage the clip and remove the rear door frame garnish.
- HINT:
-
This rear door frame garnish needs to be replaced with a new one because the clip will break when removing it.
69840A
22.REMOVE REAR DOOR WINDOW REGULATOR ASSEMBLY (w/o Power Window)
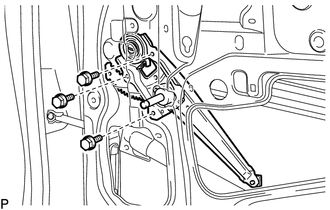
Remove the 3 bolts and rear door window regulator assembly.
- NOTICE:
-
Do not drop or damage the rear door window regulator assembly when removing the bolts.
23.REMOVE REAR DOOR WINDOW REGULATOR ASSEMBLY (w/ Power Window)
Connect the cable to the negative (-) battery terminal.
Connect the rear power window regulator switch assembly.
Operate the rear power window regulator switch assembly to raise the rear door window regulator assembly to the highest position.
Disconnect the cable from the negative (-) battery terminal.
Disconnect the rear power window regulator switch assembly.
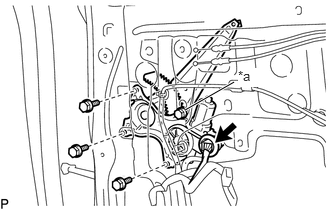
| *a | Temporary Bolt |
Disconnect the connector.
Loosen the temporary bolt.
- NOTICE:
-
Do not remove the temporary bolt. If the temporary bolt is removed, the rear door window regulator assembly may fall and cause damage.
Remove the 3 bolts.
Remove the rear door window regulator assembly.
Remove the temporary bolt from the rear door window regulator assembly.
85710F
24.REMOVE REAR POWER WINDOW REGULATOR MOTOR ASSEMBLY (w/ Power Window)
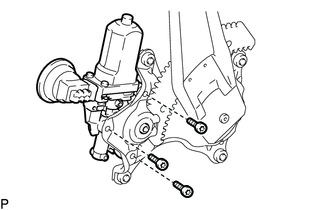
Using a T25 "TORX" socket wrench, remove the 3 screws and rear power window regulator motor assembly from the rear door window regulator sub-assembly.
69330
25.REMOVE REAR DOOR LOCK ASSEMBLY
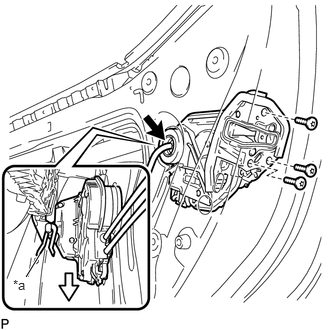
| *a | Release Plate |
Disconnect the connector.
Using a T30 "TORX" socket wrench, remove the 3 screws.
Move the rear door lock assembly downward and disconnect in from the release plate of the rear door outside handle frame sub-assembly.
When reusing the rear door lock assembly:
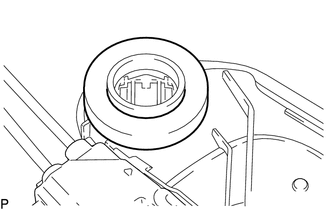
Remove the door lock wiring harness seal from the rear door lock assembly.
69037
26.REMOVE REAR DOOR LOCK COVER SUB-ASSEMBLY
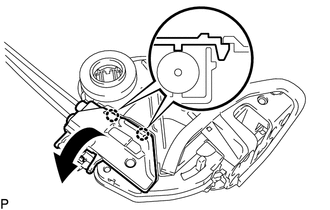
Using a screwdriver, disengage the 2 claws as shown in the illustration.
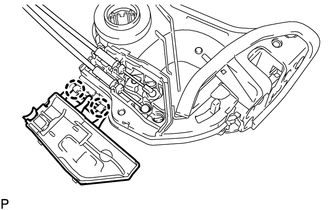
Disengage the 2 claws and remove the rear door lock cover sub-assembly.
69730D
27.REMOVE REAR DOOR LOCK REMOTE CONTROL CABLE ASSEMBLY
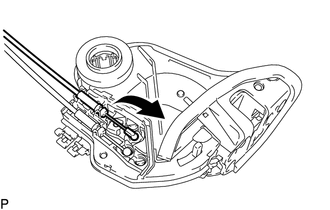
Remove the rear door lock remote control cable assembly as shown in the illustration.
69770B
28.REMOVE REAR DOOR INSIDE LOCKING CABLE ASSEMBLY
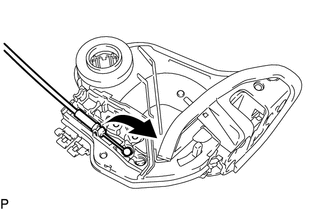
Remove the rear door inside locking cable assembly as shown in the illustration.
69227J
29.REMOVE REAR DOOR OUTSIDE HANDLE COVER
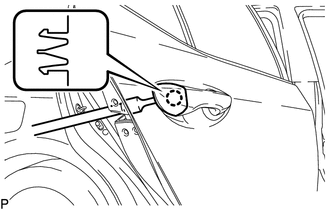
Using a T30 "TORX" socket wrench, loosen the screw.
- HINT:
-
The screw cannot be removed because it is integrated into the rear door outside handle frame sub-assembly.
Disengage the claw and remove the rear door outside handle cover.
69230
30.REMOVE REAR DOOR OUTSIDE HANDLE ASSEMBLY
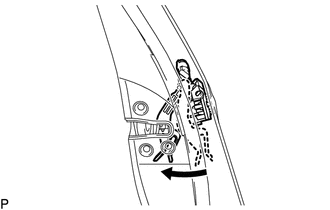
Pull and hold the release plate of the rear door outside handle frame sub-assembly as shown in the illustration.
- NOTICE:
-
The release plate may interfere with the rear door outside handle assembly and may be damaged when removing the rear door outside handle assembly, unless it is pulled and held.
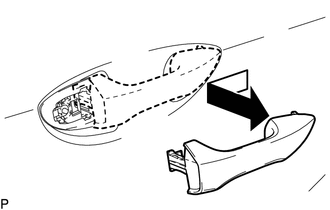
Remove the rear door outside handle assembly as shown in the illustration.
69241G
31.REMOVE REAR DOOR FRONT OUTSIDE HANDLE PAD
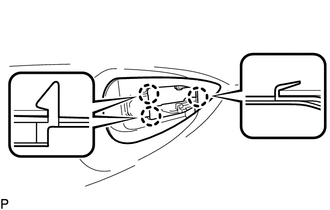
Disengage the 3 claws and remove the rear door front outside handle pad.
69242G
32.REMOVE REAR DOOR REAR OUTSIDE HANDLE PAD
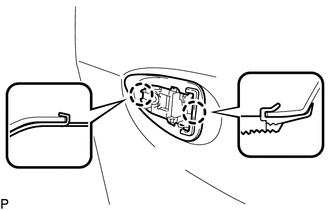
Disengage the 2 claws and remove the rear door rear outside handle pad.
69203A
33.REMOVE REAR DOOR OUTSIDE HANDLE FRAME SUB-ASSEMBLY
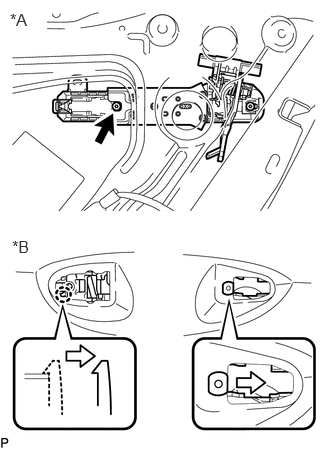
| *A | Inside |
| *B | Outside |
Using a T30 "TORX" socket wrench, remove the screw.
Slide the rear door outside handle frame sub-assembly to disengage the claw of the rear door outside handle frame sub-assembly, and then remove it.
75792
34.REMOVE DOOR WINDOW FRAME MOULDING CLIP
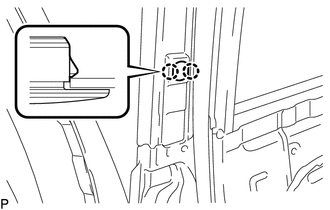
Disengage the 2 claws and remove the door window frame moulding clip.
67003C
35.REMOVE REAR DOOR PANEL CUSHION
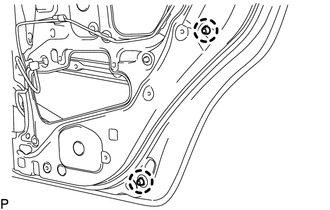
Disengage the 2 claws and remove the 2 rear door panel cushions.
75730
36.REMOVE REAR DOOR BELT MOULDING ASSEMBLY
- HINT:
-
Use the same procedure as for the LH side.
-
Click hereVehicle Exterior>EXTERIOR PANELS / TRIM>REAR DOOR BELT MOULDING>REMOVAL
75761A
37.REMOVE REAR DOOR FRONT WINDOW FRAME MOULDING
- HINT:
-
Use the same procedure as for the LH side.
-
Click hereVehicle Exterior>EXTERIOR PANELS / TRIM>REAR DOOR WINDOW FRAME MOULDING>REMOVAL
75923
38.REMOVE NO. 2 BLACK OUT TAPE
- HINT:
-
Use the same procedure as for the LH side.
-
Click hereVehicle Exterior>EXTERIOR PANELS / TRIM>BLACK OUT TAPE(for Rear Door)>REMOVAL