EXTERIOR PANELS / TRIM REAR DOOR BELT MOULDING REMOVAL
CAUTION / NOTICE / HINT
- HINT:
- ·
Use the same procedure for the RH side and LH side.
·The following procedure is for the LH side.
PROCEDURE

 1. PRECAUTION (w/ Power Window)
- NOTICE:
-
After turning the ignition switch off, waiting time may be required before disconnecting the cable from the negative (-) battery terminal. Therefore, make sure to read the disconnecting the cable from the negative (-) battery terminal notices before proceeding with work.
-
Click hereGeneral>INTRODUCTION>REPAIR INSTRUCTION>PRECAUTION
2.DISCONNECT CABLE FROM NEGATIVE BATTERY TERMINAL (w/ Power Window)
- NOTICE:
-
When disconnecting the cable, some systems need to be initialized after the cable is reconnected.
-
Click hereGeneral>INTRODUCTION>REPAIR INSTRUCTION>INITIALIZATION
74260
3.REMOVE REAR ARMREST ASSEMBLY
- HINT:
-
The following procedure is for the RH side.
-
Click hereVehicle Exterior>DOOR / HATCH>REAR DOOR>DISASSEMBLY
69260E
4.REMOVE REAR DOOR WINDOW REGULATOR HANDLE ASSEMBLY (w/o Power Window)
- HINT:
-
The following procedure is for the RH side.
-
Click hereVehicle Exterior>DOOR / HATCH>REAR DOOR>DISASSEMBLY
69272B
5.REMOVE REAR DOOR REGULATOR INSIDE HANDLE PLATE (w/o Power Window)
- HINT:
-
The following procedure is for the RH side.
-
Click hereVehicle Exterior>DOOR / HATCH>REAR DOOR>DISASSEMBLY
74272A
6.REMOVE REAR DOOR ARMREST UPPER BASE PANEL (w/o Power Window)
- HINT:
-
The following procedure is for the RH side.
-
Click hereVehicle Exterior>DOOR / HATCH>REAR DOOR>DISASSEMBLY
7.REMOVE REAR POWER WINDOW REGULATOR SWITCH ASSEMBLY WITH REAR DOOR ARMREST BASE PANEL (w/ Power Window)
- HINT:
-
The following procedure is for the RH side.
-
Click hereVehicle Exterior>DOOR / HATCH>REAR DOOR>DISASSEMBLY
67604
8.REMOVE REAR DOOR TRIM BOARD SUB-ASSEMBLY
- HINT:
-
The following procedure is for the RH side.
-
Click hereVehicle Exterior>DOOR / HATCH>REAR DOOR>DISASSEMBLY
68174A
9.REMOVE REAR DOOR INNER GLASS WEATHERSTRIP
- HINT:
-
The following procedure is for the RH side.
-
Click hereVehicle Exterior>DOOR / HATCH>REAR DOOR>DISASSEMBLY
67842E
10.REMOVE REAR DOOR SERVICE HOLE COVER
- HINT:
-
The following procedure is for the RH side.
-
Click hereVehicle Exterior>DOOR / HATCH>REAR DOOR>DISASSEMBLY
67872
11.DISCONNECT REAR DOOR WEATHERSTRIP
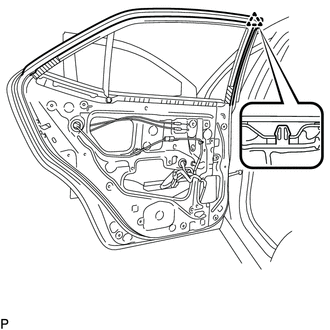
Using a clip remover, disengage the clip and disconnect the rear door weatherstrip.
68152C
12.REMOVE REAR DOOR GLASS RUN
- HINT:
-
The following procedure is for the RH side.
-
Click hereVehicle Exterior>DOOR / HATCH>REAR DOOR>DISASSEMBLY
67848A
13.REMOVE NO. 1 REAR DOOR VENT SEAL
- HINT:
-
The following procedure is for the RH side.
-
Click hereVehicle Exterior>DOOR / HATCH>REAR DOOR>DISASSEMBLY
67408H
14.REMOVE REAR DOOR WINDOW DIVISION BAR SUB-ASSEMBLY
- HINT:
-
The following procedure is for the RH side.
-
Click hereVehicle Exterior>DOOR / HATCH>REAR DOOR>DISASSEMBLY
68124B
15.REMOVE REAR DOOR QUARTER WINDOW GLASS
- HINT:
-
The following procedure is for the RH side.
-
Click hereVehicle Exterior>DOOR / HATCH>REAR DOOR>DISASSEMBLY
68104
16.REMOVE REAR DOOR GLASS SUB-ASSEMBLY
- HINT:
-
The following procedure is for the RH side.
-
Click hereVehicle Exterior>DOOR / HATCH>REAR DOOR>DISASSEMBLY
75740
17.REMOVE REAR DOOR BELT MOULDING ASSEMBLY
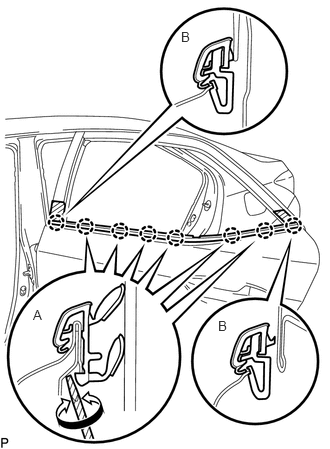
for Resin Type:

|
Protective Tape |
Apply protective tape around the rear door belt moulding assembly as shown in the illustration.
Using a screwdriver with its tip wrapped with protective tape, disengage the 6 claws (A) as shown in the illustration.
Disengage the 2 claws (B) to remove the rear door belt moulding assembly.
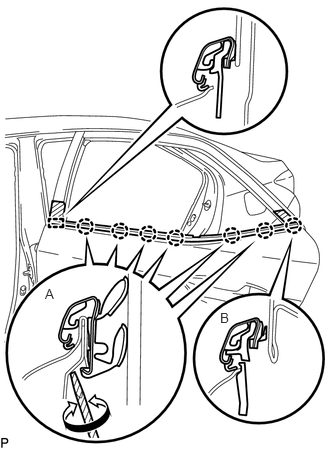
for Plating Type:
|
|
Protective Tape |
Apply protective tape around the rear door belt moulding assembly as shown in the illustration.
Using a screwdriver with its tip wrapped with protective tape, disengage the 6 claws (A) as shown in the illustration.
Disengage the claw (B) and guide to remove the rear door belt moulding assembly.