LIGHTING (EXT)  LIGHTING SYSTEM  Low Beam Headlight Circuit  


DESCRIPTION

The main body ECU (multiplex network body ECU) controls the low beam headlights.

WIRING DIAGRAM
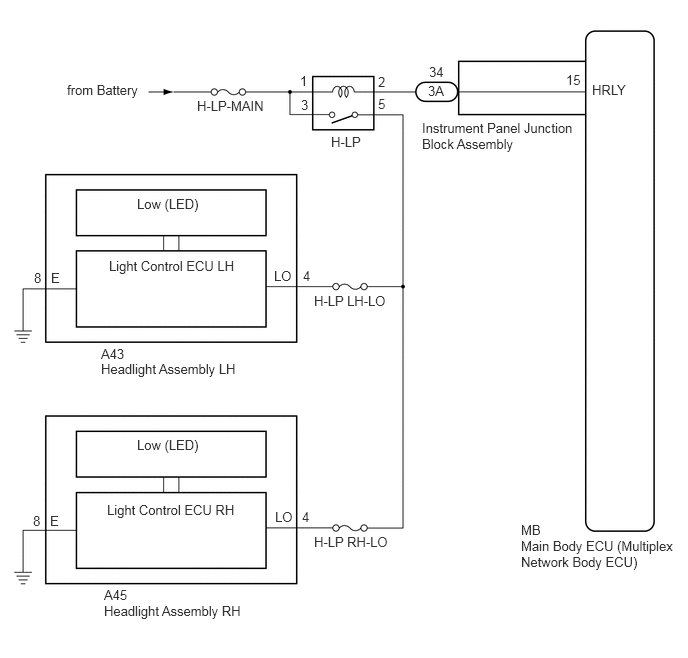
E333940E07
0.698,0.854 1.604,1.167 0.906,0.313 10 false from Battery 2.052,1.021 2.802,1.25 0.75,0.229 10 false H-LP-MAIN 3.448,1.396 4.031,1.615 0.583,0.219 10 false H-LP 4.396,1.25 6.021,1.708 1.625,0.458 10 false Instrument Panel Junction Block Assembly 3.271,3.052 4.146,3.281 0.875,0.229 10 false H-LP LH-LO 3.271,5.563 4.146,5.792 0.875,0.229 10 false H-LP RH-LO 1.052,3.604 1.427,3.802 0.375,0.198 10 false A43 1.052,3.76 2.74,4 1.688,0.24 10 false Headlight Assembly LH 1.083,6.115 1.458,6.313 0.375,0.198 10 false A45 1.083,6.281 2.771,6.521 1.688,0.24 10 false Headlight Assembly RH 2.854,2.792 3.135,3 0.281,0.208 10 false LO 3.156,2.792 3.438,3 0.281,0.208 10 false 4 2.865,5.302 3.146,5.51 0.281,0.208 10 false LO 3.146,5.302 3.427,5.51 0.281,0.208 10 false 4 1.427,2.042 2.24,2.281 0.813,0.24 10 false Low (LED) 1.135,2.688 2.604,2.906 1.469,0.219 10 false Light Control ECU LH 1.115,5.229 2.583,5.448 1.469,0.219 10 false Light Control ECU RH 3.125,0.76 3.354,0.979 0.229,0.219 10 false 1 3.938,0.771 4.167,0.99 0.229,0.219 10 false 2 3.135,1.01 3.365,1.229 0.229,0.219 10 false 3 3.938,1 4.167,1.219 0.229,0.219 10 false 5 4.458,0.865 4.781,1.063 0.323,0.198 10 false 3A 4.469,0.667 4.792,0.865 0.323,0.198 10 false 34 5.896,0.75 6.219,0.948 0.323,0.198 10 false 15 6.167,0.854 6.75,1.073 0.583,0.219 10 false HRLY 5.427,5.438 5.771,5.656 0.344,0.219 10 false MB 5.427,5.604 7.083,6.021 1.656,0.417 10 false Main Body ECU (Multiplex Network Body ECU) 0.521,5.344 0.75,5.552 0.229,0.208 10 false E 0.531,2.813 0.76,3.021 0.229,0.208 10 false E 0.354,2.813 0.583,3.021 0.229,0.208 10 false 8 0.344,5.344 0.573,5.552 0.229,0.208 10 false 8 1.427,4.552 2.24,4.792 0.813,0.24 10 false Low (LED)

CAUTION / NOTICE / HINT

NOTICE:

Inspect the fuses for circuits related to this system before performing the following procedure.


PROCEDURE

1.PERFORM ACTIVE TEST USING GTS
a.

Connect the GTS to the DLC3.


b.

Turn the ignition switch to ON.


c.

Turn the GTS on.


d.

Enter the following menus: Body Electrical / Main Body / Active Test.


e.

Perform the Active Test according to the display on the GTS.

Body Electrical > Main Body > Active Test
Tester Display Measurement Item Control Range Diagnostic Note
Headlight Relay H-LP relay OFF or ON -
Body Electrical > Main Body > Active Test
Tester Display
Headlight Relay
50004 123 14
OK:

Headlight relay operates. (Low beam headlights illuminate.)


Result:
Proceed to
OK
NG


OK

PROCEED TO NEXT SUSPECTED AREA SHOWN IN PROBLEM SYMPTOMS TABLE

NG

2.INSPECT H-LP RELAY
a.

Remove the H-LP relay from the engine room relay block and junction block assembly.


Result:
Proceed to
OK
NG


OK

3.CHECK HARNESS AND CONNECTOR (POWER SOURCE - H-LP RELAY)

NG

REPLACE H-LP RELAY

3.CHECK HARNESS AND CONNECTOR (POWER SOURCE - H-LP RELAY)
a.

Measure the voltage according to the value(s) in the table below.

Standard Voltage:
Tester Connection Condition Specified Condition
1 (H-LP relay terminal) - Body ground Always 11 to 14 V
3 (H-LP relay terminal) - Body ground Always 11 to 14 V


Result:
Proceed to
OK
NG


OK

4.CHECK HARNESS AND CONNECTOR (H-LP RELAY - HEADLIGHT ASSEMBLY)

NG

REPAIR OR REPLACE HARNESS OR CONNECTOR

4.CHECK HARNESS AND CONNECTOR (H-LP RELAY - HEADLIGHT ASSEMBLY)
a.

Disconnect the A43 headlight assembly LH connector.


b.

Disconnect the A45 headlight assembly RH connector.


c.

Measure the resistance according to the value(s) in the table below.

Standard Resistance:
Tester Connection Condition Specified Condition
5 (H-LP relay terminal) - A43-4 (LO) Always Below 1 Ω
5 (H-LP relay terminal) - A45-4 (LO) Always Below 1 Ω
5 (H-LP relay terminal) or A43-4 (LO) - Body ground Always 10 kΩ or higher
5 (H-LP relay terminal) or A45-4 (LO) - Body ground Always 10 kΩ or higher


Result:
Proceed to
OK
NG


OK

5.CHECK HARNESS AND CONNECTOR (H-LP RELAY - INSTRUMENT PANEL JUNCTION BLOCK ASSEMBLY)

NG

REPAIR OR REPLACE HARNESS OR CONNECTOR

5.CHECK HARNESS AND CONNECTOR (H-LP RELAY - INSTRUMENT PANEL JUNCTION BLOCK ASSEMBLY)
a.

Disconnect the 3A instrument panel junction block assembly connector.


b.

Measure the resistance according to the value(s) in the table below.

Standard Resistance:
Tester Connection Condition Specified Condition
2 (H-LP relay terminal) - 3A-34 Always Below 1 Ω
2 (H-LP relay terminal) or 3A-34 - Body ground Always 10 kΩ or higher


Result:
Proceed to
OK
NG


OK

6.INSPECT INSTRUMENT PANEL JUNCTION BLOCK ASSEMBLY

NG

REPAIR OR REPLACE HARNESS OR CONNECTOR

6.INSPECT INSTRUMENT PANEL JUNCTION BLOCK ASSEMBLY
E259586C01
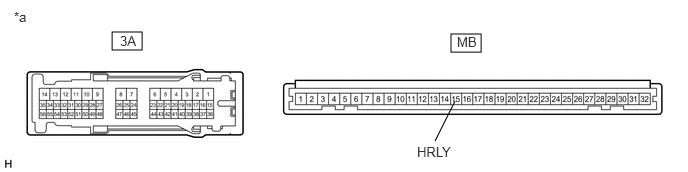
1.167,0.333 1.479,0.521 0.313,0.188 4.698,0.354 5.01,0.542 0.313,0.188 4.531,1.469 4.74,1.052 false 1.25,0.344 1.563,0.542 0.313,0.198 10 false 3A 4.76,0.354 5.073,0.552 0.313,0.198 10 false MB 4.344,1.5 4.958,1.698 0.615,0.198 10 false HRLY 0.146,0.094 0.458,0.292 0.313,0.198 10 false *a
*a Component without harness connected
(Instrument Panel Junction Block Assembly)
- -


a.

Remove the instrument panel junction block assembly.

Click herePower Source / Network>POWER DISTRIBUTION>MAIN BODY ECU>REMOVAL


b.

Remove the main body ECU (multiplex network body ECU) from the instrument panel junction block assembly.


c.

Measure the resistance according to the value(s) in the table below.

Standard Resistance:
Tester Connection Condition Specified Condition
3A-34 - MB-15 (HRLY) Always Below 1 Ω


Result:
Proceed to
OK
NG


OK

REPLACE MAIN BODY ECU (MULTIPLEX NETWORK BODY ECU)

NG

REPLACE INSTRUMENT PANEL JUNCTION BLOCK ASSEMBLY