LIGHTING (EXT) AUTOMATIC HEADLIGHT BEAM LEVEL CONTROL SYSTEM INITIALIZATION
- NOTICE:
- ·
Make sure to initialize the headlight leveling ECU assembly if it has been replaced.
·Initialize the headlight leveling ECU assembly (set the zero point of the height control sensor in the headlight leveling ECU assembly) after the vehicle height has changed due to replacement of suspension components or after performing operations such as removal and reinstallation or replacement of the rear height control sensor sub-assembly.
·Adjust the headlight aim after initializing the headlight leveling ECU assembly.
Click hereVehicle Exterior>LIGHTING (EXT)>HEADLIGHT ASSEMBLY(for LED Headlight)>ADJUSTMENT
·When a malfunction is detected in the automatic headlight beam level control system, height control sensor signal initialization is impossible. Perform troubleshooting before initialization.
HEADLIGHT LEVELING ECU ASSEMBLY INITIALIZATION PROCEDURE
Prepare vehicle for initialization
Unload the trunk and vehicle, ensuring that the spare tire, tools and jack are in their original positions.
Check that there are no occupants in the vehicle.
Turn off the headlights.
Stop the vehicle on a level surface and keep the vehicle height unchanged.
Check the display of "Headlight System Malfunction Visit Your Dealer" on the multi-information display
Turn the ignition switch to ON, and check the warning message.
- OK:
Condition Specified Condition The headlight leveling ECU assembly has been replaced with a new one. "Headlight System Malfunction Visit Your Dealer" repeatedly blinks 6 times at 2 Hz on the multi-information display. Replacement of the rear height control sensor sub-assembly, removal and reinstallation of the rear height control sensor sub-assembly, replacement of the suspension, etc. have been performed. "Headlight System Malfunction Visit Your Dealer" is not displayed on the multi-information display.
Initialization
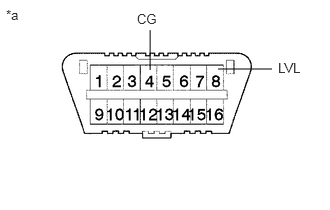
| *a | DLC3 |
Connect SST to terminals 4 (CG) and 8 (LVL) of the DLC3.
- SST
- 09843-18040
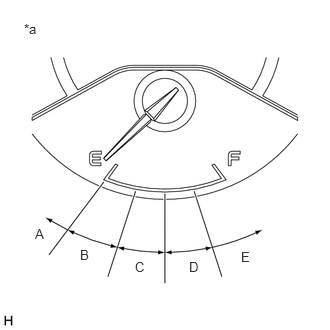
| *a | Fuel Receiver Gauge |
Turn the low beam headlights on and off using the light control switch within 20 seconds after connecting the terminals.
- HINT:
-
The number of times the low beam headlights need to be turned on and off is determined by the present fuel level as shown below.
Fuel Level Number of Times to Turn Low Beam Headlights On and Off Fuel level is within A range. 1 Fuel level is within B range. 2 Fuel level is within C range. 3 Fuel level is within D range. 4 Fuel level is within E range. 5
- NOTICE:
- ·
Turn the low beam headlights on and off at an interval of less than 3-seconds.
·Be sure to operate the light control switch from outside the vehicle.
Check the display of "Headlight System Malfunction Visit Your Dealer" on the multi-information display.
- Standard:
Condition Specified Condition The headlight leveling ECU assembly has been replaced with a new one. Blinks 6 times at 2 Hz → Repeatedly blinks N* times at 2 Hz. Replacement of the rear height control sensor sub-assembly, removal and reinstallation of the rear height control sensor sub-assembly, replacement of the suspension, etc. have been performed. Off → Repeatedly blinks N* times at 2 Hz.
- HINT:
- ·
*: The number of times that "Headlight System Malfunction Visit Your Dealer" blinks on the multi-information display is determined by the number of times the low beam headlights are turned on and off.
·If initialization does not finish normally, disconnect SST from the DLC3 and turn the ignition switch off. Then, restart initialization from step 1.
Check that initialization has finished normally and turn the ignition switch off.