1ZR-FE ENGINE MECHANICAL ENGINE UNIT DISASSEMBLY
PROCEDURE

 12108
1.REMOVE OIL FILLER CAP SUB-ASSEMBLY
12108
1.REMOVE OIL FILLER CAP SUB-ASSEMBLY
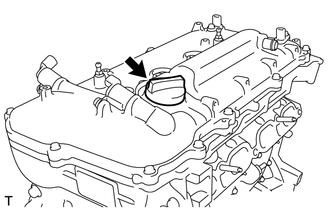
Remove the oil filler cap sub-assembly from the cylinder head cover sub-assembly.
12108A
2.REMOVE OIL FILLER CAP GASKET
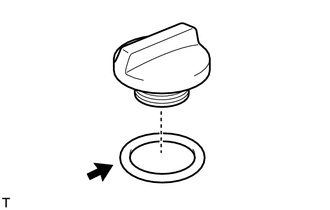
Remove the oil filler cap gasket from the oil filler cap sub-assembly.
12635
3.REMOVE ENGINE COVER JOINT
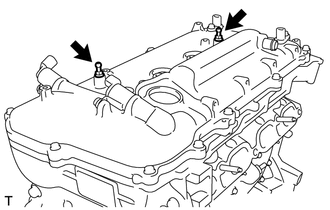
Remove the 2 engine cover joints from the cylinder head cover sub-assembly.
19100P
4.REMOVE SPARK PLUG
11101W
5.REMOVE CAMSHAFT POSITION SENSOR
11101J
6.REMOVE CAMSHAFT TIMING OIL CONTROL VALVE ASSEMBLY (for Exhaust Side)
11101J
7.REMOVE CAMSHAFT TIMING OIL CONTROL VALVE ASSEMBLY (for Intake Side)
11401G
8.REMOVE CRANKSHAFT POSITION SENSOR
83530
9.REMOVE ENGINE OIL PRESSURE SWITCH ASSEMBLY
89615
10.REMOVE KNOCK CONTROL SENSOR
89422
11.REMOVE ENGINE COOLANT TEMPERATURE SENSOR
11201
12.REMOVE CYLINDER HEAD COVER SUB-ASSEMBLY
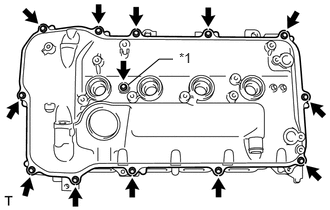
| *1 | Seal Washer |
Remove the 13 bolts, seal washer and cylinder head cover sub-assembly from the camshaft housing sub-assembly.
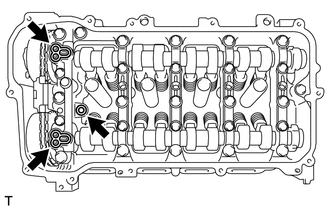
Remove the 3 gaskets from the camshaft bearing cap.
- NOTICE:
-
As gaskets may stick to the cylinder head cover sub-assembly, be careful not to drop any of the gaskets into the engine when removing the cylinder head cover sub-assembly.
11213
13.REMOVE CYLINDER HEAD COVER GASKET
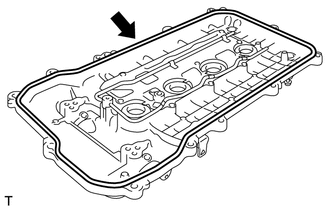
Remove the cylinder head cover gasket from the cylinder head cover sub-assembly.
11193
14.REMOVE SPARK PLUG TUBE GASKET
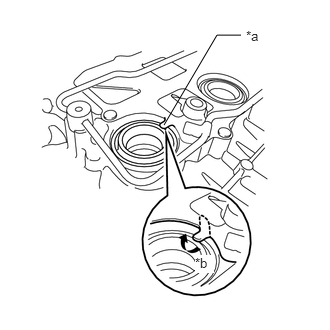
| *a | Ventilation Baffle Plate |
| *b | Pry up |
Pry up the 4 claws of the ventilation baffle plate.
- NOTICE:
-
Do not deform the claws of the ventilation baffle plate more than necessary.
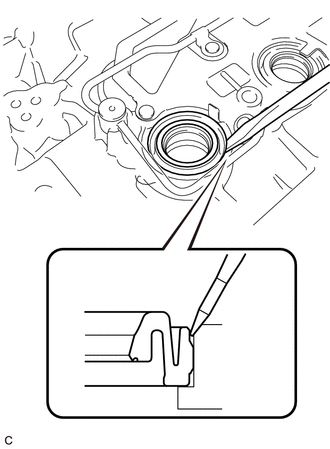
Using a screwdriver as shown in the illustration, deform each spark plug tube gasket inwards and remove the 4 spark plug tube gaskets from the cylinder head cover sub-assembly.
- NOTICE:
- ·
As much as possible prevent the spark plug tube gaskets from being deformed.
The removed spark plug tube gaskets will be used when reinstalling the new spark plug tube gaskets.
·Do not damage the cylinder head cover sub-assembly.
·Make sure not to damage the spark plug tube gasket and cylinder head cover sub-assembly when inserting the screwdriver in the joint area.
- HINT:
-
If the cylinder head cover sub-assembly is damaged, smooth the surface with 400-grit sandpaper.
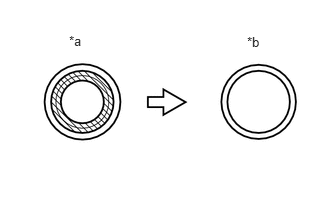
| *a | Before cutting off |
| *b | After cutting off |

|
Area to be cut off |
Using a cutter, cut off the sealing part of the removed spark plug tube gasket.
15620
15.REMOVE OIL FILTER CAP ASSEMBLY
16.SET NO. 1 CYLINDER TO TDC/COMPRESSION
13471
17.REMOVE CRANKSHAFT PULLEY
13540
18.REMOVE NO. 1 CHAIN TENSIONER ASSEMBLY
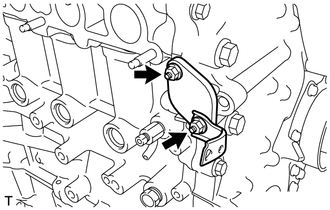
Remove the 2 nuts, bracket, No. 1 chain tensioner assembly and gasket.
- NOTICE:
-
Do not turn the crankshaft without the No. 1 chain tensioner assembly installed.
11302
19.REMOVE TIMING CHAIN COVER SUB-ASSEMBLY
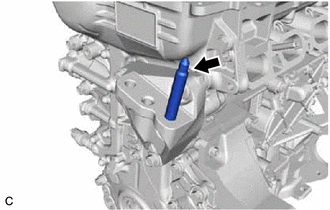
Remove the stud bolt from the engine mounting bracket RH.
- NOTICE:
-
If a stud bolt is deformed or its threads are damaged, replace it.
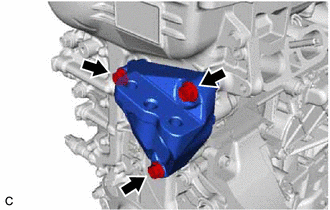
Remove the 3 bolts and engine mounting bracket RH from the timing chain cover sub-assembly.
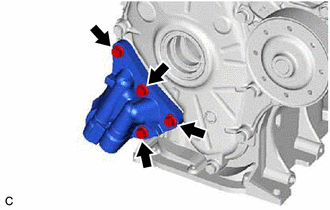
Remove the 4 bolts and oil filter bracket from the timing chain cover sub-assembly.
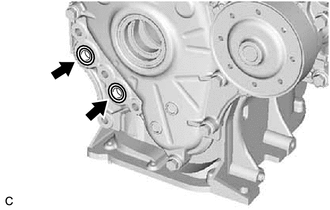
Remove the 2 O-rings from the timing chain cover sub-assembly.
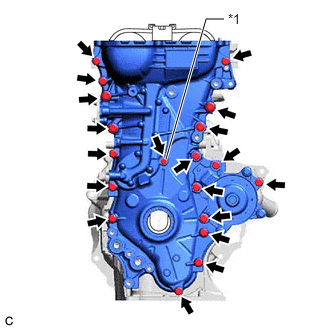
| *1 | Seal Washer |
Remove the 19 bolts and seal washer.
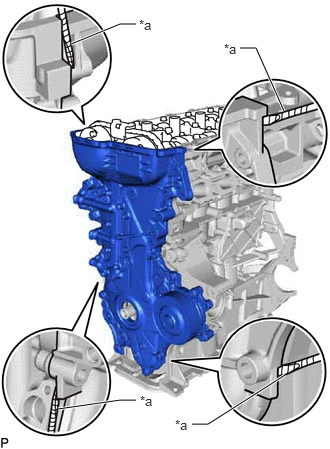
| *a | Protective Tape |
Remove the timing chain cover sub-assembly by prying between the timing chain cover sub-assembly and cylinder head sub-assembly or cylinder block sub-assembly with a screwdriver as shown in the illustration.
- NOTICE:
-
Be careful not to damage the contact surfaces of the cylinder head sub-assembly, camshaft housing sub-assembly, cylinder block sub-assembly, stiffening crankcase assembly and timing chain cover sub-assembly.
- HINT:
-
Tape the screwdriver tip before use.
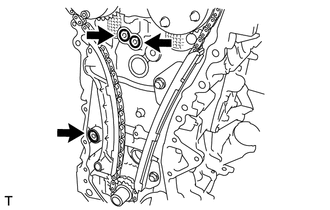
Remove the O-ring from the cylinder block sub-assembly.
Remove the 2 O-rings from the cylinder head sub-assembly.
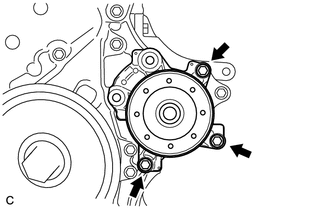
Remove the 3 bolts and engine water pump assembly from the timing chain cover sub-assembly.
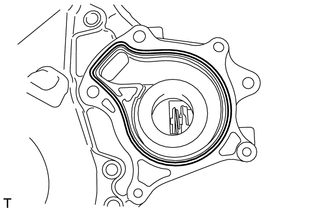
Remove the water pump gasket from the timing chain cover sub-assembly.
11302A
20.REMOVE TIMING CHAIN COVER OIL SEAL
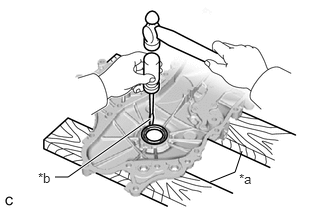
| *a | Wooden Block |
| *b | Protective Tape |
Place the timing chain cover sub-assembly on wooden blocks.
Using a screwdriver, tap out the timing chain cover oil seal.
- NOTICE:
-
Do not damage the surface of the timing chain cover oil seal press fit hole.
- HINT:
-
Tape the screwdriver tip before use.
21.REMOVE WATER INLET HOUSING STUD BOLT
- NOTICE:
-
If a water inlet housing stud bolt is deformed or its threads are damaged, replace it.
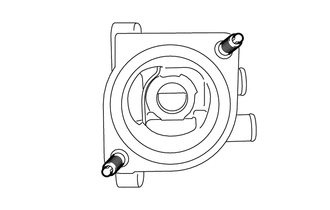
Using an E5 "TORX" socket wrench, remove the 2 water inlet housing stud bolts.
16323
22.REMOVE WATER INLET HOUSING
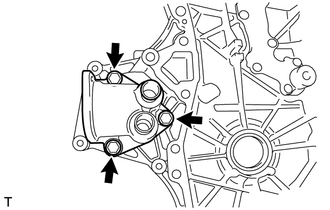
Remove the 3 bolts, gasket and water inlet housing from the timing chain cover sub-assembly.
12511
23.REMOVE NO. 1 GENERATOR BRACKET
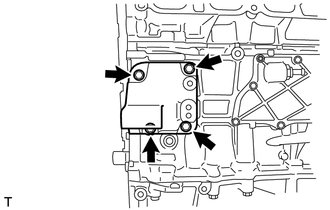
Remove the 4 bolts and No. 1 generator bracket from the cylinder block sub-assembly.
13562
24.REMOVE NO. 2 CHAIN VIBRATION DAMPER
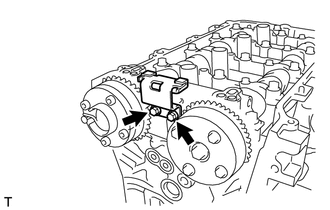
Remove the 2 bolts and No. 2 chain vibration damper from the camshaft bearing cap.
13559
25.REMOVE CHAIN TENSIONER SLIPPER
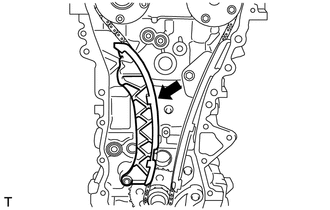
Remove the chain tensioner slipper from the cylinder block sub-assembly.
13561
26.REMOVE NO. 1 CHAIN VIBRATION DAMPER
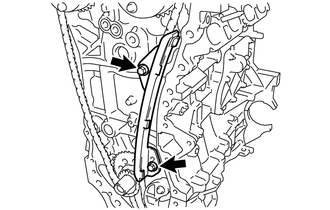
Remove the 2 bolts and No. 1 chain vibration damper.
13506
27.REMOVE CHAIN SUB-ASSEMBLY
13521
28.REMOVE CRANKSHAFT TIMING SPROCKET
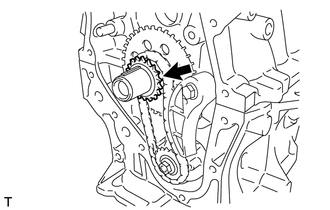
Remove the crankshaft timing sprocket from the crankshaft.
13507
29.REMOVE NO. 2 CHAIN SUB-ASSEMBLY
Temporarily install the crankshaft pulley with the crankshaft pulley set bolt.
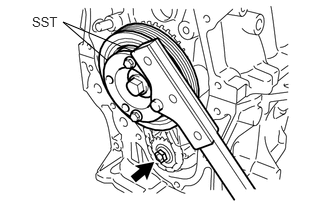
Using SST, hold the crankshaft pulley. Then remove the oil pump drive shaft gear nut.
- SST
- 09213-54015 09330-00021
- HINT:
-
Part number of installation bolt for SST (crankshaft pulley holding tool): 91551-00850 (quantity: 2)
Remove SST, the crankshaft pulley set bolt and crankshaft pulley.
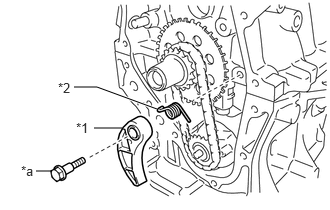
| *1 | Chain Tensioner Plate |
| *2 | Chain Damper Spring |
| *a | Bolt |
Remove the bolt, chain tensioner plate and chain damper spring.
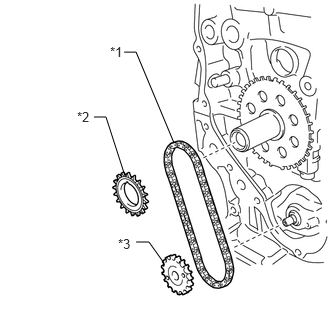
| *1 | No. 2 Chain Sub-assembly |
| *2 | Oil Pump Drive Gear |
| *3 | Oil Pump Drive Shaft Gear |
Remove the oil pump drive gear, oil pump drive shaft gear and No. 2 chain sub-assembly.
19315
30.REMOVE NO. 1 CRANKSHAFT POSITION SENSOR PLATE
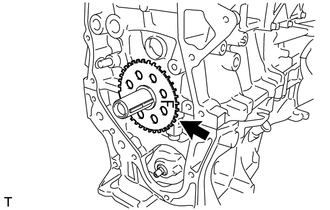
Remove the No. 1 crankshaft position sensor plate.
13521A
31.REMOVE CRANKSHAFT TIMING GEAR KEY
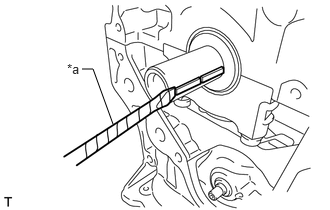
| *a | Protective Tape |
Using a screwdriver, remove the 2 crankshaft timing gear keys.
- HINT:
-
Tape the screwdriver tip before use.
13050
32.REMOVE CAMSHAFT TIMING GEAR ASSEMBLY
Check the lock of the camshaft timing gear assembly.
Release the lock pin.
- NOTICE:
-
Before removing the camshaft timing gear assembly, make sure that the lock pin has been released.
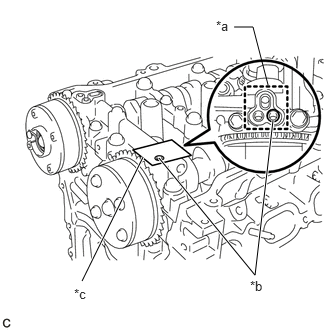
| *a | Adhesive Tape Sealing Area |
| *b | Make a Hole |
| *c | Adhesive Tape |
After cleaning the intake side VVT oil hole in the camshaft bearing cap, completely seal the oil hole with adhesive tape or equivalent as shown in the illustration to prevent air from leaking.
- NOTICE:
-
Be sure to cover the oil hole completely because air leaks due to insufficient sealing will prevent the lock pin from being released.
Make a hole in the adhesive tape covering the oil hole as shown in the illustration. (Procedure A)
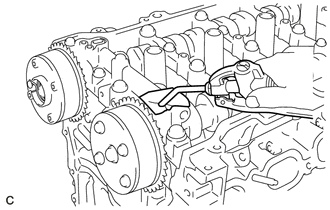
Apply approximately 150 kPa (1.5 kgf/cm2, 22 psi) of air pressure to the hole pricked in procedure (A) to release the lock pin.
- NOTICE:
- ·
If air leaks out, reattach the adhesive tape.
·Cover the oil hole with a piece of cloth when applying air pressure to prevent oil from spraying.
·Do not lock the camshaft timing gear assembly. If it is locked, release the lock pin again.
- HINT:
- ·
Depending on the air pressure applied, the camshaft timing gear assembly may turn in the advance direction without assistance by hand.
·If enough air pressure cannot be applied because of air leakage from the port, releasing the lock pin may be difficult.
Remove the adhesive tape from the camshaft bearing cap.
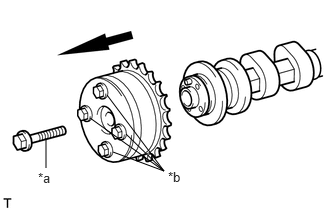
| *a | Bolt |
| *b | Do not remove |
Remove the bolt while holding the hexagonal portion of the camshaft, and then remove the camshaft timing gear assembly.
- NOTICE:
- ·
Do not remove the other 4 bolts.
·Keep the camshaft timing gear assembly horizontal while removing it from the camshaft.
13070A
33.REMOVE CAMSHAFT TIMING EXHAUST GEAR ASSEMBLY
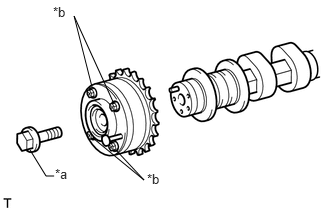
| *a | Bolt |
| *b | Do not remove |
Remove the bolt while holding the hexagonal portion of the No. 2 camshaft, then remove the camshaft timing exhaust gear assembly.
- NOTICE:
- ·
Do not remove the other 4 bolts.
·Keep the camshaft timing exhaust gear assembly horizontal while removing it from the No. 2 camshaft.
34.REMOVE CAMSHAFT BEARING CAP
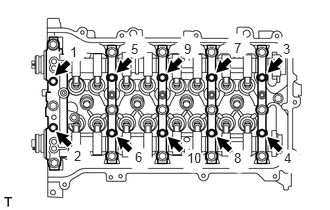
Uniformly loosen and remove the 10 bolts in the order shown in the illustration.
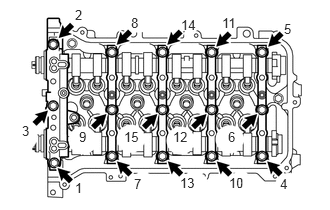
Uniformly loosen and remove the 15 bolts in the order shown in the illustration.
- NOTICE:
-
Uniformly loosen the bolts while keeping the camshaft and No. 2 camshaft level.
Remove the 5 camshaft bearing caps.
- HINT:
-
Arrange the removed parts in the correct order.
13511
35.REMOVE CAMSHAFT
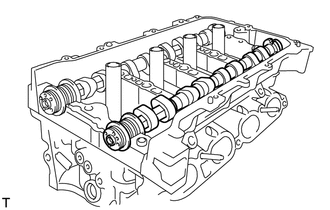
Remove the camshaft from the camshaft housing sub-assembly.
13512
36.REMOVE NO. 2 CAMSHAFT
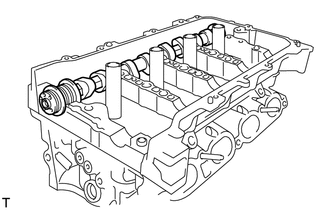
Remove the No. 2 camshaft from the camshaft housing sub-assembly.
13801
37.REMOVE NO. 1 VALVE ROCKER ARM SUB-ASSEMBLY
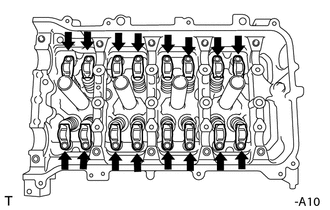
Remove the 16 No. 1 valve rocker arm sub-assemblies.
- HINT:
-
Arrange the removed parts in the correct order.
13750
38.REMOVE VALVE LASH ADJUSTER ASSEMBLY
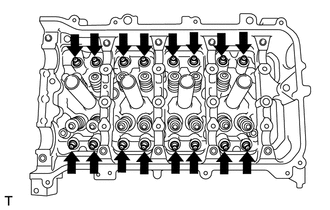
Remove the 16 valve lash adjuster assemblies from the cylinder head sub-assembly.
- HINT:
-
Arrange the removed parts in the correct order.
15678A
39.REMOVE OIL CONTROL VALVE FILTER
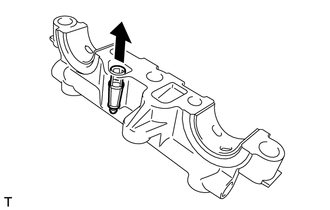
Remove the oil control valve filter from the camshaft bearing cap.
11811
40.REMOVE NO. 1 CAMSHAFT BEARING
11821
41.REMOVE NO. 2 CAMSHAFT BEARING
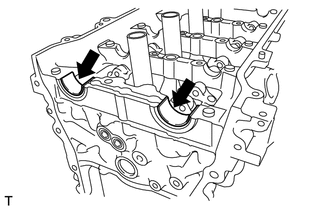
Remove the 2 No. 2 camshaft bearings from the camshaft housing sub-assembly.
- NOTICE:
-
Arrange the removed parts in the correct order.
11103
42.REMOVE CAMSHAFT HOUSING SUB-ASSEMBLY
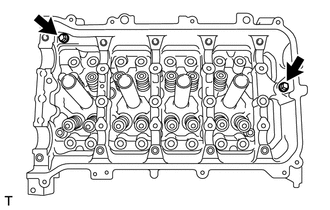
Remove the 2 bolts.
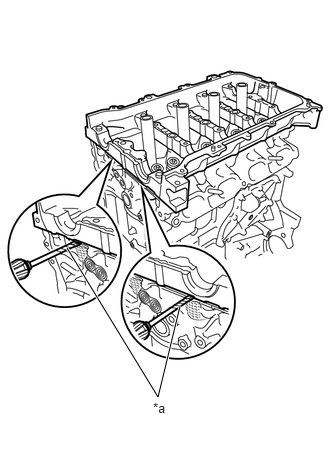
| *a | Protective Tape |
Remove the camshaft housing sub-assembly by prying between the cylinder head sub-assembly and camshaft housing sub-assembly with a screwdriver.
- NOTICE:
-
Be careful not to damage the contact surfaces of the cylinder head sub-assembly and camshaft housing sub-assembly.
- HINT:
-
Tape the screwdriver tip before use.
11101
43.REMOVE CYLINDER HEAD SUB-ASSEMBLY
11115
44.REMOVE CYLINDER HEAD GASKET
12204
45.REMOVE PCV VALVE (VENTILATION VALVE SUB-ASSEMBLY)
12101A
46.REMOVE OIL PAN DRAIN PLUG
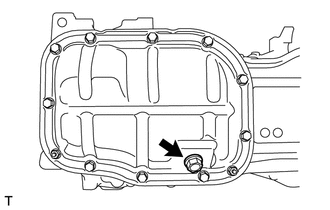
Remove the oil pan drain plug and gasket.
12102A
47.REMOVE NO. 2 OIL PAN SUB-ASSEMBLY
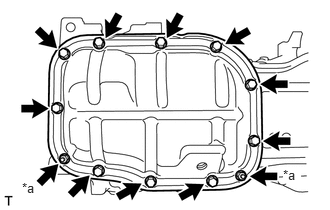
| *a | Nut |
Remove the 10 bolts and 2 nuts.
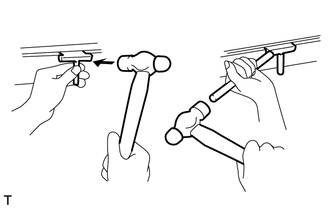
Insert the blade of an oil pan seal cutter between the stiffening crankcase assembly and No. 2 oil pan sub-assembly. Cut through the applied sealer and remove the No. 2 oil pan sub-assembly.
- NOTICE:
-
Be careful not to damage the contact surfaces of the stiffening crankcase assembly and No. 2 oil pan sub-assembly.
15100
48.REMOVE OIL PUMP ASSEMBLY
11420
49.REMOVE STIFFENING CRANKCASE ASSEMBLY
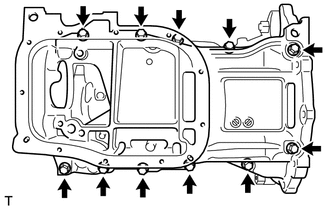
Uniformly loosen and remove the 11 bolts.
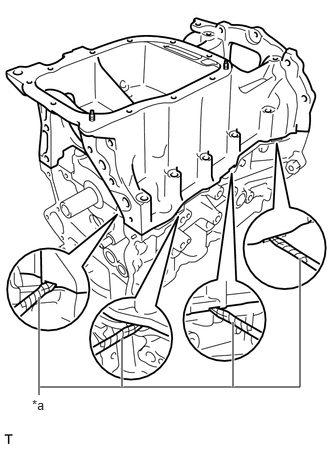
| *a | Protective Tape |
Using a screwdriver, remove the stiffening crankcase assembly by prying between the stiffening crankcase assembly and cylinder block sub-assembly.
- NOTICE:
-
Be careful not to damage the contact surfaces of the stiffening crankcase assembly and cylinder block sub-assembly.
- HINT:
-
Tape the screwdriver tip before use.
11432A
50.REMOVE NO. 1 TAPER SCREW PLUG
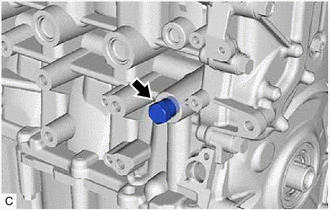
Remove the No. 1 taper screw plug.
51.REMOVE STIFFENING CRANKCASE RING PIN
- NOTICE:
-
It is not necessary to remove a stiffening crankcase ring pin unless it is being replaced.
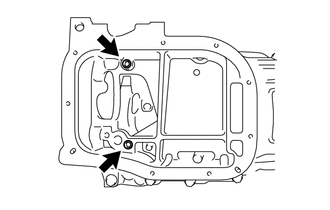
Remove the 2 stiffening crankcase ring pins from the stiffening crankcase assembly.
52.REMOVE STIFFENING CRANKCASE STUD BOLT
- NOTICE:
-
If a stiffening crankcase stud bolt is deformed or the threads are damaged, replace it.
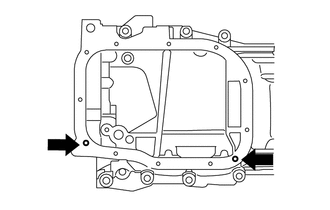
Using an E6 "TORX" socket wrench, remove the 2 stiffening crankcase stud bolts from the stiffening crankcase assembly.
11401L
53.REMOVE REAR ENGINE OIL SEAL
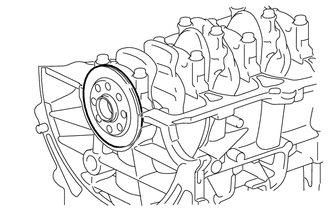
Remove the rear engine oil seal from the cylinder block sub-assembly.