K313 CVT CONTINUOUSLY VARIABLE TRANSAXLE ASSEMBLY REMOVAL
CAUTION / NOTICE / HINT
- CAUTION:
-
The engine assembly with continuously variable transaxle assembly is very heavy. Be sure to follow the procedure described in the repair manual, or the engine lifter may suddenly drop.
PROCEDURE

 11361J
1.REMOVE FLYWHEEL HOUSING UNDER COVER
11361J
1.REMOVE FLYWHEEL HOUSING UNDER COVER
32101G
2.REMOVE DRIVE PLATE AND TORQUE CONVERTER ASSEMBLY SETTING BOLT
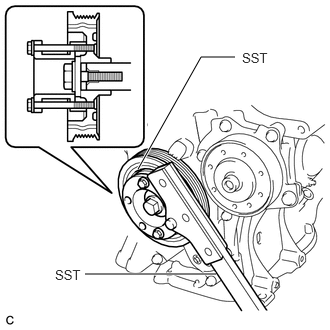
Using SST, hold the crankshaft pulley.
- SST
- 09213-54015
09330-00021
- HINT:
-
Part number of installation bolt for SST (crankshaft pulley holding tool): 91551-00850 (quantity: 2)
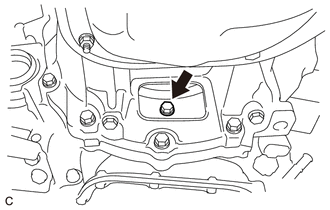
Remove the 6 drive plate and torque converter assembly setting bolts.
51201
3.REMOVE FRONT SUSPENSION CROSSMEMBER SUB-ASSEMBLY
51204A
4.REMOVE CENTER ENGINE MOUNTING MEMBER SUB-ASSEMBLY
5.REMOVE ENGINE ASSEMBLY WITH TRANSAXLE
12361A
6.REMOVE FRONT ENGINE MOUNTING INSULATOR
12371A
7.REMOVE REAR ENGINE MOUNTING INSULATOR
8.REMOVE WIRE HARNESS CLAMP BRACKET
9.INSTALL ENGINE HANGER
16282
10.DISCONNECT NO. 5 WATER BY-PASS HOSE
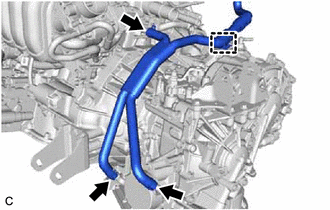
Disengage the clamp.
Slide the 3 clips and disconnect the No. 5 water by-pass hose from the transmission oil cooler and engine assembly.
82121
11.DISCONNECT ENGINE WIRE
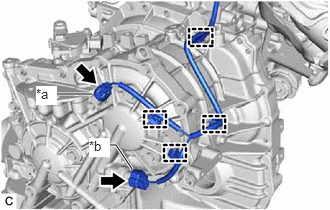
| *a | Transmission Revolution Sensor (NOUT) Connector |
| *b | Oil Pressure Sensor Connector |
Disconnect the transmission revolution sensor (NOUT) connector.
Disconnect the oil pressure sensor connector.
Disengage the 4 clamps.
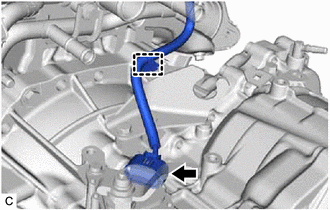
Disconnect the park/neutral position switch assembly connector.
Disengage the clamp.
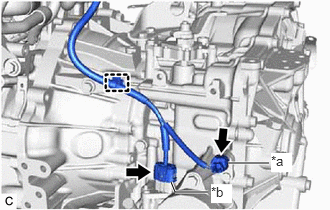
| *a | Transmission Revolution Sensor (NIN) Connector |
| *b | Transmission Wire Connector |
Disconnect the transmission revolution sensor (NIN) connector.
Disconnect the transmission wire connector.
Disengage the clamp.
11363A
12.REMOVE FLYWHEEL HOUSING SIDE COVER
28100
13.REMOVE STARTER ASSEMBLY
30400
14.REMOVE CONTINUOUSLY VARIABLE TRANSAXLE ASSEMBLY
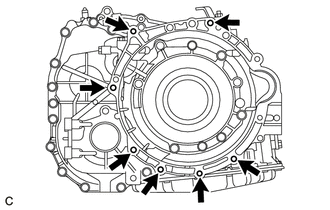
Remove the 7 bolts and continuously variable transaxle assembly from the engine assembly.
- NOTICE:
-
To prevent damaging the 2 knock pins, do not pry between the continuously variable transaxle assembly and engine assembly.
32000A
15.REMOVE TORQUE CONVERTER ASSEMBLY
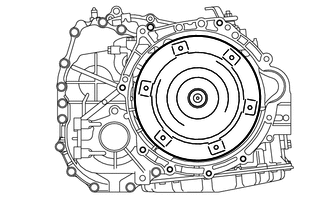
Remove the torque converter assembly from the continuously variable transaxle assembly.
- NOTICE:
-
Remove the torque converter assembly from the input shaft horizontally.
30400E
16.REMOVE CVT OIL PUMP TYPE T OIL SEAL
- CAUTION:
- ·
Do not remove the front oil pump assembly from the CVT main body, as there is a possibility of the entry of dust and foreign matter.
·Clean the work area, the tools to be used, and other equipment, etc. thoroughly before the operation, as there is the possibility that a CVT malfunction, which may prevent the vehicle from being driven, may occur if dust or fine foreign matter enters the CVT.
·Do not use cotton work gloves, cloths, paper towels, etc. that may produce lint, dust or foreign matter.
·Perform the operation as quickly as possible, as dust and foreign matter may enter the CVT while the torque converter assembly is not attached to it.
·Do not use an air gun until the torque converter assembly has been installed, as it may cause dust and foreign matter to be stirred up.
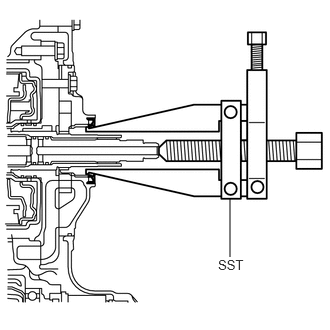
Clean the tips of both the claws of SST and the center bolt.
Using SST, remove the CVT oil pump type T oil seal from the continuously variable transaxle assembly.
- SST
- 09308-10010
- NOTICE:
-
Pay attention to the angle of the claws when opening them, and ensure that they do not come into contact with the oil pump housing, as there is the possibility that metal particles may be produced if they do.
33823
17.REMOVE NO. 1 TRANSMISSION CONTROL CABLE BRACKET
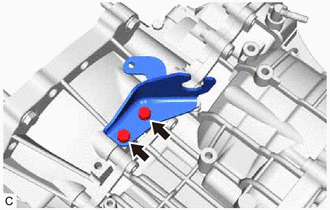
Remove the 2 bolts and No. 1 transmission control cable bracket from the continuously variable transaxle assembly.
12311A
18.REMOVE FRONT ENGINE MOUNTING BRACKET
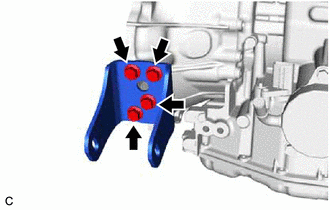
Remove the 4 bolts and front engine mounting bracket from the continuously variable transaxle assembly.
12321A
19.REMOVE REAR ENGINE MOUNTING BRACKET
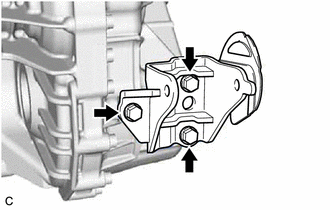
Remove the 3 bolts and rear engine mounting bracket from the continuously variable transaxle assembly.
12325A
20.REMOVE ENGINE MOUNTING BRACKET LH
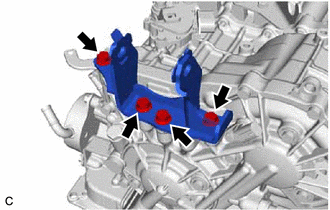
Remove the 4 bolts and engine mounting bracket LH from the continuously variable transaxle assembly.
21.REMOVE WIRE HARNESS CLAMP BRACKET
Remove the water by-pass hose clamp from the water by-pass hose clamp bracket.
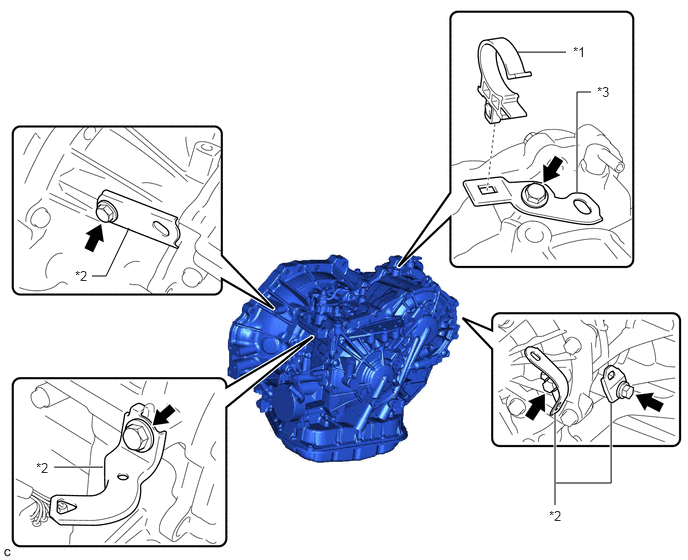
| *1 | Water By-pass Hose Clamp | *2 | Wire Harness Clamp Bracket |
| *3 | Water By-pass Hose Clamp Bracket | - | - |
Remove the 5 bolts, 4 wire harness clamp brackets and water by-pass hose clamp bracket from the continuously variable transaxle assembly.
22.REMOVE WITH HEAD STRAIGHT SCREW PLUG
- HINT:
-
Perform this procedure only when replacement of the with head straight screw plug is necessary.
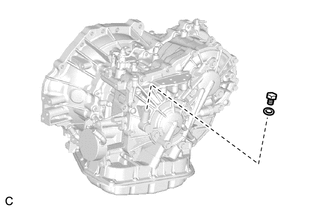
Remove the with head straight screw plug and gasket from the continuously variable transaxle assembly.
35012B
23.REMOVE BREATHER PLUG HOSE
- HINT:
-
Perform this procedure only when replacement of the breather plug hose is necessary.
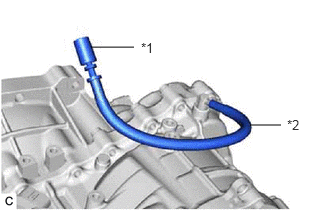
| *1 | No. 1 Breather Plug (CVT) |
| *2 | Breather Plug Hose |
Remove the breather plug hose with the No. 1 breather plug (CVT) from the continuously variable transaxle assembly.
Remove the No. 1 breather plug (CVT) from the breather plug hose.
32000A
24.INSPECT TORQUE CONVERTER ASSEMBLY
25.INSPECT DRIVE PLATE