EXTERIOR PANELS / TRIM FRONT DOOR BELT MOULDING REMOVAL
CAUTION / NOTICE / HINT
- HINT:
- ·
Use the same procedure for the RH side and LH side.
·The following procedure is for the LH side.
PROCEDURE

 1.REMOVE OUTER REAR VIEW MIRROR
- HINT:
-
The following procedure is for the RH side.
-
Click hereVehicle Exterior>MIRROR (EXT)>OUTER REAR VIEW MIRROR>REMOVAL
67832
2.REMOVE FRONT DOOR SERVICE HOLE COVER
- HINT:
-
The following procedure is for the RH side.
-
Click hereVehicle Exterior>DOOR / HATCH>FRONT DOOR>DISASSEMBLY
68102
3.REMOVE FRONT DOOR GLASS SUB-ASSEMBLY
- HINT:
-
The following procedure is for the RH side.
-
Click hereVehicle Exterior>DOOR / HATCH>FRONT DOOR>DISASSEMBLY
75720
4.REMOVE FRONT DOOR BELT MOULDING ASSEMBLY
for Resin Type:
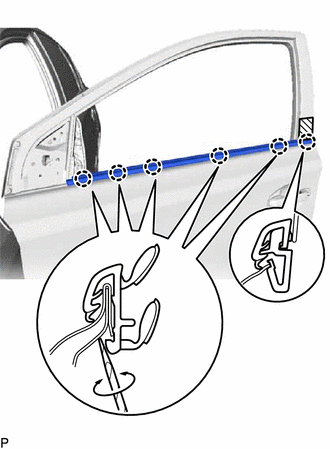

|
Protective Tape |
Apply protective tape around the front door belt moulding assembly as shown in the illustration.
Using a screwdriver with its tip wrapped with protective tape, disengage the 6 claws as shown in the illustration and remove the front door belt moulding assembly.
for Plating Type:
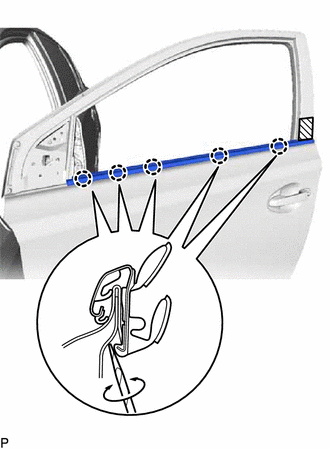
|
|
Protective Tape |
Apply protective tape around the front door belt moulding assembly as shown in the illustration.
Using a screwdriver with its tip wrapped with protective tape, disengage the 5 claws as shown in the illustration and remove the front door belt moulding assembly.