WINDOW / GLASS POWER WINDOW REGULATOR MOTOR(for Rear Door) REMOVAL
CAUTION / NOTICE / HINT
- HINT:
- ·
Use the same procedure for the RH side and LH side.
·The following procedure is for the RH side.
PROCEDURE

 1. PRECAUTION
- NOTICE:
-
After turning the ignition switch off, waiting time may be required before disconnecting the cable from the negative (-) battery terminal. Therefore, make sure to read the disconnecting the cable from the negative (-) battery terminal notices before proceeding with work.
-
Click hereGeneral>INTRODUCTION>REPAIR INSTRUCTION>PRECAUTION
2.DISCONNECT CABLE FROM NEGATIVE BATTERY TERMINAL
- NOTICE:
-
When disconnecting the cable, some systems need to be initialized after the cable is reconnected.
-
Click hereGeneral>INTRODUCTION>REPAIR INSTRUCTION>INITIALIZATION
74250
3.REMOVE REAR ARMREST ASSEMBLY
4.REMOVE REAR POWER WINDOW REGULATOR SWITCH ASSEMBLY WITH REAR DOOR ARMREST BASE PANEL
67603
5.REMOVE REAR DOOR TRIM BOARD SUB-ASSEMBLY
68173B
6.REMOVE REAR DOOR INNER GLASS WEATHERSTRIP
67841B
7.REMOVE REAR DOOR SERVICE HOLE COVER
67871
8.DISCONNECT REAR DOOR WEATHERSTRIP
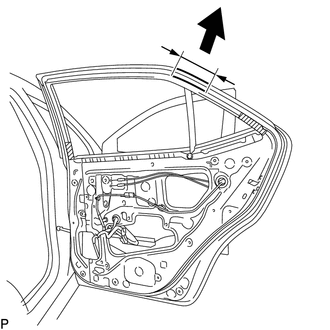
Disconnect the rear door weatherstrip as shown in the illustration.
68142C
9.REMOVE REAR DOOR GLASS RUN
67847B
10.REMOVE NO. 1 REAR DOOR VENT SEAL
67407H
11.REMOVE REAR DOOR WINDOW DIVISION BAR SUB-ASSEMBLY
68123B
12.REMOVE REAR DOOR QUARTER WINDOW GLASS
68103
13.REMOVE REAR DOOR GLASS SUB-ASSEMBLY
14.REMOVE REAR DOOR WINDOW REGULATOR ASSEMBLY
85710F
15.REMOVE REAR POWER WINDOW REGULATOR MOTOR ASSEMBLY