THEFT DETERRENT / KEYLESS ENTRY SMART ENTRY AND START SYSTEM(for Entry Function) TERMINALS OF ECU
CHECK CERTIFICATION ECU (SMART KEY ECU ASSEMBLY)
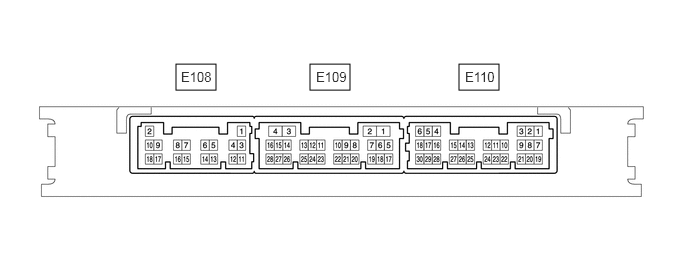
Disconnect the E108 certification ECU (smart key ECU assembly) connector.
Measure the voltage and resistance according to the value(s) in the table below.
- HINT:
-
Measure the values on the wire harness side with the connector disconnected.
| Tester Connection | Input/Output | Wiring Color | Terminal Description | Condition | Specified Condition | Related Data List Item |
|---|---|---|---|---|---|---|
| E108-11 (E) - Body ground | - | W-B - Body ground | Ground | Always | Below 1 Ω | - |
| E108-2 (+B) - E108-11 (E) | Input | L - W-B | +B power supply | Always | 11 to 14 V | - |
| E108-10 (CUTB) - E108-11 (E) | Input | LG - W-B | Dark current cut pin* | Always | 11 to 14 V | - |
*: In order to prevent the vehicle battery from being depleted when the vehicle is shipped long distances, a fuse that cuts unnecessary electrical load while the vehicle is being shipped is set in the circuit. If the fuse is removed, the circuit becomes open. If the fuse that is between the vehicle battery and terminal CUTB is removed and the circuit is open, the certification ECU (smart key ECU assembly) changes to a certain control mode (example: the transmission of radio waves every 0.25 seconds, which form the detection area, stops).
If the result is not as specified, there may be a malfunction on the wire harness side or the fuse is removed.
Reconnect the E108 certification ECU (smart key ECU assembly) connector.
Measure the voltage and check for pulses according to the value(s) in the table below.
| Tester Connection | Input/Output | Wiring Color | Terminal Description | Condition | Specified Condition | Related Data List Item |
|---|---|---|---|---|---|---|
| E110-5 (IG) - E108-11 (E) | Input | GR - W-B | GR power supply | Engine switch off → on (IG) | Below 1 V → 11 to 14 V | Ignition Switch |
| E110-12 (CLG1) - E108-11 (E) | Output | R - W-B | Output to driver door electrical key antenna
(request signal (challenge) is sent to door electrical key antenna from certification ECU (smart key ECU assembly) to form detection area) |
Procedure:
1.
Engine switch off 2.
Electrical key transmitter sub-assembly brought outside vehicle 3.
All doors closed 4.
Electrical key transmitter sub-assembly not inside vehicle 5.
Electrical key transmitter sub-assembly brought inside detection area*1 6.
All doors locked through wireless operation |
Pulse generation (See waveform 1) | Over Head + Driver Side (key diagnostic mode) |
| Procedure:
1.
Engine switch off 2.
Electrical key transmitter sub-assembly brought outside vehicle 3.
All doors closed 4.
Electrical key transmitter sub-assembly not inside vehicle 5.
Electrical key transmitter sub-assembly brought outside detection area*2 6.
All doors locked through wireless operation |
Pulse generation (See waveform 2) | Over Head + Driver Side (key diagnostic mode) | ||||
| E110-13 (CG1B) - E108-11 (E) | Output | W - W-B | Output to driver door electrical key antenna (terminal on opposite side of component from CLG1 output terminal) | Procedure:
1.
Engine switch off 2.
Electrical key transmitter sub-assembly brought outside vehicle 3.
All doors closed 4.
Electrical key transmitter sub-assembly not inside vehicle 5.
Electrical key transmitter sub-assembly brought outside detection area*2 6.
All doors locked through wireless operation |
Pulse generation (See waveform 2) | Over Head + Driver Side (key diagnostic mode) |
| E110-3 (CLG5) - E108-11 (E) | Output | P - W-B | Output to No. 1 indoor electrical key antenna assembly (front floor) | Procedure:
1.
Engine switch off 2.
Electrical key transmitter sub-assembly not inside vehicle 3.
Door opened 4.
Door closed 5.
Within 30 seconds |
Pulse generation (See waveform 3) | Over Head + Front Room (key diagnostic mode) |
| E110-2 (CG5B) - E108-11 (E) | Output | G - W-B | Output to No. 1 indoor electrical key antenna assembly (front floor) (terminal on opposite side of component from CLG5 output terminal) | Procedure:
1.
Engine switch off 2.
Electrical key transmitter sub-assembly not inside vehicle 3.
Door opened 4.
Door closed 5.
Within 30 seconds |
Pulse generation (See waveform 3) | Over Head + Front Room (key diagnostic mode) |
| E110-20 (TSW1) - E108-11 (E) | Input | V - W-B | Driver door lock sensor signal input
(Sends signal from door lock sensor on front door outside handle assembly (for driver door) to certification ECU (smart key ECU assembly). Certification ECU (smart key ECU assembly) sends 12 V pulse waveform every 20 ms. from terminal TSW. When door lock sensor is touched, the pulse is grounded. |
Procedure:
1.
Engine switch off 2.
Electrical key transmitter sub-assembly brought outside vehicle 3.
All doors closed 4.
Driver door lock sensor not touched → touched |
Pulse generation (See waveform 5) | D-Door Trigger Switch |
| E110-22 (SEN1) - E108-11 (E) | Input | L - W-B | Driver door unlock sensor signal input
(when system is in unlock standby mode and touch sensor is touched, door electrical key antenna sends touch sensor input signal (sensing) to certification ECU (smart key ECU assembly)) |
Procedure:
1.
Engine switch off 2.
Electrical key transmitter sub-assembly brought outside vehicle 3.
All doors locked 4.
Electrical key transmitter sub-assembly not sufficiently close to vehicle 5.
Driver door unlock sensor not touched → touched |
Pulse generation (See waveform 5) | D-Door Touch Sensor |
| E109-27 (TSW5) - E108-11 (E) | Input | V - W-B | Luggage electrical key switch signal input | Luggage electrical key switch off → on | Pulse generation (See waveform 5) | Tr/B-Door Unlock SW |
| E109-11 (CLG6) - E108-11 (E) | Output | W - W-B | Output to No. 2 indoor electrical key antenna assembly (rear floor) | Procedure:
1.
Engine switch off 2.
Electrical key transmitter sub-assembly not inside vehicle 3.
Door opened 4.
Door closed 5.
Within 30 seconds |
Pulse generation (See waveform 3) | Over Head + Rear Room (key diagnostic mode) |
| E109-10 (CG6B) - E108-11 (E) | Output | LG - W-B | Output to No. 2 indoor electrical key antenna assembly (rear floor) (terminal on opposite side of component from CLG6 output terminal) | Procedure:
1.
Engine switch off 2.
Electrical key transmitter sub-assembly not inside vehicle 3.
Door opened 4.
Door closed 5.
Within 30 seconds |
Pulse generation (See waveform 3) | Over Head + Rear Room (key diagnostic mode) |
| E109-9 (CLG7) - E108-11 (E) | Output | R - W-B | Output to No. 3 indoor electrical key antenna assembly (inside luggage compartment) | Procedure:
1.
Door is closed 2.
Engine switch off 3.
Electrical key transmitter sub-assembly not inside vehicle 4.
Driver door lock sensor not touched → touched |
Pulse generation (See waveform 8) | Over Head + Luggage (inside) (key diagnostic mode) |
| E109-8 (CG7B) - E108-11 (E) | Output | G - W-B | Output to No. 3 indoor electrical key antenna assembly (inside luggage compartment) (terminal on opposite side of component from CLG7 output terminal) | Procedure:
1.
Door is closed 2.
Engine switch off 3.
Electrical key transmitter sub-assembly not inside vehicle 4.
Driver door lock sensor not touched → touched |
Pulse generation (See waveform 8) | Over Head + Luggage (inside) (key diagnostic mode) |
| E110-19 (POS1) - E108-11 (E) | Output | Y - W-B | Driver door unlock sensor power source (12 V (drops when engine switch turned on (IG))) | Engine switch off → on (IG) | 9 to 14 V → Below 2 V | - |
| E109-5 (RCO) - E108-11 (E) | Output | V - W-B | Output to door control with receiver ECU assembly
(Power supply for door control with receiver ECU assembly. Certification ECU (smart key ECU assembly) outputs 5 V when receiver starts operating.) |
Procedure:
1.
Engine switch off 2.
Electrical key transmitter sub-assembly brought outside vehicle 3.
Electrical key transmitter sub-assembly brought outside detection area*2 but kept inside wireless function operational area*3 4.
Lock or unlock switch of electrical key transmitter sub-assembly not pressed → pressed |
Pulse generation (See waveform 6) | - |
| E109-17 (RDAM) - E108-11 (E) | Input | Y - W-B | Door control with receiver ECU assembly verifies data received from electrical key transmitter sub-assembly. Door control with receiver ECU assembly sends data to ECU and intermittently grounds 12 V signal from certification ECU (smart key ECU assembly). | Proceed:
1.
Engine switch off 2.
All doors locked 3.
Electrical key transmitter sub-assembly brought outside detection area*2 but kept inside wireless function operational area*3 4.
Lock or unlock switch of electrical key transmitter sub-assembly not pressed → pressed |
Pulse generation (See waveform 7) | - |
| E109-6 (CSEL) - E108-11 (E) | Output | L - W-B | Communication channel switching circuit | Procedure:
1.
Engine switch off 2.
All doors closed |
Below 1 V → pulse generation | Key diagnostic mode |
| E109-2 (CLG8) - E108-11 (E) | Output | LG - W-B | Output to electrical key antenna (outside luggage compartment) | Procedure:
1.
Engine switch off 2.
Electrical key transmitter sub-assembly brought outside vehicle 3.
All doors closed 4.
Luggage electrical key switch off → on |
Pulse generation (See waveform 4) | Overhead + Luggage
or Luggage + Luggage (key diagnostic mode) |
| E109-1 (CG8B) - E108-11 (E) | Output | P - W-B | Output to electrical key antenna (outside luggage compartment) (terminal on opposite side of component from CLG8 output terminal) | Procedure:
1.
Engine switch off 2.
Electrical key transmitter sub-assembly brought outside vehicle 3.
All doors closed 4.
Luggage electrical key switch off → on |
Pulse generation (See waveform 4) | Overhead + Luggage
or Luggage + Luggage (key diagnostic mode) |
*1: For details about the areas that are inside the entry function detection area, refer to Operation Check.
*2: For details about the areas that are outside the entry function detection area, refer to Operation Check.
*3: For details about the areas that are inside the wireless function operational area, refer to Operation Check.
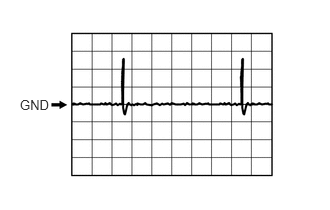
Using an oscilloscope, check waveform 1.
- HINT:
-
The oscilloscope waveform shown in the illustration is an example for reference only. Noise, chattering, etc. are not shown.
| Item | Content |
|---|---|
| Tester Connection | E110-12 (CLG1) - E108-11 (E) |
| Tool Setting | 2 V/DIV., 500 ms/DIV. |
| Condition | Procedure:
1.
Engine switch off 2.
Electrical key transmitter sub-assembly brought outside vehicle 3.
All doors closed 4.
Electrical key transmitter sub-assembly not inside vehicle 5.
Electrical key transmitter sub-assembly brought inside detection area* 6.
All doors locked through wireless operation |
*: For details about the areas that are inside the entry function detection area, refer to Operation Check.
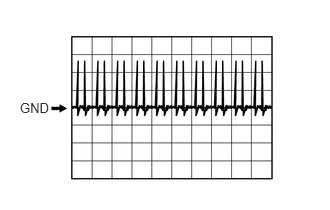
Using an oscilloscope, check waveform 2.
- HINT:
-
The oscilloscope waveform shown in the illustration is an example for reference only. Noise, chattering, etc. are not shown.
| Item | Content |
|---|---|
| Tester Connection | E110-12 (CLG1) - E108-11 (E) |
| Tool Setting | 2 V/DIV., 500 ms/DIV. |
| Condition | Procedure:
1.
Engine switch off 2.
Electrical key transmitter sub-assembly brought outside vehicle 3.
All doors closed 4.
Electrical key transmitter sub-assembly not inside vehicle 5.
Electrical key transmitter sub-assembly brought outside detection area* 6.
All doors locked through wireless operation |
*: For details about the areas that are outside the entry function detection area, refer to Operation Check.
| Item | Content |
|---|---|
| Tester Connection | E110-13 (CG1B) - E108-11 (E) |
| Tool Setting | 2 V/DIV., 500 ms/DIV. |
| Condition | Procedure:
1.
Engine switch off 2.
Electrical key transmitter sub-assembly brought outside vehicle 3.
All doors closed 4.
Electrical key transmitter sub-assembly not inside vehicle 5.
Electrical key transmitter sub-assembly brought outside detection area* 6.
All doors locked through wireless operation |
*: For details about the areas that are outside the entry function detection area, refer to Operation Check.
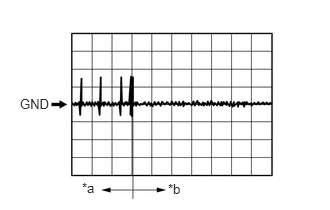
| *a | Door open |
| *b | Approximately 30 seconds after door closed |
Using an oscilloscope, check waveform 3.
- HINT:
-
The oscilloscope waveform shown in the illustration is an example for reference only. Noise, chattering, etc. are not shown.
| Item | Content |
|---|---|
| Tester Connection | E110-3 (CLG5) - E108-11 (E)
E110-2 (CG5B) - E108-11 (E) E109-11 (CLG6) - E108-11 (E) E109-10 (CG6B) - E108-11 (E) |
| Tool Setting | 2 V/DIV., 500 ms/DIV. |
| Condition | Procedure:
1.
Engine switch off 2.
Electrical key transmitter sub-assembly not inside vehicle 3.
Door opened 4.
Door closed 5.
Within 30 seconds |
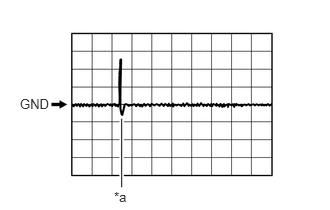
| *a | Engine switch off, all doors closed and luggage electrical key switch off → on |
Using an oscilloscope, check waveform 4.
- HINT:
-
The oscilloscope waveform shown in the illustration is an example for reference only. Noise, chattering, etc. are not shown.
| Item | Content |
|---|---|
| Tester Connection | E109-2 (CLG8) - E108-11 (E)
E109-1 (CG8B) - E108-11 (E) |
| Tool Setting | 2 V/DIV., 500 ms/DIV. |
| Condition | Procedure:
1.
Engine switch off 2.
Electrical key transmitter sub-assembly brought outside vehicle 3.
All doors closed 4.
Luggage electrical key switch off → on |
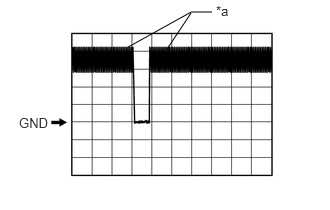
| *a | In actuality, sampling is being performed |
Using an oscilloscope, check waveform 5.
- HINT:
-
The oscilloscope waveform shown in the illustration is an example for reference only. Noise, chattering, etc. are not shown.
| Item | Content |
|---|---|
| Tester Connection | E110-20 (TSW1) - E108-11 (E) |
| Tool Setting | 2 V/DIV., 500 ms/DIV. |
| Condition | Procedure:
1.
Engine switch off 2.
Electrical key transmitter sub-assembly brought outside vehicle 3.
All doors closed 4.
Driver door lock sensor not touched → touched |
| Item | Content |
|---|---|
| Tester Connection | E110-22 (SEN1) - E108-11 (E) |
| Tool Setting | 2 V/DIV., 500 ms/DIV. |
| Condition | Procedure:
1.
Engine switch off 2.
Electrical key transmitter sub-assembly brought outside vehicle 3.
All doors locked 4.
Electrical key transmitter sub-assembly not sufficiently close to vehicle 5.
Driver door unlock sensor not touched → touched |
| Item | Content |
|---|---|
| Tester Connection | E109-27 (TSW5) - E108-11 (E) |
| Tool Setting | 2 V/DIV., 500 ms/DIV. |
| Condition | Luggage electrical key switch off → on |
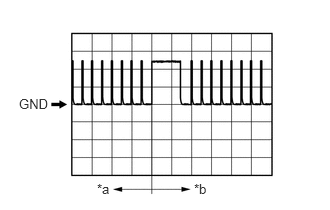
| *a | Before lock or unlock switch of electrical key transmitter sub-assembly pressed |
| *b | After lock or unlock switch of electrical key transmitter sub-assembly pressed |
Using an oscilloscope, check waveform 6.
- HINT:
-
The oscilloscope waveform shown in the illustration is an example for reference only. Noise, chattering, etc. are not shown.
| Item | Content |
|---|---|
| Tester Connection | E109-5 (RCO) - E108-11 (E) |
| Tool Setting | 2 V/DIV., 500 ms/DIV. |
| Condition | Procedure:
1.
Engine switch off 2.
Electrical key transmitter sub-assembly brought outside vehicle 3.
Electrical key transmitter sub-assembly brought outside detection area*1 but kept inside wireless function operational area*2 4.
Lock or unlock switch of electrical key transmitter sub-assembly not pressed → pressed |
*1: For details about the areas that are outside the entry function detection area, refer to Operation Check.
*2: For details about the areas that are inside the wireless function operational area, refer to Operation Check.
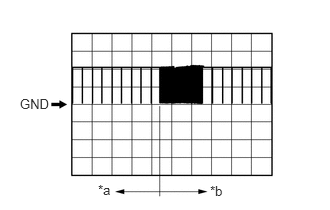
| *a | Before lock or unlock switch of electrical key transmitter sub-assembly pressed |
| *b | After lock or unlock switch of electrical key transmitter sub-assembly pressed |
Using an oscilloscope, check waveform 7.
- HINT:
-
The oscilloscope waveform shown in the illustration is an example for reference only. Noise, chattering, etc. are not shown.
| Item | Content |
|---|---|
| Tester Connection | E109-17 (RDAM) - E108-11 (E) |
| Tool Setting | 5 V/DIV., 500 ms/DIV. |
| Condition | Procedure:
1.
Engine switch off 2.
All doors locked 3.
Electrical key transmitter sub-assembly brought outside detection area*1 but kept inside wireless function operational area*2 4.
Lock or unlock switch of electrical key transmitter sub-assembly not pressed → pressed |
*1: For details about the areas that are outside the entry function detection area, refer to Operation Check.
*2: For details about the areas that are inside the wireless function operational area, refer to Operation Check.
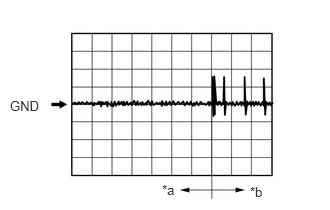
| *a | Before driver door lock sensor touched |
| *b | After driver door lock sensor touched |
Using an oscilloscope, check waveform 8.
- HINT:
-
The oscilloscope waveform shown in the illustration is an example for reference only. Noise, chattering, etc. are not shown.
| Item | Content |
|---|---|
| Tester Connection | E109-9 (CLG7) - E108-11 (E)
E109-8 (CG7B) - E108-11 (E) |
| Tool Setting | 2 V/DIV., 500 ms/DIV. |
| Condition | Proceed:
1.
Door is closed 2.
Engine switch off 3.
Electrical key transmitter sub-assembly not inside vehicle 4.
Driver door lock sensor not touched → touched |
CHECK INSTRUMENT PANEL JUNCTION BLOCK ASSEMBLY AND MAIN BODY ECU (MULTIPLEX NETWORK BODY ECU)
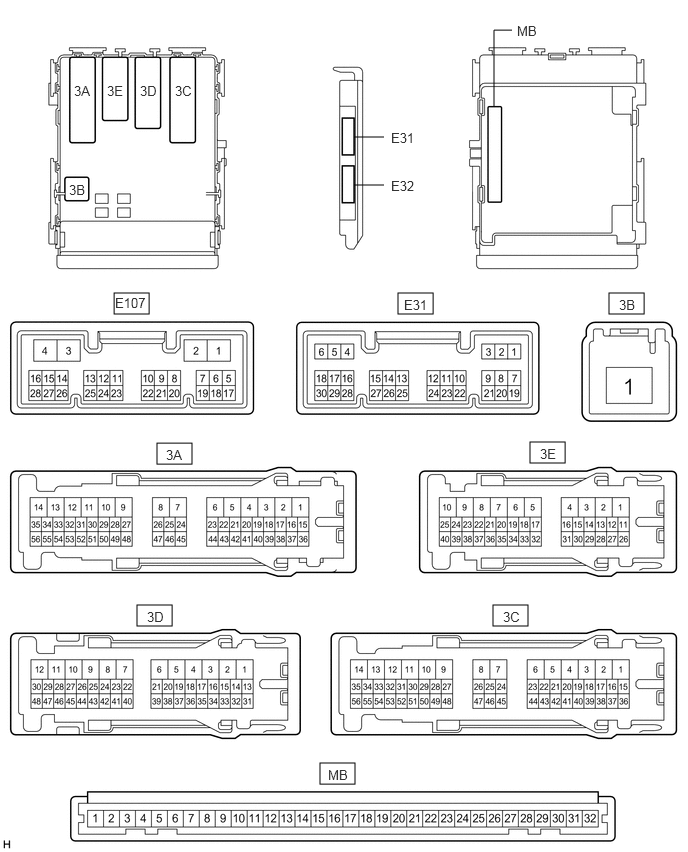
Remove the main body ECU (multiplex network body ECU) from the instrument panel junction block assembly.
Measure the voltage and resistance according to the value(s) in the table below.
- HINT:
-
Measure the values on the wire harness side with the connector disconnected.
| Tester Connection | Input/Output | Wiring Color | Terminal Description | Condition | Specified Condition | Related Data List Item |
|---|---|---|---|---|---|---|
| MB-11 (GND1) - Body ground | - | - | Ground | Always | Below 1 Ω | - |
| MB-30 (BECU) - Body ground | Input | - | Battery power supply (for CPU) | Always | 11 to 14 V | - |
| MB-29 (ACC) - Body ground | Input | - | ACC power supply | Engine switch on (ACC) | 11 to 14 V | ACC SW |
| MB-32 (IG) - Body ground | Input | - | IG power supply | Engine switch on (IG) | 11 to 14 V | IG SW |
If the result is not as specified, there may be a malfunction in the wire harness.
Install the main body ECU (multiplex network body ECU) to the instrument panel junction block assembly.
Measure the voltage and check for pulses according to the value(s) in the table below.
| Tester Connection | Input/Output | Wiring Color | Terminal Description | Condition | Specified Condition | Related Data List Item |
|---|---|---|---|---|---|---|
| E31-7 (LSFL) - Body ground | Input | Y - Body ground | Front door LH unlock detection switch input | Front door LH locked → unlocked | Pulse generation
(See waveform 1) |
FL Door Lock Pos |
| E31-18 (LSFR) - Body ground | Input | LG - Body ground | Front door RH unlock detection switch input | Front door RH locked → unlocked | Pulse generation
(See waveform 1) |
FR Door Lock Pos |
| 3E-23 (LSR) - Body ground | Input | Y - Body ground | Rear door LH unlock detection switch input | Engine switch off, all doors closed and rear door LH locked → unlocked | Pulse generation
(See waveform 1) |
RL-Door Lock Pos SW |
| 3E-38 (LSR) - Body ground | Input | Y - Body ground | Rear door RH unlock detection switch input | Engine switch off, all doors closed and rear door RH locked → unlocked | Pulse generation
(See waveform 1) |
RR-Door Lock Pos SW |
| 3E-37 (FLCY) - Body ground | Input | W - Body ground | Front door LH courtesy light switch input | Front door LH closed → open | Pulse generation
(See waveform 2) |
FL Door Courtesy SW |
| E31-19 (FRCY) - Body ground | Input | V - Body ground | Front door RH courtesy light switch input | Front door RH closed → open | Pulse generation
(See waveform 2) |
FR Door Courtesy SW |
| E31-24 (LCTY) - Body ground | Input | SB - Body ground | Rear door LH courtesy light switch input | Rear door LH closed → open | Pulse generation
(See waveform 2) |
RL Door Courtesy SW |
| E31-6 (RCTY) - Body ground | Input | LG - Body ground | Rear door RH courtesy light switch input | Rear door RH closed → open | Pulse generation
(See waveform 2) |
RR Door Courtesy SW |
| 3E-34 (LGCY) - Body ground | Input | LG - Body ground | Luggage door courtesy light switch input | Luggage compartment door closed → opened | Pulse generation
(See waveform 2) |
Luggage Courtesy SW |
If the result is not as specified, the main body ECU (multiplex network body ECU) or instrument panel junction block assembly may be malfunctioning.
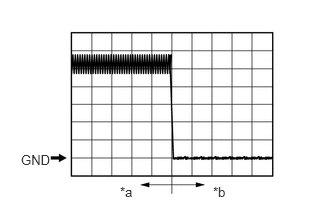
| *a | Door locked |
| *b | Door unlocked |
Using an oscilloscope, check waveform 1.
- NOTICE:
-
The oscilloscope waveform shown in the illustration is an example for reference only. Noise, chattering, etc. are not shown.
| Item | Content |
|---|---|
| Tester Connection | E31-7 (LSFL) - Body ground
E31-18 (LSFR) - Body ground 3E-23 (LSR) - Body ground 3E-38 (LSR) - Body ground |
| Tool Setting | 2 V/DIV., 200 ms/DIV. |
| Condition | Door locked → unlocked |
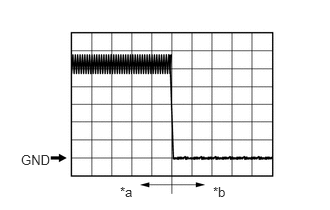
| *a | Door closed |
| *b | Door open |
Using an oscilloscope, check waveform 2.
- NOTICE:
-
The oscilloscope waveform shown in the illustration is an example for reference only. Noise, chattering, etc. are not shown.
| Item | Content |
|---|---|
| Tester Connection | 3E-37 (FLCY) - Body ground
E31-19 (FRCY) - Body ground E31-24 (LCTY) - Body ground E31-6 (RCTY) - Body ground 3E-34 (LGCY) - Body ground |
| Tool Setting | 2 V/DIV., 200 ms/DIV. |
| Condition | Door closed → opened |