BRAKE CONTROL / DYNAMIC CONTROL SYSTEMS FRONT SPEED SENSOR INSTALLATION
CAUTION / NOTICE / HINT
- HINT:
- ·
Use the same procedure for the LH side and RH side.
·The following procedure is for the LH side.
·If the front speed sensor rotor needs to be replaced, replace the front drive shaft assembly.
PROCEDURE

 89543
1.INSTALL FRONT SPEED SENSOR
89543
1.INSTALL FRONT SPEED SENSOR
Install the front speed sensor to the steering knuckle with the bolt.
- Torque:
- 8.5 N*m (87 kgf*cm, 75 in.*lbf)
- NOTICE:
- ·
Prevent foreign matter from attaching to the front speed sensor tip.
·Firmly insert the front speed sensor body into the steering knuckle before tightening the bolt.
·After installing the front speed sensor to the steering knuckle, make sure that there is no clearance between the front speed sensor stay and steering knuckle. Also make sure that no foreign matter is stuck between the parts.
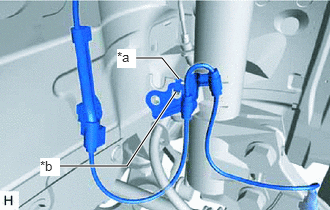
| *a | Hook |
| *b | Claw |
Engage the hook and claw to install the front speed sensor clamp to the flexible hose bracket.
- NOTICE:
-
Do not twist the front speed sensor wire harness when installing it.
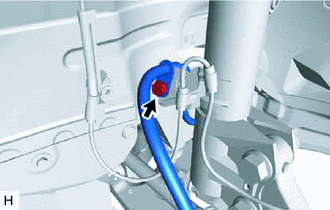
Install the front flexible hose to the flexible hose bracket with the bolt.
- Torque:
- 29 N*m (296 kgf*cm, 21 ft.*lbf)
- NOTICE:
-
The bolt tightens the front flexible hose and front speed sensor together. Make sure that the front flexible hose is positioned over the front speed sensor.
Install the front speed sensor clamp with the bolt.
- Torque:
- 8.0 N*m (82 kgf*cm, 71 in.*lbf)
Engage the clamp and connect the connector.
53876A
2.INSTALL FRONT FENDER LINER
Install the front fender liner with the clip.
3.INSTALL FRONT WHEEL
4.CONNECT CABLE TO NEGATIVE BATTERY TERMINAL
- NOTICE:
-
When disconnecting the cable, some systems need to be initialized after the cable is reconnected.
-
Click hereGeneral>INTRODUCTION>REPAIR INSTRUCTION>INITIALIZATION
5.CHECK FOR SPEED SENSOR SIGNAL