HORN HORN INSPECTION
PROCEDURE

 86510
1.INSPECT HIGH PITCHED HORN ASSEMBLY
86510
1.INSPECT HIGH PITCHED HORN ASSEMBLY
a.
1.688,1.302 1.958,1.302
false
2.198,0.406 2.469,0.396
false
0.167,0.125 0.469,0.417
0.302,0.292
10
false
*a
1.542,1.219 1.708,1.385
0.167,0.167
10
false
1
2.49,0.292 2.656,0.458
0.167,0.167
10
false
*b
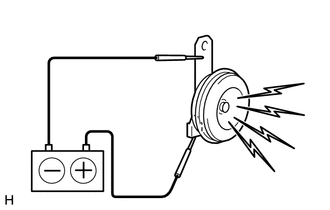
| *a | Component without harness connected
(High Pitched Horn Assembly) |
| *b | Body ground |
Apply battery voltage and check the operation of the high pitched horn assembly according to the table below.
- OK:
Measurement Condition Specified Condition Battery positive (+) → Terminal 1
Battery negative (-) → Body groundHigh pitched horn sounds
If the result is not as specified, replace the high pitched horn assembly.
86520
2.INSPECT LOW PITCHED HORN ASSEMBLY
a.
1.688,1.302 1.958,1.302
false
2.198,0.406 2.469,0.396
false
0.167,0.125 0.469,0.417
0.302,0.292
10
false
*a
1.542,1.219 1.708,1.385
0.167,0.167
10
false
1
2.49,0.292 2.656,0.458
0.167,0.167
10
false
*b
| *a | Component without harness connected
(Low Pitched Horn Assembly) |
| *b | Body ground |
Apply battery voltage and check the operation of the low pitched horn assembly according to the table below.
- OK:
Measurement Condition Specified Condition Battery positive (+) → Terminal 1
Battery negative (-) → Body groundLow pitched horn sounds
If the result is not as specified, replace the low pitched horn assembly.